Eating Chocolate Beetroot Brownies doesn't need to be laden with guilt. Brownies are one of the chocolate lover's favourite styles of cake, and with this beetroot and dark chocolate recipe, if you are watching the calories during the week after an indulgent getaway, you can have your Brownie and eat it too.
PASSIONATE ABOUT DELICIOUS HOME COOKING AND SIMPLE LIVING IN THE QUEENSLAND TROPICS
Saturday, March 2, 2024
Monday, September 13, 2021
Chocolate Beetroot Cake - In My Kitchen, September 2021
"Food connects people, and the Kitchen is where the magic can happen."
There are days when nothing but a rich, moist chocolate cake will do. I'd been wanting to make a Chocolate Beetroot cake for a while, ever since I went out to coffee with some friends at the Soul Food Market in Mackay, North Queensland, where we had a slice of Chocolate Beetroot cake, which was gluten free, lactose free, sugar free, and perhaps egg free, but not delicious free, because as you have probably already guessed, it is a health food shop and a bulk foods shop, which also specialises in vegetarian foods for dine in or take away. It's an amazing little business tucked away in an unpretentious arcade.
There is always a delicious aroma floating out of the front door, with soups and ratatouilles etc cooking on the stove. One of my friends has allergies to everything it seems, so we chose to eat at the Soul Food Market so that she could enjoy something delicious to eat without any after effects. My Chocolate cake recipe isn't vegetarian or vegan or sugar free but it does contain beetroot, and dark chocolate, both healthy additions, which also makes it exceptionally moist. These comments about the Soul Food Market are purely my own and we all paid for our own morning tea. So here's the recipe my friends, it is adapted from a Taste.com recipe.
Chocolate Beetroot Cake with Chocolate Ganache
1/2 cup (125 ml vegetable oil or light olive oil)
1/2 cup (125 ml) maple syrup
60 g dark chocolate (70 %) chopped
250 g (around 2 cups) raw beetroot, coarsely grated
3 eggs, lightly beaten, room temperature
1 1/2 cups (225 g) self raising flour or 1 1/2 cups plain flour sifted with 3 teaspoons of baking powder
1/4 cup cocoa powder
Ganache
3/4 cup (185 ml) thin cream
150 g dark chocolate, finely chopped
1 tbsp. maple syrup
Method:
Preheat the oven to 160 deg. C.
Grease a 20 cm round cakepan and line with baking paper.
On a low heat, warm the oil in a medium size saucepan, which is large enough to hold all of the ingredients when needed.
Add the brown sugar, maple syrup and chocolate and stir until the chocolate is melted. Remove saucepan from the heat.
Add the grated beetroot to the pan.
Whisk the eggs in a small bowl and then add them to the saucepan.
Sift the flour and cocoa powder together and stir into the cake and beetroot batter.
Pour the batter into the tin and bake for 50 minutes - 1 hour or until the mixture pulls away from the side of the tin and a skewer inserted comes out clean.
Leave the cake to cool for 5 minutes in the tin, before turning out and cooking completely.
Ganache Method:
Combine all of the ingredients in a small saucepan over a low heat.
Stir over a medium-low heat, for 5 minutes, or until the chocolate is melted and the mixture is smooth and glossy.
Leave to cool for 10 minutes, when the mixture should thicken slightly, and pour small amounts gradually over the cake. Cover the top of the cake first, and then smooth the ganache around the sides of the cake.
Perfecto.
This post is part of the In My Kitchen series hosted by the lovely Sherry from Sherry's Pickings, where we share lots of interesting stories from our kitchens over the last month. Today is the deadline to post so my apologies that this might be a bit of a rush job.
Cumquat Marmalade, 2nd Batch
We were given some more cumquats, a completely different variety of cumquat to last time. These were almost the size of half a small mandarin, and had the largest seeds, and lots of them.
Amazingly, it seemed that every quart in each cumquat contained a seed, we were still removing them from the pot even as the jam was nearly ready to be bottled. Mr. HRK and I both removed all the seeds, or so we thought, the day before so that they could be soaked to extract the pectin, which is the jam thickener. Well weren't we in for a surprise, when seeds kept popping up in the pot as the jam was cooking, until the end of the cooking time. I also had to remove half of the skin when I sliced them up to soak, as some of the skin had dark spots on it.
Anyway not to be deterred, I followed exactly the same formula to make this marmalade as I did a couple of weeks ago when I made my first batch, although I had a lot more cumquats this time, I just increased the ratio of quantities according to weight. This batch is still delicious, and thickened well, but isn't as clear as the first batch. I'm blaming it on the fruit which I think had been left on the tree too long, anyway it still tastes delicious. "I'm certainly not looking a gift horse in the mouth". Cumquats are a precious commodity. This is the link to my previous Cumquat Marmalade batch recipe in August if you missed it. Dear reader, if you are gifted a jar of Cumquat Marmalade by a friend or relative, please be very appreciative. The maker of this marmalade put her/his heart and soul into making this jam. Jam making is a labour of love and every batch can turn out differently given the differences in fruit quality. I am getting better at it and feel a lot more confident now with jam and marmalade making. This one such a delicious marmalade.
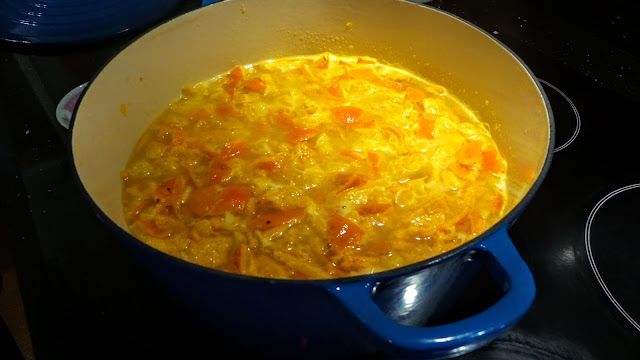
![]() |
Nasturtiums from our garden give the slice some colour for afternoon tea at home. I often make this Boiled fruit cake into two smaller cakes, but this time I used a large square cake tin and sent the whole cake North. Two packets of cherries, lots of mixed fruit and a swig of brandy give this cake a delicious flavour. Here's the recipe and it's story for you. |
It's Spring here, and we've been doing a lot of gardening, planting new seedlings, repotting and enjoying being outside in the beautiful weather. I pruned my Pineapple Sage plant a couple of weeks ago and it has responded beautifully by thickening up and flowering. The red flowers bring some nice colour and attract the bees and insects. I added some of the Pineapple Sage leaves to my
![]() |
Pineapple Sage coming into flower |
I've planted beans under the trellis, and two rows of radishes. They are coming along nicely in the warmer weather.
Monday, April 5, 2021
Homemade Chocolate Ganache Cake
Over the Easter break the only kind of cake that I want to make is a chocolate cake, and with lots of icing. It was our lovely friend's birthday yesterday, which was also Easter Sunday, so for her birthday I made this rich, moist cake with luscious frosting which we all enjoyed at home after lunch accompanied by Mr. HRK's special espresso coffee. This was my first attempt at making chocolate ganache. Normally I make traditional chocolate icing, but this was a birthday celebration and Easter Sunday as well, so I thought ganache would be quite special. It's also nice to decorate chocolate cake with raspberries don't you think, however it's not essential. I also placed some chocolate coated ginger around the edge of the cake because the birthday girl loves ginger.
When I saw this recipe in Silvia Colloca's recipe book, Love Laugh Bake!, I was captivated and had to try it. I'm on a mission to find the best chocolate cake to add to my baking repertoire, and my friends it's tough going. This one just might be it, and would be fine served just with whipped cream, traditional icing or the ganache frosting from this recipe. It's a cinch to make, and whilst not every chocolate cake needs to have dark chocolate in it's list of ingredients, yes sometimes just good quality cocoa powder will do, I think that for an elegant touch, and one that warrants becoming an impressive birthday centrepiece, this rich, moist chocolate cake is a winner.
Let's Bake:
Serves 8-10
Ingredients:
180 g dark chocolate chips
200 g unsalted butter, plus extra for greasing the tin
250 g brown sugar
4 eggs
350 g (2 1/2 cups) self-raising flour, sifted (or plain flour + 5 teaspoons very fresh baking powder)
3 tablespoons Cocoa powder, sifted
200 ml buttermilk
125 g (1 cup) raspberries
Ganache Frosting
300 ml thickened cream
300 g milk chocolate chips
100 g dark chocolate chips
Method:
Preheat your oven to 160 deg. C. and grease and line a 22-23 cm round cake
Melting the chocolate and butter:
Select a medium sized pyrex bowl that fits over a saucepan ensuring there is no space between the bowl and the rim of the saucepan. Place the chocolate and butter in the pyrex bowl, set approx. 3 cm of water in the saucepan to simmer, and then place the bowl over the simmering water. The bowl mustn't come in contact with the water, and steam mustn't enter the bowl or the chocolate may separate. (Sorry to sound bossy about this but it has happened to me.) Set aside to cool.
Mix the eggs and sugar until pale and fluffy using your electric mixer.
Remove the bowl from the mixer.
Sift the flour and cocoa together and add to the beaten egg mixture. Then add the buttermilk, and the cooled melted chocolate and fold this mixture to combine.
Pour the mixture into the lined baking tin and bake for 35-40 minutes. Just to be sure, test with a skewer inserted into the middle of the cake and if it comes out clean, the cake is cooked.
Cool the cake in the tin for 10 minutes, and then ease onto a wire cooling rake to cool completely. Cut the cake in half horizontally using a serrated knife, so that it can be filled in the centre with ganache a bit later, but this isn't essential.
Making the Ganache:
Pour the cream into a small saucepan and bring to simmering point on a low heat, small bubbles will start appearing and light steam will rise from the cream. Remove from the heat, then add the chocolate to the saucepan and wait for it to melt into the warm cream.
Whisk the mixture lightly until smooth. Transfer the mixture to a mixing bowl, cover very tightly with cling wrap and place in the refrigerator for 60 minutes to set to a spreadable consistency. If you leave the melted chocolate in the saucepan it will take longer to set. I left the ganache in the frig for a whole morning, and it was perfect to spread on the cake in the early afternoon. Mine took longer to set than 60 minutes. We are still experiencing humidity here so the ganache started to soften quickly after being removed from the frig. and was great to work with.
If you have cut your cake into two halves, place the bottom layer on a cake stand cut side up. Spread one-third of the frosting onto it, and scatter with half of the raspberries. Place the top layer of the cake over the raspberries, and spread the frosting over the top and around the sides. Scatter the remaining raspberries over the top of the cake.
We don't buy each other Easter eggs or chocolates anymore at Easter time, especially when we have chocolate cake to look forward to. However we managed to have some chocolate eggs delivered to our grandchildren in the Falkland Islands as part of a special grocery hamper for our sons 40th birthday just before Easter. They all loved it. More about that story later.
Mr. HRK and I hope you have enjoyed a peaceful and relaxing Easter with family or friends or both, wherever you are.
Warm wishes,
Pauline
Saturday, August 31, 2019
Chocolate Eggplant Brownies, a Father's Day surprise package
Eggplant in Brownies, what next? When I saw this Brownie recipe including eggplant, and I had a large glossy black eggplant languishing in my fruit bowl which needed to be used, my interest was piqued. This is the result. I seem to be including fruit and vegetables into the cakes, and desserts I make more and more these days, reducing calories, adding fibre, trying to stay healthy, which also means I can still feel as if I'm indulging on a regular basis without feeling guilty. Do you know what I mean? There is a plethora of Brownies recipes in circulation now, some including cooked beetroot, pears, or whatever your little heart desires really. I wanted to make Mr. HRK something nice for a Father's Day treat, as our children aren't in town, and Father's Day is a good excuse to make something special.
Monday, November 13, 2017
Nigella's Chocolate Cake with Coffee Buttercream
On Friday, I made a Chocolate cake with Coffee Buttercream and I really enjoyed making this cake. I haven't cooked a double layer cake with a buttercream icing for quite a while, and it's how cakes always used to be made, generally with icing. This was simply a matter of adding the wet ingredients to the dry ingredients, with no electric mixer involved, just a wooden spoon and a bowl. A cinch to make. We had our tennis friends over for Dinner, after tennis, and as it was Lou's birthday, I wanted to make her a proper cake with icing, that could be nicely lit up by candles. The cake I chose is from Nigella Lawson's latest recipe book, "At My Table", and thanks Nigella because it is delicious and a delight to eat.
It's so nice to celebrate with cake, don't you think. As we get older, the saying of "a second on the lips, a lifetime on the hips" becomes particularly relevant, unfortunately, so Mr. HRK and I try to limit ourselves to desserts and cakes for mainly celebratory events now. We are getting better at it. Twenty years ago that wasn't an issue for me. However it is amazing how often celebrations come around and of course as a starter I have cake every Tuesday at Mahjong, which is a longstanding tradition, and so life goes on. It's all about enjoying a celebration now and then, and balancing our diet and lifestyle around the celebrations.
Anyway let's cook:
Ingredients for the cake:
225g Plain Flour
275g Caster Sugar
75g sieved good quality Cocoa
2 teaspoons Instant Espresso Coffee Powder
2 teaspoons Baking Powder
1 teaspoon Bicarbonate of Soda
175ml Full Cream Milk, at room temperature
175 ml Vegetable Oil, plus more for greasing the baking tins if you wish (I used butter for greasing mine)
2 large Eggs, at room temperature
250ml of Water, from a freshly boiled kettle
Ingredients for the Icing
350g icing sugar
175g soft Unsalted Butter
Instant Espresso Coffee Powder, 2 1/2 teaspoons, dissolved in 1 x 15ml tablespoons just-boiled water
(All of my tablespoon measurements are 20ml and that is what I probably used in this recipe with no problems)
This icing is a cinch to make in a food processor. Because it is warmer and more humid where I live than where this recipe was probable tested, I thought I might have problems with the icing melting all over the cake but it held it's consistency beautifully, although it is slightly cooler here at the moment.
- Preheat the oven to 180 deg. C./160 deg. C. Fan forced
- Grease the sides and line the bases of two 20 cm cake tins. It is important not to use cake tins with loose bottoms as this mixture is very runny (a very liquid batter).
- Combine the flour, sugar, cocoa, 2 teaspoons of powdered instant espresso powder, baking powder and bicarb soda in a large bowl. Mix with a fork until thoroughly combined.
- Whisk the eggs, milk and oil together in a smaller bowl. Pour the wet ingredients into the dry and with a whisk or wooden spoon beat to mix until you have a smooth, but thick mixture like a fudge.
- Gently beat in the just boiled water, scraping the sides and bottom of the bowl as you do.
- A smooth dark, glossy and fairly runny batter will develop and when everything is well mixed, pour equally into the two tins. (If you have a large batter pouring jug that you can mix the ingredients in use that for easier pouring, however I just used a large bowl.)
- Place the cake tins into your oven for 25-35 minutes, but Nigella suggests that you start checking at 20. Mine took 35 minutes to cook, by which time, the cakes were coming away from the sides of the tin, and a few cracks were forming on the surface. Don't worry about that, it will all be covered up by delicious butter cream icing. When the cake tester came out clean I knew they were cooked.


Let's make the icing now:
Pulse the icing sugar in your food processor a few times to remove any lumps but make sure the feeding funnel on the lid is covered so that icing dust doesn't fly everywhere:)
Place one of the cakes on a serving plate or stand, flat-side up. It is probably better to place the highest cake as the base. Spread the lower layer generously with half the coffee butter cream, then make a sandwich with the second layer, with the top of the cake facing upwards.
Pile the rest of the butter cream on top, and use a wide icing knife or spatula to spread the icing, over the cake. Nigella uses the word swirlingly to describe this technique which I love.
Decorate as you wish. I used smashed pistachio nuts, or you could use chocolate covered coffee beans as she did. It is your choice.
If you eat some cake this week, I hope you really enjoy it. Have a great week. We are enjoying some rain which is wonderful, and means it is also cool.
Best wishes
Pauline
Thursday, June 22, 2017
The Power of Raw Chocolate and My Recipe for How to Make Chocolate at Home
Chocolate making at home is really the story of Raw Cacao, not cocoa, although Cacao does originate from the wonderful fruit called the Cocoa Pod. My homemade chocolate is a very different product to the chocolate we are used to buying from the supermarket with many more health benefits and is a dark chocolate. Cacao is one of the richest sources of Magnesium available which is great for our heart and energy levels and it is full of other valuable antioxidants as well. As we don't temper the chocolate we make at home or add emulsifiers to ensure longevity on supermarket shelves, the health benefits of the cacao aren't removed in the chocolate making process.
Mr. HRK and I have been experimenting with making chocolate during the past few weeks and now I feel confident in passing on this recipe with some of the tips we have learned along the way. We can now make a batch of chocolate in around 15 minutes, set it in the freezer for 40 minutes and voila it is ready to eat in an hour from start to finish. This recipe makes about 20-30 chocolates depending on your mold size.
So prepare to relax. Making chocolate should be an enjoyable activity and is the perfect time to remember to enjoy life. Chocolate should make you feel good, and not guilty about eating it. This recipe is Lactose free (no dairy is used) and sugar free ( the natural sweetener Agave is used.) We like to turn on our favourite music, and make some chocolate. Because it is a dark chocolate, we don't feel the need to eat more than two chocolates at once. One with a coffee is perfect for me.
Vanilla powder for flavouring is used in this recipe and we have found it difficult to source locally. So we have been substituting with scraping the seeds from two Vanilla Beans, and crushing them, which works well. We have ordered Vanilla powder online which should arrive shortly.
Equipment you will need:
A pyrex heatproof bowl and a pyrex jug (Don't use metal)
A smallish saucepan (slightly smaller in diameter than the bowl so that the bowl can sit in it without touching the bottom or the 2cm of water simmering in the bottom of the saucepan)
Silicon Chocolate molds (or 2 ice cube trays will work)
1 small whisk
1 spatula
Tea towel
A sieve or flour sifter
Knife, chopping board & measuring spoons/cups
Kitchen scales
Kitchen thermometer (optional as I don't use one)
An apron for me
Ingredients for basic Raw Chocolate Recipe:
80g Cacao Butter chopped into small pieces Available from Health Food shops (Or 65 grams Cacao Butter and 15 grams Cold Pressed Coconut Oil).
55g Cacao powder (sifted through a sieve) Available from Supermarkets and Health Food shops. Cacao powder from Ecuador is very good but not essential.
*3 Tbsp Dark Agave Syrup. Available from Health Food shops.
1/4 tsp Vanilla Powder (you might need to purchase this online)
*Use a 15ml Tbsp measure
(I am still experimenting with other variations to the basic recipe such as using various nuts, Cacao Nibs, Goji berries and desiccated coconut. Stay tuned for more on that later.)
Let's make chocolate:
Bring approximately 2cm of water to the boil in a small saucepan
Place the chopped cacao butter & vanilla powder in your pyrex bowl. If you are also using Coconut Oil add it as well now. Coconut Oil was used in this batch for the photo, but generally we just use Cacao butter.
Your chocolate should stay fresh in the fridge for up to 8 weeks, however it is there to be eaten and shouldn't last that long.
We have made a batch using Hazelnuts, by just popping one Hazelnut into each mold, and whilst the crunch was great, the flavour of the Hazelnut wasn't as obvious as we expected. We also substituted aniseed powder for vanilla powder in one batch however we couldn't really taste the aniseed so perhaps we need to use more next time. I am looking forward to using Macadamia Nuts in my next batch, so I will let you know how that goes.
If you try this recipe, and I hope you do, I would love to hear of any successful variations that you have. One of the things we have found with this process, is that it is important to make the basic chocolate recipe first, and then stir in desiccated coconut or chopped nuts just before pouring.
Enjoy!
Thanks for taking the time to read my post, and if you make some chocolate or have any other ideas I would love to hear from you.
Best wishes
Pauline
(Thank you to Willow for initially showing us how to make chocolate and for sharing his recipe.)
Sunday, November 13, 2016
Simplicity Chocolate Cake, a vintage recipe for a Sunday afternoon
Chocolate cake is always such a special treat, and everyone needs a simple and fast chocolate cake recipe in their repertoire, don't you think? It has been very hot here this weekend, and after a siesta following lunch I woke up craving some chocolate cake, but realising there was nothing sweet in the house to eat. Mr. HRK had also turned the coffee machine on so he was obviously thinking of a special afternoon tea as well.
I've been meaning to bake this recipe of my Mum's for a long time. It was a very easy and economical cake to make which she often baked when I lived at home, but is probably a bit small as a round cake by modern day standards, however today I baked it in a loaf tin which was perfect for Mr. HRK and me. It makes two nice sandwich cakes by just doubling the recipe. It took about 15 minutes to prepare and mix and then only 40 minutes to cook. Because we were in such a hurry to try it, I iced it when still warm which isn't what I usually do but it was delicious. I also added about 1 1/2 tablespoons of dark chocolate chips to the batter because I was feeling needy, and these worked a treat.
Ingredients:
1 cup S.R. flour
1 small cup sugar ( a teacup size)
1/2 cup milk
2 eggs
2 tablespoons cocoa powder
1 teaspoon vanilla essence
3 tablespoons melted butter
1 1/2 tablespoons dark chocolate chips (optional)

Method:
- Put all the ingredients, except the chocolate chips into your mixing bowl together and beat until well combined and glossy.
- Carefully mix the chocolate chips into the batter by hand (This step can be eliminated)
- Spoon the cake mixture into a well greased round cake tin or a loaf tin, depending on the occasion you are baking for.
- Cook for 40 minutes in a moderate oven, or until a skewer inserted comes out clean. Test it after 30 minutes though just in case.
![]() |
Just iced while still warm |
So to any dear friends who read this, do you have a simple family cake recipe that you resort to when you just need some cake to eat at home when you feel like indulging? Is Sunday the day that you often feel like indulging in a nice afternoon tea?
Best wishes
Pauline xx
An original recipe by Pauline +Happy Retirees Kitchen
Monday, February 15, 2016
Flourless Chocolate Patty Cakes for Valentine's Day
Indulge yourself with these gluten free and very low sugar Chocolate Patty Cakes (Cupcakes)
Monday, September 7, 2015
Julia's Chocolate Chip Tray Bake Slice
Chocolate Chip Tray Bake Slice
![]() |
Eungella Dam from the Lookout |
We had forgotten just how extensive the dam is. On our return journey home we saw magnificent King Orchids growing wild on the cliffs, and a rare Cane fire was glowing in the distance. The cane farmers generally harvest the sugar cane green these days, but it is always a thrill to see a cane fire burning at sunset. It makes me think of Graeme Connor's haunting song, "Cane Fires Burning."
Back to food. We enjoyed a casual lunch of French baguette, wraps and salad, sliced roast lamb, pesto and hummus. Then Julia brought out her delicious chocolate chip slice.What a winner! As delicious as any chocolate caramel slice I have ever tasted, but less complicated, and fewer calories of course. This slice can be assembled in under 30 minutes, cooked for another 30 minutes, and is ready to eat shortly after. I had to bake it this morning, and Neil has given it the seal of approval. Julie is one of the best cooks I know, and always seems to have a culinary surprise up her sleeve. Thanks for sharing the recipe of this little gem Julia.
1 cup biscuit crumbs (e.g. Nice biscuits)
1 cup desiccated coconut
1 cup dark chocolate chips
1 cup slivered or flaked almonds
1 tin condensed milk (low sugar if preferred)
Lightly grease a slice tin, approx. 18cm x 28cm.
Spread melted butter over base of tin, then spread Nice crumbs, coconut, choc chips, and almonds in even layers.
Then pour over the condensed milk evenly. Bake for 30 minutes on 175 deg. C. Check the slice after 15 minutes as this slice will burn if the oven is too hot. Adjust temperature accordingly.
Allow to cool in the tin, slice into squares, and then store in the refrigerator in a plastic container for up to a week, if it lasts that long.

I find that I enjoy a recipe so much more if it is linked to a special experience. Do you sometimes think of something or someone special when you cook a dish with an experience attached to it?
Friday, June 26, 2015
Chocolate Raspberry Pudding Cake
Nigella Lawson's Chocolate Raspberry Pudding Cake
There are lots of decadent chocolate cake recipes out there now, however this one with the addition of liqueur, dark chocolate and raspberries is in my mind winning the race at present. This is one of those cakes where it is preferable to make it on the day of eating, and if possible eating it only an hour or so after it comes out of the oven, especially if being served as a dessert.Thursday, May 22, 2014
Chocolate Brownies, Paleo Style And No Guilt
Click here for recipe:
Paleo Chocolate Brownie cake, was one of the highlights from the kitchen on the weekend when our beautiful daughter came home for a surprise visit. The slice is based on cacao, coconut flour, honey and white sweet potato. So a trip to the health food shop for the coconut flour and cacao, purchase of the sweet potato, and we were set.
We didn't make the dark chocolate topping this time, mainly because we forgot to buy it, however the chocolate Brownie with a cuppa doesn't really need it. If serving as a dessert though, I would certainly adorn the cake with the melted chocolate sauce and berries.
(This recipe is adapted from the Eat, Drink Paleo website.)
Wednesday, February 5, 2014
The Queen of Sheba's Chocolate and Almond Cake
Monday, December 2, 2013
Cherry Ripe Balls
I just found this recipe via a post on Facebook: https://www.facebook.com/bellybellykelly and I think it will be added to our Christmas repertoire this year.
Cherry Ripe Balls Recipe
Ingredients:
- 5-6 cherry ripe bars (6 if you want a stronger cherry ripe flavour, which I prefer)
- 1 packet of Nice biscuits (alternately use choc ripple or any other biscuit)
- 2 tablespoons of cocoa
- 1 can sweetened condensed milk (get the Aldi’s brand if you can, as Nestle is a highly unethical brand – and Aldi’s is cheaper to boot)
- Desiccated coconut for rolling
Cherry Ripe Balls Recipe – Method
- Simply place the cherry ripe bars, biscuits and cocoa in a food processor and blend. Be careful if you have a stick/hand blender – several members have blown theirs up doing this! If you don’t have a food processor, you can use zip lock bags and attack them with a rolling pin – freezer bags are not thick enough and will break open.
- Once you’ve got your mix ready, add the can of condensed milk, mix in well and roll into balls, covering with coconut. You might like to add some red food colouring to the coconut, or use red sprinkles instead of coconut or some other variation. Leave them to set in the fridge and you’re done!
Cherry Ripe Balls Recipe – Variations
We’ve had some great suggestions for variations to this recipe. You can substitute the cherry ripes for whatever you like – some members have tried mint slice, crunchie, peppermint crisp (these come out very gooey, I added around half a cup of coconut to try and ‘dry’ it out more!), boost bars, oreo, tim tam and more – even mixing a combination of them. You can also finish the balls by dipping them in chocolate to make them even naughtier!If you don’t have or use Nice biscuits, you can use something similar like Marie, arrowroot or choc ripple (especially good with a peppermint bar substitute).
Sunday, December 1, 2013
Rum Balls Eungella Style
250g butter
2 egg yolks
4 tablespoons cocoa (60ml)
4 tablespoons icing sugar or mixture (60ml)
4 tablespoons Bundaberg rum (60ml)
200 g sultanas
330 g cooking chocolate
30g coconut
Grate 300g chocolate, cream warmed butter and egg yolks, mix in cocoa, icing sugar, rum, sultanas & grated chocolate thoroughly. Grate remaining chocolate and mix with coconut. Form mixture into balls and roll them in the grated chocolate/coconut mixture. Refrigerate before serving.
Molten Chocolate Puddings
180g NESTLE PLAISTOWE 63% Cocoa Couverture, plus 100g extra melted chocolate to serve
140g unsalted butter
3 eggs, plus 3 egg yolks
85g caster sugar
2/3 cup (100g) plain flour, sifted
Preheat the oven to 180C and grease eight 175ml dariole moulds. Break 40g of the NESTLE PLAISTOWE 63% Cocoa Couverture into 5g squares and set aside.
Let's cook:
Place the remaining chocolate with the butter in a heatproof bowl over a saucepan of simmering water (don't let the bowl touch the water.) When melted, remove from the heat and stir until smooth. Cool slightly.
Place eggs, extra yolks and sugar in the bowl of an electric mixer and beat until pale and thick. Pour in melted chocolate, then add flour. Using a large metal spoon, stir until mixture is well combined.
Pour evenly into moulds. Push a square of reserved chocolate into the centre of each pudding, ensuring it is completely covered. Place moulds on a tray and bake in the oven for 9 minutes.
Remove moulds from the oven and stand for 1 minute before inverting onto serving plates. Serve immediately, drizzled with extra melted chocolate.
Makes 8.