Sunday, January 29, 2023

Pork Egg Foo Young (Chinese Omelette)

Healthy Egg Foo Young is a delicious Chinese omelette which was created by the economical Chinese kitchen cooks to use up meat and vegetable leftovers, as was Fried Rice. Most Chinese restaurants generally have omelettes on the menu, and they are also delicious as a takeaway, however you can easily make them at home, as a welcome change to the normal cheese and herb omelette. You might have even eaten omelette at a Chinese restaurant, but not realised what they are called. The ingredient possibilities are endless, depending on what you have in your refrigerator. I keep a stock of standard Chinese sauces on hand at all times as I cook a lot of stir fries and Asian food, so that makes cooking a meal like this one very easy to bring together with eggs and leftovers. I always enjoy eating an omelette, don't you? Where would we be without eggs in our kitchens?

I've deconstructed this omelette as I wanted to taste all of the amazing Chinese flavours and ingredients separately, as much as possible.  When I saw a photo of Pork Egg Foo Young presented in this way by the Australian Eggs website, I had to try it. The 4 omelettes are made separately in a non-stick pan, the pork mince is cooked up with the vegetables and sauces and kept warm, and the pouring sauce is made separately in a small saucepan. 

Egg Foo Young can be served as a thicker omelette with the meat and vegetables cooked within the egg mixture. I've given some ideas on that later in this post. I prefer the deconstructed version as everything can be cooked separately and kept warm in advance, and then assembled when you are ready to eat. 

Being able to prepare all of the ingredients in advance is one of the advantages of Chinese cooking and why I love it. There is often lots of vegetable chopping involved. I also love that so many fresh ingredients are used. I chopped the vegetables, whisked the eggs, measured out all of the sauces, and I was ready to start cooking. Mr. HRK cooked the pork mince for me and that was a great help as I had chopped all the vegetables and made the sauce by this stage. I could clean up around him and think about the photos I needed to take. I'd made my Wombok salad during the week and I still had 1/2 a wombok (Chinese Cabbage) needing to be used, some of it was perfect for this omelette. Womboks are always available at our supermarkets and generally quite economical to buy. A whole wombok can be made into a very large salad. 

Serves 4

INGREDIENTS:

Egg Foo Young Sauce:

2 tablespoons light soy sauce

1 tablespoon Chinese Cooking Wine or Mirin

2 tablespoons hoisin sauce

2 tsp oyster sauce

1 teaspoon sesame oil

1 cup (250 ml) water

1 chicken stock cube, crumbled

1 tablespoon cornflour

METHOD FOR SAUCE;

Combine soy, Mirin, hoisin sauce, oyster sauce, sesame oil, chicken stock cube, and water in a saucepan. Bring to a boil, and stir over a medium heat for 2 minutes.

Add the cornflour and cook for 3 minutes or until the sauce thickens to almost a thin syrup consistency.

The sauce can also be cooked in the microwave. 

MICROWAVE OPTION: 

Place all the ingredients in a small microwave proof jug. Microwave on high for 1 1/2 minutes until thickened. Stir really well, and then give it another whirl for 1 1/2 minutes until thickened. Mix again ensuring there are no lumps.

PORK FILLING FOR OMELETTE:

300 g pork mince

3 cloves garlic, crushed

1 1/2 tablespoons ginger paste, or grated fresh ginger

100 g white mushrooms, finely chopped

2 cups (160 g) finely shredded Chinese cabbage or Wombok

3 green onions, shredded, plus extra for garnish

2 cups (110 g) bean sprouts, plus extra for a garnish

2 teaspoons each Soy sauce and Oyster sauce

1 teaspoon salt

Optional: Add 1 teaspoon sugar

METHOD FOR OMELETTE FILLING:

Heat 1 tablespoon vegetable oil in a small non-stick frying pan. 

Add the ginger and garlic. Cook stirring for 30 seconds until fragrant.

Now add the Pork Mince and cook, stirring, breaking up any lumps, until browned.

Add the cabbage and the mushrooms, stirring for another 4-5 minutes just until they are softened.

Add the Soy Sauce, Oyster Sauce, sugar and salt to combine.

Finally add the green onions and bean sprouts, stir, and cook for another 2-3 minutes.

Taste the pork and if you would like a little more flavour add another 1/2 teaspoon each of soy sauce and oyster sauce until it is to your liking.

Set aside and remove from the pan to a heatproof bowl and cover.

I used the same pan to make the omelettes in. Wipe the pan clean.

OMELETTE:

Serves 4

8 eggs

1/4 cup vegetable oil

1 teaspoon salt

Sesame oil

OMELETTE:

Heat 2 teaspoons of vegetable oil and a light drizzle of sesame oil in the non-stick pan over a medium heat. Add 2 beaten eggs and cook for 2-3 minutes, tilting the pan to form a round omelette. I used a plastic spatula to lift the omelette around the edges.

Flip over carefully and cook for 1 further minute until the egg is set and lightly browned.

Lift out onto a plate.

Repeat and make another 3 omelettes.

To serve, spoon the cooked pork and vegetable mixture on top of the 4 omelettes covering 3/4 of the omelette surface. Turn the remaining 1/4 of the omelette over the filling.

Garnish with extra sprouts and green onions.

Drizzle over the sauce.

Scatter with sesame seeds if desired. I don't use sesame seeds with mine.

COOKS NOTES:

Replace the pork mince with peeled and deveined raw prawns, or chicken or turkey mince.

Everyone has different preferences with the amount of flavour they prefer with Chinese food. Because I have added the cooked pork separately onto the egg omelette, it's important to taste the pork after cooking and add a little more Soy sauce and Oyster sauce if you wish. I needed to, but I like lots of flavour.

Serve with a side of rice if you wish, and some steamed vegetables.

Substitute the green onion with finely chopped white, brown or red onions, or even cooked leeks.

A note about the sauces:

Don't use a dark soy sauce or kecap manis. A light soy sauce is preferable. Kikkoman is what I used.

I used Mirin instead of Chinese cooking wine as that's what I had on hand. It substitutes well.

Please note:

Here's a couple of  Omelette variations:

I have chosen to serve the cooked pork and vegetables separately over the egg omelette for the above recipe. However, if you prefer, as some takeaway Chinese restaurants do now, the pork and vegetables can also be mixed in with the eggs and cooked as four thicker omelettes. 

Cooking 4 separate omelettes using just 6 eggs mixed with a filling is achievable. If you prefer this idea, I would use a combined quantity of 2 1/2 cups of protein (pork mince, chopped prawns, or chicken mince) and chopped vegetables with the eggs. However, the vegetables should be finely chopped and cooked separately before adding to the egg mixture, particularly if you are using various vegetables such as capsicum, onions, eggplants, sliced mushrooms and garlic.  

Method for combined protein and vegetable omelettes:

  1. Whisk the eggs into a large bowl. Add the bean sprouts, finely chopped green onions, minced pork and other cooked vegetables.
  2. Heat about 1 teaspoon of vegetable oil and a splash of sesame oil to a non-stick skillet on a moderate heat. If using garlic, add 2 crushed cloves to the oil and saute quickly and move to the centre of your pan.
  3. Add your batter to the pan using a ladle. Ladle in just one quarter of it to start with. Form it into a round shape with a spatula.
  4. When the base of the omelette is a light golden, this should take about 2 minutes, flip it over and cook the other side for 1 minute. 
  5. Repeat this process with the remaining egg mixture to make 4 omelettes.
  6. It will be easier if you can use two pans at the same time.
  7. Slide the omelette onto the plate when cooked. Pour the sauce over the omelette and garnish as you wish, with green onions and some extra beansprouts. Add some sesame seeds but I don't eat them. Those little seeds can cause gut problems.

Vegetarian Chinese omelette?

A vegetarian omelette sounds good too doesn't it? Use all the sauces and vegetables from the previous ingredient list.


I had a lot of fun making these omelettes, and whilst they aren't very photogenic, they were delicious to eat and didn't take long at all. Fancy a Chinese Omelette for tonight's dinner? That sounds perfect to me.

Hope you all have an enjoyable week.

Pauline x


Wednesday, January 25, 2023

The Typical Foods that Australians Love to Eat

 I've been "flat out like a lizard drinking all day", but I wanted to write something about typical Aussie food today and a few slang expressions just might get thrown in as well. Aussies, except for vegetarians and vegans have always loved a good beef steak, and throwing a lamb chop on the barbecue, as well as the prawn. Sorry but I refuse to call it a shrimp, despite Paul Hogan's best intentions to "throw a shrimp on the barbie". However, now it seems that delicious seafood is very popular and is more affordable than red meat, depending on where we buy it. A high percentage of us are favouring seafood at Christmas time now, instead of chicken and pork, it's easy and it's fresh. To mark the day I'm not going to mention just yet, I bought enough fresh prawns today from the supermarket to make a prawn sandwich on very fresh bread and butter, I adore seafood, even more that Mr. HRK. I was raised by my Mother to love it, as she grew up by the beach in Central Queensland with access to lots of lovely seafood. Give me a plate of fresh oysters, Queensland Mud Crabs, and prawns, and I am in Heaven.

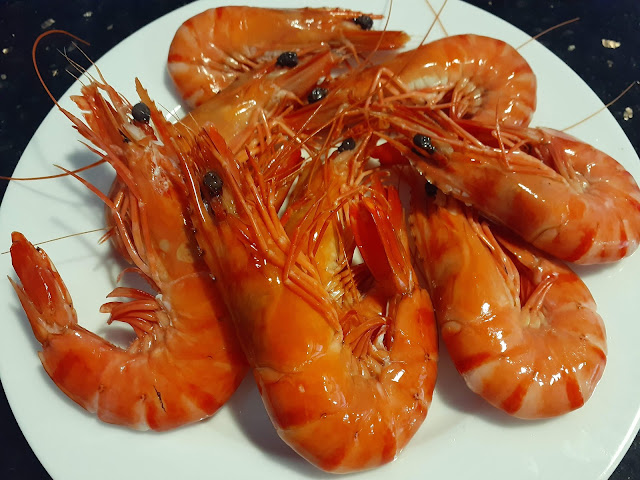
These Crystal Bay prawns, which I bought this morning, were farmed in the pristine waters of the Hinchinbrook Channel near Cardwell, in Far North Queensland, and made a delicious sandwich for lunch today, after being peeled and cleaned of course. Many are being sustainably farmed, and sold at quite reasonable prices in supermarkets. However if you like to eat them with a delicious seafood sauce, I have a few favourites to suggest. This is my Seafood Cocktail with Marie Rose sauce.  My mouth is watering at the thought of it. Long live the Prawn Cocktail, with fresh oysters on the side.

Vegemite is 100 years old, and is a black spread like Promite, that Aussies have been trained to love almost from the cradle. None of us can remember when we first tasted it, but it's always been in the refrigerator. Many a Mum has dipped her finger into a jar of vegemite while they are eating it spread on toast for breakfast and given their young child a taste even before they started on solids, just so they would grow up loving it, and most of us do. We've all grown up being "happy little vegemites". It celebrates everything fun and unique about being an Aussie. One of the amusing things we love to do with overseas visitors, is to give them a taste of vegemite on toast just to see their reaction. Even though we eat Australian made Weet-bix most mornings for breakfast during the week, it's often vegemite on toast that is my first food craving for the day, along with a cup of tea. Now that is an honest confession from a foodie. 

Vegemite, the brand, is celebrating 100 years this year, such an Aussie icon. Besides having it on toast, we love to add it to savoury mince dishes, beef stews, and Mr. HRK insists it's his secret ingredient when he's cooking. Pizza companies have now developed a frozen vegemite pizza, to be released soon. Mr. HRK will be trying that out, he loves making pizzas.

The Royal Australian Mint has released a Vegemite edition of the $1 coin which will feature a piece of toast with vegemite smeared on it. Some Vegemite stamps are going to be released as well. Vegemite is a trademark of the Bega Cheese Limited, we've been to BEGA.

So what else do we Aussies hold dear to their hearts as favourite foods? Weetbix has always been around as a breakfast cereal, we've been eating them since we were kids. After all, Aussie Kids are Weet-Bix kids, well they were, I'm not so sure now. It's a totally Australian product made by Sanitarium, and besides eating it for breakfast, it has been used as a basis for biscuits and slices and Rum Balls at Christmas, oh yes Rum Balls. I dare not mess with that recipe, or there will be a family revolt.

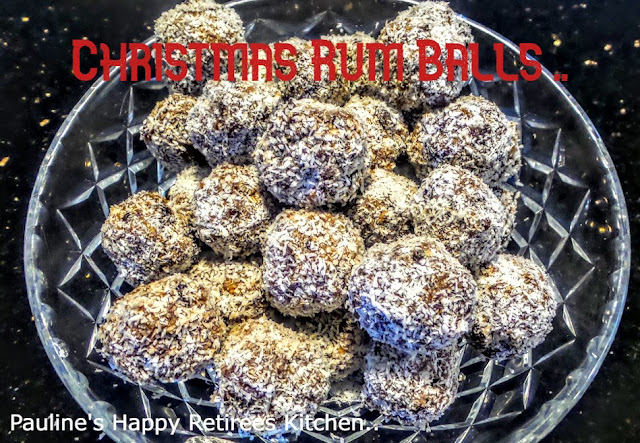
Recipe can be found at: HAPPY RETIREE'S KITCHEN : Christmas Rum Balls and Chocolate Rum Truffles (happyretireeskitchen.blogspot.com) As far as I'm concerned, these taste great at any time of the year, and made with lots of Queensland Bundaberg Rum of course.

The LAMINGTON is the national cake of Australia, that's fair dinkum. There I've said it, it's a big claim, but true.  It is a slab of sponge cake cut in large squares, dipped in chocolate and sprinkled liberally with desiccated coconut. It was first invented in Queensland with the first recipe appearing in the Country Life newspaper as early as 1900. The story goes that it was created by a cooking accident at work by a maid-servant to Lord Lamington, the very British eighth Governor of Queensland.

Many of us who have had children attend primary school in Queensland, participated in Lamington Drives at the school, which were a major annual fundraiser, and a very messy experience. All the slabs of cake that had to be cut up into squares, all the runny chocolate icing in large bowls which the cake had to be dipped into, and all those trays of coconut which the chocolate covered cake had to be rolled in. I'm sure we wore gloves, but you can imagine that it could get quite messy. I think it turned me off actually making Lamingtons. I prefer to buy them now from a very good local bakery, but recipes are available if you want to give them a try. They really are delicious, but the cake has to be like the real sponge cake that lamingtons are traditionally made from. That's the secret. I've ordered a dozen chocolate lamingtons for tomorrow, it's traditional, I had to. We'll share them with neighbours and friends. There are plenty of varieties to choose from now, pink ones, ones with cream and jam in the middle, ones coated in hundreds and thousands and various kinds of sprinkles, the list is endless.


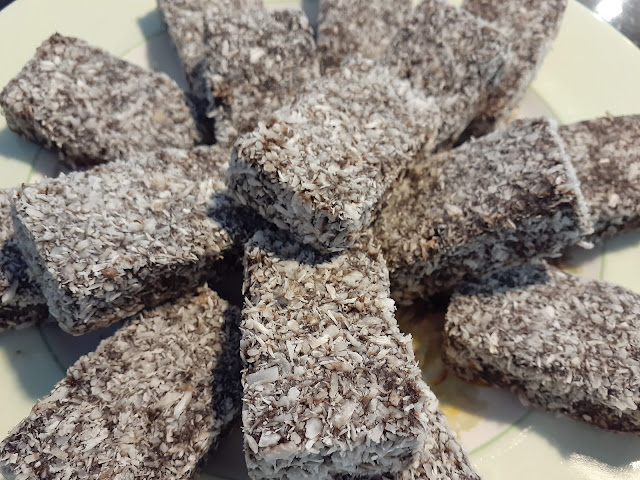
The lamingtons in the photo above were bought from the supermarket today, and are actually a good size for children to eat. They are white cake coated in chocolate icing and rolled in coconut, however they don't taste as good as the bakery product which is larger and with a softer cake. However these are quite affordable for many families and capture the spirit of the lamington for Australia Day.

Call us strange, but something else we love to do here Down Under is eat the humble pumpkin when cooked, in many ways, and at any time of the year. It is such an earthy and economical vegetable to eat whether baked, boiled, mashed, or made into sweets. Not many other countries in the world grow it and eat it like we do. 

Some of you will remember my Pumpkin Scone recipe from International Scone Week last year, but I just checked my blog recipes and I have cooked quite a few pumpkin cakes over the years too.

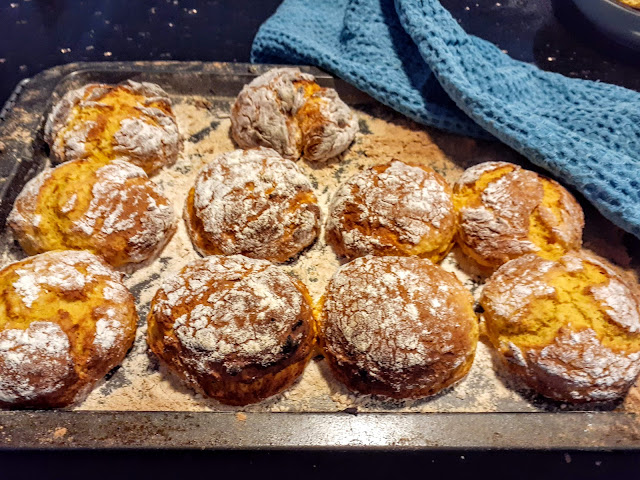
Here's a batch of Aussie Damper scones just out of the oven.

Did I say damper? Real rustic damper is what we love to cook in a cast iron Camp Oven over a fire when we go camping in the bush. Eating it hot with butter and smothered in Golden Syrup is a must.


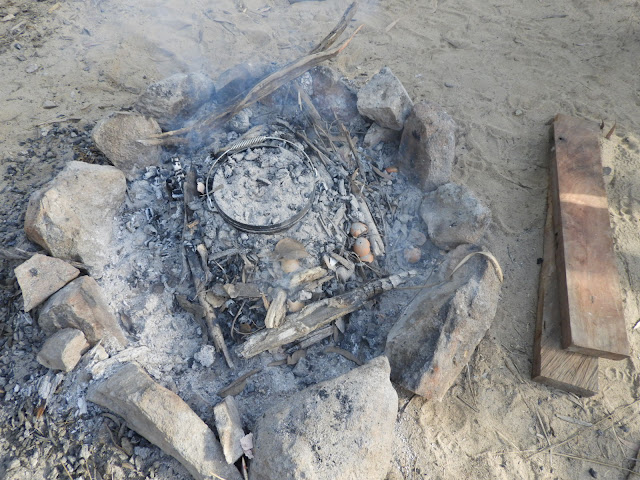
The Camp Oven cooking the damper in the smouldering coals of the fire. Hot Coals must also be placed in the lid of the pot.

Damper Ingredients:

2 cups SR Flour
Pinch of salt
Water

Let's make Damper:

  • In a bowl, add 2 cups of self-raising flour and a pinch of salt
  • Slowly add water from the jug and mix gently with a wooden spoon until the ingredients start to combine and form a dough
  • The dough now needs to be mixed together, not kneaded. Using your hands, yes your clean hands, cup the ingredients in your hands, and slowly work the dough until you get a nice round damper shape.

Back to the pumpkin recipes.

Rosemary Pumpkin Spice Cake with Cream Cheese frosting

Golden Pumpkin, Olive and Zucchini Loaf

And this is one of my all time favourites, Pumpkin and Apricot Fruit Cake. We love a good fruit cake.

There are more but you can find them I'm sure if you feel inspired.

Many of the classic Aussie dishes have a British, Irish or Scottish origin, Meat Pies, Apple Pies, Hearty stews. Fair shake of the sauce bottle, who doesn't love a good pie?

I can hear you saying, what about the famous Aussie Pavlova? The Pav smothered in fresh cream is a favourite dessert here in Oz, and we definitely claim it as our own, however our friends across the ditch in New Zealand, also hold it dear. Anyway it's a debate that still hasn't been resolved, and might never be. Here's the link to my pavlova recipe. In an ideal world, fresh passionfruit would have been added to this pav as well.


Pikelets are a popular morning tea treat here, something like mini pancakes, but served with jam and cream, or Golden Syrup, another Aussie favourite,  they are always a winner. The Aussie sheep shearers love 'em, and they are entrenched firmly in shearing history. I love whipping up a quick batch of pikelets and so do kids.


What I've written is just the tip of the iceberg, as we Aussies love our food, however we must remember that many can barely afford to put a meal on the table, and need help from charities working in those areas. We are so fortunate here to have such a diversity of foods, spices, herbs and cuisines to choose from.  I've listed some of the typical Aussie foods here, but we have such a rich history of immigration in this country, resulting in a diversity of cuisines to choose from.

What are you eating tomorrow my friends? A BBQ is always popular, or will you be laying back and enjoying some seafood? What are your Aussie favourites? I couldn't possibly mention all of them.

For my overseas readers, Australia Day has become very controversial and political, with a change of name and date being proposed because of the history associated with it. There I've mentioned it.

Anyway, have a good one.

Warmest wishes
Pauline


Tuesday, January 17, 2023

Leek and Stilton Quiche

Leek and Stilton Quiche is typically a British style quiche, mainly because of it's signature ingredients, Leeks and Stilton cheese, and will be a memorable dish for a special occasion. It is quite rich, but oh so delicious. Stilton is the creamiest and tastiest of all blue cheese varieties, with the most amount of fat, but doesn't contain any gluten. To be honest, I've never eaten much Stilton before, even when we lived in England for 12 months, but now it is readily available in Australian supermarkets, at a very reasonable price. To be authentically Stilton, it must only be made in the English counties of Leicestershire, Nottinghamshire, and Derbyshire. It's been that way since 1996, as Stilton is a protected Destination of Origin cheese.

The Thomas Dux Stilton Cheese I used in this recipe was made in the village of Long Clawson in Leicestershire, using local cow's milk, so I'm relieved to be able to say it's authentic. If you can't find any Stilton near you, or you would rather replace it with another cheese variety, Italian Gorgonzola or Roquefort, a French blue cheese made from sheep's milk, would be good substitutes. Or even a very tasty mature hard cheese would work well. Stilton is rich and strong in flavour, however the taste is less salty than Roquefort. I also found this pastry that I made to be perfect, crisp and delicious. It was so much fun to make.

Quiche is still a very popular luncheon dish in Australia and I love to make a healthy vegetable quiche, often the quick and easy type without pastry for an easy lunch. The popularity of quiche has been around since the 1970's, and with vegetables, a mature cheddar cheese, and eggs amongst the list of ingredients, I think it is a healthy and enjoyable weekend dish for families. However, if I am in the mood to do something a little more special, I will be making this Leek and Stilton quiche again, it's a keeper. And did I tell you how easy it is to make this pastry, it really is.


Mary Berry

This quiche is a Mary Berry recipe. So who is Mary Berry? She is a British cooking institution. She trained at the Cordon Bleu in Paris and the Bath School of Home Economics, and became a British food writer, chef, television presenter, and baker. During the British Swinging 60's, she became the cookery editor of Housewife magazine, followed by Ideal Home magazine, so she's been around for a while, a lot longer than I have. She is now Dame Mary Rosa Alleyne Hunnings DBE (nee Berry), professionally known as Mary Berry.

From 2010 to 2016 she was a judge on the Great British bakeoff, which kept her in the public eye. She has published over 80 cookery books, and surprisingly I don't have any of them on my bookshelf. If I was British, I'm sure I would have. I think you could say she is the British equivalent of Aussie cooking icons, Maggie Beer and Stephanie Alexander. 

This recipe, including the pastry turned out perfectly, top marks Mary Berry. I saw her make this on one of her cooking programs on TV fairly recently, and I have wanted to make it ever since. 

Finely chopped young leeks and celery from our garden and Thomas Dux Blue Stilton. I bought this Stilton from Woolworths supermarket.

Ingredients:

Shortcrust Pastry

225 g (8 oz) plain flour, some extra for dusting

125 g (4 1/2 oz) cold butter, straight out of the frig, cubed, plus extra for greasing

1 cold egg, beaten with 1 tbsp cold water

For the Stilton filling:

1 tbsp olive oil

2 leeks, thinly sliced

2 celery sticks, thinly sliced

4 eggs

450 ml (15 fl oz) thickened cream

150 g (5 oz) Stilton cheese, coarsely grated

2 tbsp chopped parsley

salt and freshly ground black pepper

Equipment:

You will need a 28 cm (11 inch) round, loose-bottomed deep tart tin, preferably fluted

Method:

Chilling time: 15 minutes, Total Cooking time 1 1/2 hours, plus resting

Preheat your oven to 200 C/180 C fan/Gas 6 and grease the tin, fluted sides as well, with butter

Let's make the Pastry:

Add the measured flour and butter into a food processor and give it a good whizz until it resembles breadcrumbs.

Add the beaten egg and water, and whizz until it forms into a ball of dough. This happens quickly.

Or, you can rub the flour and butter together using your fingers, in a mixing bowl to resemble fine breadcrumbs, before adding the egg and water.

Grab your large rolling pin, dust it well with flour, dust your kitchen workbench very well with flour with a circumference similar to the size of your tart tin.

Roll the pastry out on the floured work surface to a disc a little bit larger than your tin and about the thickness of a $1 or 1pound coin. Carefully transfer the pastry to your well greased tin and press it into the base and sides. I like to roll the pastry over my rolling pin, by starting at the edge of the pastry with the rolling pin, and carefully rolling the rolling pin, covering it with the pastry as you go. The pastry will be wrapped around the rolling pin in a few layers. To unroll the pastry start at the edge of the tin closest to you, and roll the rolling pin away from you to unroll the pastry covering the whole tin. I grew up watching my Mum doing this countless times, she made delicious tarts, sweet and savoury, and made it all look effortless. 

 Carefully press the pastry into the base and sides of the tin. Form a little lip around the edges of the tin, trim off any excess to neaten the edges.  Prick the base of the pastry with a fork.

Place the tin in the fridge to chill for about 15 minutes.

Baking Blind:

Line the pastry case with a large sheet of baking paper with a little overhang, and add the baking beans, and bake blind in the oven for 15 minutes. I used brown rice, that I keep in a special bottle just for this purpose. After the rice has been used for the blind baking of pastry, it won't be reusable for normal cooking. 

Your oven should already be preheated.

Remove the beans and paper and return the pastry to the oven for a further 5-10 minutes or until just cooked and pale golden.

The edges of the pastry case will pull away from the side of the tin when it is cooked which makes it very easy to lift out it of the baking tin. Tips on that later.

Delicious homemade shortcrust pastry

Reduce the oven temperature to 180C/160 C fan/Gas 4.

Making the Stilton Cheese and Leek Filling:

Select a wide based frying pan with a lid, add the oil.

Cook the vegetables. Add the leeks and celery and fry over a high heat for 2-3 minutes. Reduce the heat to low, cover with a lid and gently simmer for 20-25 minutes. The vegetables should be completely tender. If there is still extra moisture in the pan, increase the heat, and fry for another minute to dry off any excess liquid. I didn't need to this time. 

Take the pan off the stove and move to a cool spot. 

Beat the eggs and cream together in a jug and season lightly with salt and pepper.

Spoon the cooked leeks and celery into the pastry case, scatter with cheese and then parsley. 


Pour over the egg and cream mixture.

Bake the quiche in the oven for about 35-40 minutes or until golden brown and just set on top. Mary Berry says to check the tart halfway through the cooking time and if it is browning on one side more than the other, turn it around on the oven shelf, which I did.

Leave for 5-10 minutes to rest before turning it out and it's ready to serve.

Leek and Stilton Quiche

Tip: The tart can be prepared ahead of time.

It can be made 8 hours ahead and reheated. The pastry case can be cooked up to a day ahead and stored in a covered container. 

Can it be frozen? Absolutely. I haven't actually frozen the whole tart, but Mary says both the cooked tart and the unfilled pastry freezes well, if you have room in your freezer. This would be wonderful if planning for a party. Reheat it gently in the oven to keep the pastry crisp.

Cook's tips:

  • A food processor makes light work of making pastry, but if you really like being tactile, the flour and butter can be mixed between your fingers which is what I do with my scones.
  • I've emphasized that all of the ingredients for the pastry must be cold, in my part of the world where Summers are hot, that is imperative for pastry making. However in the Northern Hemisphere Winter, not so much.
  • My fluted tart tin isn't as deep as I would like, so I'm working on that. A loose-bottomed one makes it very easy to remove the quiche from the tin.
  • To remove the tart from a loose bottomed tin easily, place the tart in it's tin on top of an upturned 1 Litre pyrex jug or equivalent. The fluted edge will drop to the bench, leaving the tart and base sitting on the jug base. Easy peasy.
  • If using a hard, mature cheese or another type of blue cheese, the fine balance of cheese to herbs could be further achieved by adding 3 mixed tablespoons of chopped parsley, thyme, tarragon and oregano. Just a suggestion.

I had a small amount of leftover pastry, so I made a small pastry shell for a mini quiche, waste not want not.


Best wishes from a very wet North Queensland. I hope your week is going well. You might have heard there are flood warnings for the Mackay region where we live. It's been raining here since Thursday. Thankfully we are high and dry here, but the CBD of Mackay and the Pioneer River are on flood alert this morning and all of the roads in and out of Mackay are cut. It will be a worrying time for a lot of people. I'll be making a few phone calls to some friends in low lying areas this morning to check that they are are ok. 

Pauline


Thursday, January 12, 2023

Beating the Heat with a Summery Mixed Bean Salad


Dear Friends, Reach into your pantry, hunt down that tin of Mixed Beans, and whip up this simple bean salad. This salad serves 4-6 people. If you are doubling the quantities, use a red and a green capsicum, as the two colours look attractive and give a nice contrast in flavours. I just love the tang of this salad in Summer. I originally made this just with white Cannellini beans and it was delicious, so it is versatile regardless of what type of beans you choose. I have also lightly blanched some green beans, and added them chopped to the mix as well. Whilst I love a healthy grain salad at the best of times, this bean salad requires no cooking at all, such a bonus at this time of year.

Happy New Year to you all. We are just back from our Summer holidays at the Gold Coast and I am gradually easing back into cooking, blogging and everything really. January is such a transition period, don't you think? Did I say cooking? Up until yesterday, we were experiencing maximum temperatures here at home of 35 deg. C. with high humidity, so salads and easily prepared meals involving little to no cooking were my preference. That's how this recipe came about, as during the heatwave I was craving something really tasty, a little bit sweet, sour and tart that required no cooking. However, thank goodness the heavens have opened up and the heat has been followed by very heavy rain today, over 100 mm, which we just love. Hopefully there won't be any serious flooding. It's predicted to continue over the next few days.  The heat and humidity came as a bit of a shock to us after a cool beach holiday at the beautiful Gold Coast, and Gold Coast hinterland in Southern Queensland. 

These are photos of Tugun beach on the Gold Coast, with the Life Guard Tower on the right, complete with cute Christmas decorations and solar panels. We found this to be the best swimming beach, and whilst our holiday accommodation wasn't at this beach, Mr. HRK swam here during family holidays as a child. The rule is to always swim between the flags. The Life Savers (Guards) do a wonderful job looking after swimmers and surfers on the beaches at this time of year.


This is how I make my Mixed Bean Salad.
Ingredients:
Serves 4-6

400g (1-16oz) can Mixed Beans (or any white bean such as Cannellini if you prefer)
1 red or green capsicum, or use half of each for colour
2 spring onions, finely chopped or 1/2 medium very fresh brown onion 
1 large tomato, deseeded and finely chopped
6 tbsp. good quality red wine vinegar (I used Jamie Oliver)
1/4 cup Extra Virgin Olive Oil
salt to taste
1 clove garlic finely chopped(optional)

(Preparation time 10 minutes)


Preparation:
  1. Rinse and drain the can of beans
  2. Chop the capsicum and spring onions very finely and place into a medium size mixing bowl. Add the beans and any other fresh salad ingredients that you choose and mix it all together.
  3. Mix together the red wine vinegar, the olive oil, and whisk with a small whisk to emulsify.  Add the salt, a light grinding of black pepper, and pour into the beans. Taste it and adjust the seasoning if necessary, although the flavours will develop so you could do this closer to serving the salad.
  4. If you have some very fresh garlic and you love it, peel and mince 1 clove of garlic, and add it to the mixture and stir. 
  5. There is plenty of dressing for this salad so if you wish to add a few extra salad ingredients, see my notes below for ideas, then there will be plenty of dressing for a larger salad.
  6. Add a teaspoon of mustard and a little sugar to the dressing if that is more to your taste for a vinaigrette dressing.
  7. If you are entertaining dinner guests, the whole recipe can also be mixed together early on the day of serving and kept in the refrigerator, so that is one less thing to do close to the event. 

Cook's notes:
  • Omit the tomato if you wish, it wasn't in my original recipe, but I like tomato in this salad.
  • This salad is perfect just with the ingredients listed above. I am always careful not to add to many ingredients to recipes however with salads, which are so versatile, it is generally quite simple to add extra ingredients that you have on hand. Add 2 celery sticks for some extra crunch, and if you intend to serve all of this in one sitting, add some finely chopped cucumber just before serving if you wish.  However, the cucumber won't last well in the salad if refrigerated.
  • Add some herbs such as chopped fresh tarragon and chopped fresh parsley for extra flavour.
  • The quantities can easily be doubled to serve more people. A tin of extra chickpeas can be added, and another chopped capsicum of a different colour, green or yellow.
  • Leftovers will keep well covered in the refrigerator for 2-3 days, and even improve in flavour. Unlike some fresh salads which wilt after adding a dressing and being refrigerated, this one will last beautifully.

We ate this salad last night with my delicious Rustic Greek Halloumi and Spinach Pie that I love to make and eat. It's very easy to bring together and it had started raining so the kitchen was cool, bliss.


 I needed to use up some frozen spinach and halloumi so it was a perfect match, and ideal for a vegetarian meat free Monday, even though it wasn't Monday. This salad also contrasts perfectly served with Spanish chicken and chorizo casserole. However, it can stand on it's own just served with a green salad.  I would also happily serve it with any Mexican style meals.

Thanks for dropping by,
Have a great weekend, 
Pauline

I'm adding a little p.s. to my post today, as I'm having trouble replying to your comments but I am reading them, and trying to catch up on your lovely comments on previous posts. Hopefully Blogger will rectify this problem . After all it is Friday the 13th. Take care everyone.