Monday, December 7, 2020

In my Christmas Kitchen 2020

 My friends it's been a cooking frenzy in my kitchen this last week, preparing for Christmas and the arrival of our daughter and family. Sore feet, music constantly playing, lots of water and the occasional vino, have ensured the marathon is completed. So here are just a few photos, and  very sincere and warm wishes for a wonderful festive season from Mr. HRK and me. I might not be back on the blogging platform until the New Year but I will be reading what you are up to. This is my December contribution to the wonderful Sherry Picking's In My Kitchen series. Thanks Sherry. 

This is my latest Christmas fruit cake, no fiddling with the photo at all, and a very nutty presentation this year.  I could have even added more nuts.

Recipe is on my blog. Link to Christmas cake recipe

Christmas cake ready for the oven

I made the next cake especially because my daughter loves it, as do I. This is a Coffee and Walnut cake or slice. Old fashioned cakey goodness, with lots of coffee icing this time. A bit flattened because it is already in it's protective container. Link to the Coffee and Walnut Cake

Another fruit cake to get us through until the ceremonial cutting of the Christmas cake, I know, does that sound like an indulgence? This is my Boiled Cherry Brandy Fruit cake, our friend Paul's Mothers recipe. A real goodie this one. Link to the recipe here. I think it could double up as a Christmas cake really.


Also the plum puddings are made, 4 hours of simmering away in the big pots. The most difficult part of that exercise is keeping the water simmering at a constant heat. Well worth it though.

What I love about this time of year is the smell of mangoes in the refrigerator, and eating them as well. Now that the mango chutney is made, there's lots of mango eating to be achieved and some mango ice cream to be churned.

Walks on the beach with  Locky our Border Collie have been a welcome respite during the warm weather. We are lucky to live so close. He is having a little holiday for a few days with good friends whilst we have a little dog free holiday, and we miss him already.


Oh I nearly forgot, last week I made another edition of Nigella's Apricot Rosewater Almond cake with Cardamon when 9 book club friends came over to our house for our bookclub meeting, and the cake was delicious as always. We discussed A Gentleman In Moscow by Amor Towles, which I read twice, and loved it even more the second time. So if you can get your hands on it over Christmas, I highly recommend it. It is a sublime read, with lots of wonderful references to Russian food and wine and music from the 1920s, just after the Russian revolution, written from a food lover's perspective. It is also a real book of manners and gives an insight into the history of the time. It is work of fiction though.


Apricot Rosewater Almond Cake with Cardamons

Ingredients:

Serves 8-10

150 grams dried apricots
250 millilitres cold water
2 cardamon pods (cracked)
200 grams ground almonds
50 grams fine polenta (not instant)
1 teaspoon baking powder
150 grams caster sugar
6 large eggs
2 teaspoons lemon juice
1 teaspoon rosewater
nonstick spray or sunflower oil for greasing

For Decorating

2 teaspoons apricot jam
1 teaspoon lemon juice
2 1/2 teaspoons very finely chopped pistachios

METHOD:

Grease and line a 1 x 20 cm/8-inch round spring form cake tin
  1. Put the dried apricots into a small saucepan, cover them with cold water and drop in the cracked cardamon pods, still containing the fragrant cardamon seeds. Bring to the boil, and keep it bubbling on the stove for 10 minutes. Keep an eye on it as at the end of 10 minutes  the saucepan will be just about out of water but mustn't boil dry. The apricots will absorb more water as they cool. 
  2. Take the saucepan off the heat and allow the apricots to cool.
  3. Preheat your oven to 180 deg. C./160 deg. C. Fan, or Gas mark 4/350 deg. F.
  4. Remove 5 of the dried apricots and tear each in half, and set them aside on a plate for a while. Discard the cardamon husks, leaving the seeds in the pan.
  5. Pour and scrape out the sticky contents of the saucepan including the apricots into the bowl of a food processor. Add the ground almonds, polenta, baking powder, caster sugar and eggs, and give a good long blitz to combine.
  6. Open up the top of the food processor, scrape down the batter, and add 2 teaspoons of lemon juice and the rosewater, and blitz again, then scrape into the prepared cake tin and smooth the surface with a spatula. Arrange the apricot halves around the circumference of the tin.
  7. Bake for 40 minutes, however if the cake is browning  too early, cover it loosely with foil at the 30 minute mark. I didn't need to do this. When it's ready, the cake will be coming away from the edges of the tin, the top will feel firm, and a cake tester will come out with just one or two damp crumbs on it.
  8. Remove the cake to a wire rack. If you are using apricot jam to decorate and this gives a beautiful gloss and flavour to the cake, warm it up a little first to make it easier to spread. Stir a teaspoon of lemon juice into the jam and brush over the top of the cake. Then sprinkle with the pistachios and leave the cake to cool in its tin before releasing from the cake tin and removing to a serving plate.
That's all folks. Even if yours is a quiet Christmas, I hope you can manage some food indulgences, after all it is the festive season. The Australian government is urging us Aussies to drink more wine to support the suffering industry, no problem mate. Yippee, it's holiday time.

Warm wishes,

Pauline


Friday, December 4, 2020

Ricciarelli Biscuits or Italian Almond Biscuits


Italian biscuits like these are always such a treat. The Christmas Countdown is on for us. My daughter and family arrive on Monday from Cairns which is such a joyous thought, however that means lots of cooking, cleaning and organising, but as much time for blogging. I wanted to try these little Italian biscuits which my friend Christine baked during the week for our Mahjong afternoon tea and given more time I would have baked a second batch, if only just to improve the presentation of them. Please believe me though that these biscuits taste absolutely amazing, are gluten free, and are my favourite new biscuit for Christmas. I learned a lot cooking this first batch. I will be halving the sugar back to 125 g in future as Christine did. If you are a really sweet tooth, well go for the full 250 g by all means, but I find that with the reduced sugar I can eat two of them. Next time I will make them into attractive little rectangular parcels which is a pretty look. I also reduced my oven heat to 160 deg. C for these, however next time it will be 180 deg. as Sylvia Colloca suggests, as I like the slightly crazed and cracked look that results. Given all of that though, these are delicious and will keep in an airtight container for a few weeks. 

If you make them and I urge you to, I suggest you bake a double batch, as they will disappear very quickly.

 Makes 16-18

Ingredients:

300 g (3 cups) almond meal

250 g caster sugar (125 g is enough sugar)

2 egg whites

finely grated zest of 1 lemon

icing sugar, for dusting


Method:

  1.  Preheat the oven to 180 deg. C fan forced and conventional. Line a baking tray with baking paper.
  2. Mix the almond meal and sugar in a large bowl. Add the egg whites and lemon zest and mix through to create a paste (using your hands is best here.) Pinch off pieces of paste and shape into 3 cm x 4 cm rectangles (give or take). This mixture is very pliable. I like to make mine look a little bit more interesting by placing indents of my fingers around the edges and then a slight thumbprint in the middle. Dust in the icing sugar to coat well, then place onto the lined tray, leaving room for spreading. Bake for 10-12 minutes or until the biscuits look slightly marked or crazed and the bottom is firm.
  3. Cool on a rack. These biscuits keep for weeks in an airtight container, so you can double the ingredients if you like and make a bigger batch.

This is an Italian family recipe by Silvia Colloca for SBS food.

Last night Mr. HRK and I attended a Christmas concert at the Conservatorium of Music here in Mackay, which was a beautiful sparkly event and was hosted by the brilliant Professor Judith Brown who is also a remarkable pianist. Community choirs, and graduate and current students all dressed up and blinged up and performed on stage. Judith reminded everyone of the true meaning of Christmas. The Conservatorium of Music is a Faculty of the Central Queensland University. Before I retired, one of my roles at the University was as the Music Librarian for the  Con as we call it, and as part of that role I attended lots of the student concerts and got to know the talented staff and students very well. This year has of course been a difficult one for music students and performers everywhere, as there have been no concerts permitted or avenues for performance, because of the pandemic. So last night was very special for them and for us, and I realised  all over again how much I love attending concerts, and just how important music is for the soul, and yes I always have music playing when I am cooking, do you? Bring on Christmas!

Happy Christmas baking my friends,

Warm wishes

Pauline


Friday, November 20, 2020

Pasta Liguria with pesto, new potatoes, and green beans


With this recipe we are travelling in the kitchen to Liguria, in northwestern Italy, where it's Mediterranean coastline is known as the Italian Riviera. Liguria's most famous specialities are pesto and focaccia, which can be served plain, or with tasty variations like onion, olives, sage, cheese etc. Hugh Fearnley-Whittingstall of River Cottage fame in his veg everyday cookbook, says that this is a traditional pasta dish from Liguria using a delicious homemade pesto. Making your own pesto takes this dish to a whole new level. I am still to find a bought one that I like, but they must be available somewhere I suppose. 

For this recipe I used Hugh's recipe for pesto and combined basil and parsley, however just basil or just parsley would be fine. If you are fortunate enough to have access to a lot of fresh coriander, use that for an equally delicious pesto. This recipe can be prepared in two stages which saves a lot of time at the time of cooking. I made the pesto a few days ago and kept it in the refrigerator, and if you missed the recipe on my In My Kitchen November post here it is. If the pesto is already made, this recipe is cooked up in a jiffy. Another good thing is that this is a one pot dish after the pesto is made. I should also add that I only used the bowtie pasta for this recipe because that is what I had in the pantry. It's a fun pasta to use though.

It also makes a delicious meat free Monday dish that the whole family will love.

Pesto recipe:


Basil Pesto ingredients:

50 g pine nuts or walnuts, lightly toasted (I used pine nuts this time)
A large bunch of basil (about 30 g), leaves only
1 large bunch of parsley (about 30 g), leaves only
A few mint leaves (optional)
1 garlic clove, chopped
50 g Parmesan, hard goats cheese, or other well flavoured hard cheese, finely grated
 (I use parmesan)
 Finely grated zest of 1/2 lemon
100-150 ml extra virgin olive oil
A good squeeze of lemon juice
Sea salt and freshly ground black pepper

To Serve:

Extra virgin olive oil, to trickle over the top (optional)

Method:

Put the toasted pine nuts into the food processor along with the herbs, garlic, grated cheese and lemon zest. Blitz to a paste, then, with the motor running, slowly pour in the olive oil until you have a thick, sloppy puree. Scrape the pesto into a bowl and season with salt, pepper and a good squeeze of lemon juice. This will keep in the refrigerator for a few days. Sometimes I make a  pasta dish using this pesto with new potatoes, and green beans. Delicious!

Lets cook some Pasta. 

Serves 4 generously

Pasta with Pesto, New Potatoes and Green beans Ingredients:

300g new potatoes, I used "baby spud lite" potatoes from Woolworths (no promo intended)

300g pasta, such as farfalle (bowtie shape) or any pasta shape,  or penne, trofie, orecchiette 

200g green or French beans

50g stoned green olives, roughly sliced or chopped

Salt

Method:

Put a very large pan of well salted water onto the boil. Salting the water heavily (2 tablespoons), is believed to help maintain the bright colour of the beans, and keep the potatoes firm. Meanwhile, cut the potatoes into thick matchsticks (like thin chips).

Add the potatoes and pasta to the pan and cook until the pasta is al dente - Probably 10-12 minutes. This should be the right amount of time for the potatoes as well, however I wasn't quite sure and so I added the pasta, cooked it for 2 minutes, then added the potatoes, cooked it all for 5 minutes and then added the green beans for 4 minutes. Perfect timing! The most important thing here is to keep the integrity of the potatoes so that they don't cook too long and break up. If the pasta is the type that cooks very quickly, put the potatoes in a few minutes before you add the pasta. 

Carefully drain off the pasta and vegetables, and let them steam off for a minute or two, then add the pesto and mix thoroughly but gently. Check to see if more salt or pepper is needed, I added a good grinding of pepper.

(If you are worried about the timing though, cook each element separately in the same pot of boiling water.  First the potatoes, when almost done take them out, then the green beans, take them out when almost done, keep the water going and add the pasta until done. Then gently mix everything together.)

Divide between 4 serving bowls, and scatter over the green olives. Grate some parmesan cheese over each bowl and add  an extra trickle of olive oil if you like. Serve with an extra bowl of grated cheese on the table. Mr. HRK and I are having leftovers for lunch today. Yum, can't wait.

I really hope you try this recipe as it is absolutely delicious and so simple to make.

As always your comments will make my day, so please let me know what you think in the comments box.

Happy eating,

 Pauline


Saturday, November 14, 2020

In My kitchen, November 2020

Beautiful Jacaranda trees growing in our street

It's a lovely time of year with the Jacaranda trees in flower and my Dancing Lady orchids (oncidiums) producing beautiful golden sprays of colour this year. I feel as if I have lost a week though, as I started this post a week ago and then we received news that our brother-in-law was in intensive care in Rockhampton which is in Central Queensland, following surgery. Jim is blind and has been for over 20years, he is incredibly independent though. But his blindness adds extra complications to any health issues. Knowing that Jim's children and family in NSW wouldn't be able to visit him because of Covid restrictions and other family couldn't get there until Monday we drove down, after all Mackay is only 350 kms up the road from Rky. Rockhampton is my hometown, so it is always nice to go back,  perhaps under better circumstances though. We drove home yesterday after 6 days of visiting the hospital, and Jim seems to be doing quite well in rehab at the Mater Hospital now so I'm so pleased we could be there for him. The staff at the Rockhampton Base Hospital provided excellent care for him. 

Dancing Lady orchids


A highlight of the trip though was that Mr. HRK and I found a grove of Common mango trees where we took our dog Locky for a walk each day, still green but ready for picking, and perfect for making mango chutney. So my handyman husband repaired Jim's specially designed mango picker,  and on Wednesday we picked two bags of mangoes. We needed enough mangoes for 2 kilos of mango flesh. Jim also has a thriving Bowen Mango tree in his backyard, so we picked all of those for him and brought back just a dozen for ourselves. Common mangoes don't have the lovely pink blush around the stalk that the Bowen mangoes have, as they ripen then turn yellow.

A bowl of Green Common Mangoes ready for cooking.

It's interesting though that the mangoes in Mackay are still not ready for harvesting despite being further North, Rky has surprisingly had more rain than us. So today in my kitchen can you guess what I've been doing all morning, yes my friends, making mango chutney as some of the mangoes have started to ripen already with the warmer weather around. The mangoes need to be very green and hard for making chutney or the flesh will just break down too easily in the chutney. The result, 13 jars of spicy and sweet mango chutney which I am very pleased with. Mr. HRK peeled them while I sliced them up, and then I cooked up the mixture in a large pot, outside in our patio BBQ area on the gas burner, our outdoor kitchen. It took 45 minutes. So it's Mango Madness here in the North, or anywhere where there are mangoes growing, heralding the beginning of the Christmas preparations. Traditionally mango chutney is eaten with ham on Christmas. Day. However we eat it all year round. 
Click here for my Mango Chutney recipe on a previous post.


All the ingredients are in the pot, ready for cooking


My latest batch of mango chutney still to be labelled and stored.

Just before we left for Rockhampton, I made this delicious Chicken, Tomato and Basil traybake using up some fresh tomatoes given to me by my wonderful friend Irena. It was delicious.  I'll put up the recipe one day soon. 


My sweet Italian basil is growing beautifully this year, so I made some pesto from it. It was so delicious, the best pesto I have ever made, mainly because I think the basil was so fresh. The pesto is all gone, so I need to make some more. However here is the recipe I used from River Cottage Veg everyday, written by Hugh Fearnley-Whittingstall. A great recipe book and never far from my kitchen.


Hey presto we have delicious basil pesto


Basil Pesto ingredients:

50 g pine nuts or walnuts, lightly toasted (I used pine nuts this time)
A large bunch of basil (about 30 g), leaves only
1 large bunch of parsley (about 30 g), leaves only
A few mint leaves (optional)
1 garlic clove, chopped
50 g Parmesan, hard goats cheese, or other well flavoured hard cheese, finely grated
 (I use parmesan)
 Finely grated zest of 1/2 lemon
100-150 ml extra virgin olive oil
A good squeeze of lemon juice
Sea salt and freshly ground black pepper

To Serve:

Extra virgin olive oil, to trickle over the top (optional)

Method:

Put the toasted pine nuts into the food processor along with the herbs, garlic, grated cheese and lemon zest. Blitz to a paste, then, with the motor running, slowly pour in the olive oil until you have a thick, sloppy puree. Scrape the pesto into a bowl and season with salt, pepper and a good squeeze of lemon juice. This will keep in the refrigerator for a few days. Sometimes I make a  pasta dish using this pesto with new potatoes, and green beans. Delicious!

Below is my Brassia Rex orchid in flower at this time of year. It's quite an un usual flower.


Nasturtiums from a friend make a lovely posy in a vase in the kitchen. This is the last of them now unfortunately that the Summer heat takes it's toll on some garden plants.


 I started sewing a couple of weeks ago, and made this book bag for Hugo our grandson, and sent it in a Christmas parcel over to the Falkland Islands with a book inside of course. I really enjoy sewing once I get started. This is an easy project and very useful. I'll be making some more for the children in the future.


I've written this post as part of the In My Kitchen series hosted by Sherrys Pickings. It is worthwhile dropping over to her posts if you haven't already

We are so fortunate here in Queensland that life continues pretty much as normal now, however we are aware that the the Covid pandemic situation overseas is still very concerning. You are all in our thoughts and prayers and one of the biggest global challenges now is to produce and distribute a  reliable vaccine that immunises populations across the world against this dreadful virus.

That's all folks, have a safe weekend. My next project today, soaking the fruit and nuts for this years Christmas cake.

Warm wishes,

Pauline.


Monday, November 2, 2020

Gingered Garlic Pork with Stir Fried Vegetables


This is the perfect meal on a hot and sticky day like we are experiencing today, it's light and tasty. I love the way we Aussies describe a day like today, it's a Stinker, or it's Muggy and we are always hoping for rain or a storm. Luckily here in North Queensland, so far we haven't had any of the awful hailstorms that have started in southern Queensland. Some poor people's homes have been wrecked by huge hailstones.  We haven't had any of the rain either unfortunately, no doubt though it will come eventually.  My Dove orchids are starting to flower, and they are often pretty accurate that it will rain.

Friday, October 30, 2020

Spanish Vegetable Stew with Chorizo


I had an abundance of vegetables in my refrigerator crisper needing to be used during the week, and rather than do a traybake of them, or donate them eventually to the compost bin, I decided to make a rich vegetable stew with a Spanish theme and Mediterranean flavours. By adding a  spicy, paprika enriched chorizo the vegetables were transformed into a delicious dish reminding me of our holidays in Spain, 5 years ago.  Once again, I feel very fortunate that we travelled there when we did. Strangely though amongst this  medley of vegetables there was no eggplant, so I used up the zucchini instead, but eggplant would also be perfect. We eat fresh vegetables and salad every day, however sometimes I still manage to accumulate them, because I can't resist them when they are selling for a good price or look especially fresh and delicious at the market. 

I almost feel guilty putting up a recipe like this one on my blog as it is so easy, but my friends it is so tasty and authentically Spanish as well. Spanish food isn't complicated food, it's pretty simple really, with lots of fresh ingredients and sometimes incorporating bottled pimentos, olives and peppers etc for authentic flavouring. Whilst writing this up, it inspired me to take a look at some of our old photos of when we were driving around Spain and the cooking class in San Sebastian that Shannon and I went to. It was truly the best experience and it was just us in the class. So much food and wine, because after a cooking class, you get to eat the results. Amazing! As this is mainly a food blog after all, I thought you might enjoy a few of the Spanish photos we took, as we can't travel to Spain anytime soon. First the recipe, and then the photos.

Ingredients:

3 tablespoons extra Virgin Olive Oil

1 onion, diced

1 bunch fresh asparagus (in season right now)

340g zucchini or eggplant or both, diced

120 g large mushrooms, sliced

1/2 red capsicum

1 tsp. mixed herbs, or combination of fresh if you have them

100g chorizo, diced

3 garlic cloves. sliced

400g tin chopped tomatoes

2 handfuls diced pumpkin (I used Kent, but you can use butternut if you wish) or leave it out

Salt and ground Pepper for extra seasoning


Method:

  1. Saute the onion in the olive oil in a casserole dish over a medium-low heat until softened and sweetened for 4-5 minutes, then add the zucchini or eggplant, capsicum, mushrooms, herbs and chorizo.
  2. Cook this mixture for 5 minutes, and as it starts to brown, stirring regularly, and add the garlic at almost the end of the cooking time.
  3. Pour in the chopped tomatoes, asparagus, and the pumpkin and half a cup of water, just enough to loosen up the mixture, and then simmer for about 40 minutes, with the lid on, stirring occasionally to prevent the mixture from sticking, until all of the vegetables are cooked to your liking.
  4. Have a taste to check if it needs any extra seasoning, I added a little extra salt and ground black pepper.
  5. Serve it with brown rice or quinoa, and some steamed greens and a sprinkling of parsley to garnish.


Now for my Spanish photos:-
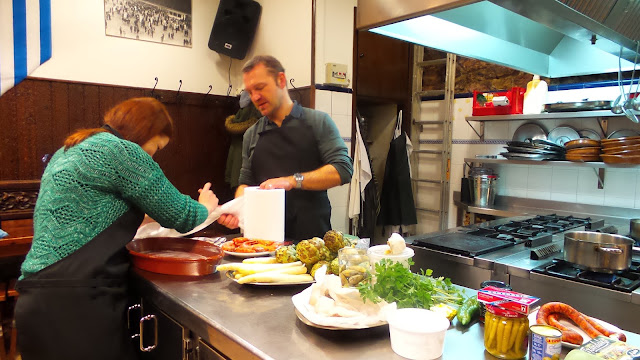
The Spanish cooking class kitchen in San Sebastian and one of our chefs. She was delightful.


Here's Shannon hard at work in the kitchen with our other chef. The fresh white asparagus was delightful, and can you spot the chorizo?


Of course every Spanish market has beautiful flowers, and San Sebastian was no exception.


Oh to have fresh artichokes (alcachofa) like these ones below.


Lots of fresh produce to choose from at the San Sebastian market which we shopped at for our cooking class. Yes there were tubs of wattle, that was a surprise.


There are always lots of different varieties of olives, and legumes to buy for every Spanish dish and their delicious tapas.


The salads in Spain were simple and delicious. We drove around all of Spain, and this was the most common salad we encountered at most cafes and roadside restaurants. When we are travelling, fresh salad and vegetables are always welcome and not always easy to come by, but they are in Spain.. They love their boiled eggs, iceberg lettuce and tinned fish. Also note the green olives, the grated carrot, tomato, corn and radish. Just like what we eat at home during the Australian Summer, don't you think?


If you would like a Spanish dessert to finish your meal with a Spanish theme, I wrote a little more about our Spanish adventures when I baked the Basque Burnt Cheesecake. Here is the cheesecake recipe.

Warmest wishes from sunny North Queensland.


Pauline

Saturday, October 24, 2020

Thai Style Vegetable Green Curry, a Meat Free Monday recipe

I often cook a green chicken curry with some vegetables included especially if I have eggplant needing to be used, but this time, using the Five Tastes Green Curry Paste in a vegetarian version I was so thrilled with the amazing flavour of this curry, minus the chicken. Thai food is a very popular cuisine in Australia, partly due to our proximity to South East Asia, our climate, and the ease with which we can grow many fresh Asian herbs and vegetables. It just tastes so very good. 

Thursday, October 15, 2020

Bulgur or Bourghal Wheat Risotto with Chicken and Artichokes


It's easy to treat yourself to a fast, tasty and nutritious meal at the end of a busy day from food in your pantry. This is a quick post, to share with you a deceptively easy and delicious midweek meal. At the end of a busy day, if you have some left over chicken in the frig, a bottle of  preserved artichokes in your pantry, some bulgur wheat, and some white wine for the dish and the cook, voila you have the makings of a tasty and nutritious meal only 45 minutes max away.  

Monday, October 5, 2020

Showcasing In My Kitchen, October 2020


I've been going to make Golden Syrup Dumplings  for MR. HRK for a while now, definitely one of his faves, and when I saw Maggie Beer make a guest appearance on journalist Annabel Crabb's  recent TV show, "Back in Time for Dinner", broadcast on the ABC here in Australia over four Tuesday nights,  I couldn't put it off any longer. I've made Golden Syrup dumplings a  few times in the past, always delicious, but I thought I would try Maggie's recipe this time. Yes I'm quite a fan of Maggie Beer, show me someone that isn't.

Watching this series was quite nostalgic in a way for our age group as we found ourselves reminiscing over  the various pieces of kitchen and garden equipment that we remember from our childhood days. Not during the wartime era I hasten to add, we definitely weren't around then or even thought of, however by the 1950's and the 1960's some of those old Aussie things, now vintage, were still around in some homes.

Something I found interesting during the 1920's episode of "Back in Time for Dinner"  was the revolutionary appearance of canned food in the kitchen pantry in the 1920s and the excitement that caused for the woman of the house. Offal was still a readily available and popular choice for meals, and we even ate our fair share of it, but suddenly the housewives were creating a plethora of meals out of canned meat, canned fish, and canned fruit and vegetables. There was no disgrace in serving a meal out of a tin, and it's still ok if it's baked beans, sardines, tuna, salmon, or spaghetti. Now it seems there is no disgrace in serving a meal out of a bottle, although as you know if you read my posts regularly, I like to mainly cook from scratch now that I have the time. However pantry staples such as tinned food are still important as an economical and  time saving resource. As well as all of the homemade jams, chutneys and pickles in my pantry, I keep a good stock of tinned tomatoes, chick peas, corn, pulses, sliced beetroot, sardines, tuna, sliced apples, pineapple pieces, and condensed milk as a minimum. Does that sound like your pantry these days?


No bully beef or Spam in sight though, as were the staples in the wartime era. After the First World War, attention turned to manufacturing food for the population, instead of the soldiers. Post War in the 1920's, the Ad man arrived, and gas ovens, couches, lino floors, new household appliances, and tinned food, sparked up everyone's lives. Let's not forget the glamourous Flappers either, it was party time.

Along with the tinned food innovation,  came the humble can opener, and some subsequent kitchen accidents, as these weren't easy appliances to use. The old can opener was really sharp, and a warning to watch your fingers came with it. I would have hated that can opener, and I can remember it still being around in kitchens in the 60s. This a photo of the one in the show. 


Then along came this one, a slight improvement. I remember trying to wrestle with this one in my Mum's kitchen. They seemed to go blunt quite quickly.

When the electric can opener appeared, in the 70s I think, it was revolutionary and everyone had to have one to make life easier. We still laugh when remembering that Mr. HRK and I received four  electric can openers for wedding presents in 1977, that's how popular they were. They were all the same, and yellow if I remember correctly,  and we know where in Rockhampton our young friends went to purchase them. It was at Millroys, a much smaller version  of Myer today, no clothing though that I remember. The electric can opener looked something like this, I don't have fond memories of that one either.


Thankfully now, most of the cans are ring top making life a lot easier. However I wish cans of condensed milk still needed to be opened with a can opener as boiling a can with a ring top to make caramel always worries me, even though I have had no disasters as yet. Touch wood! Which raises the question my friends, do you still have a can opener in your kitchen, or do you prefer an electric one or do you use one at all? I like my hand operated can opener, an easy one to use and occasionally I still need to use it.


Enough reminiscing, let's cook some dumplings, requiring no can openers. When I have cooked dumplings in the past, I have placed them in the frying pan to cook with the simmering sauce just as we sat down to eat the main meal, and they were ready when we finished eating. Although I always checked them after 20 minutes. However if you like a long interval between the main course and dessert, just slide them into the sauce as soon as you finish your main course. How you do it,  could depend on whether you are eating with your family, or entertaining guests. Golden syrup has been around in kitchen pantries for a long time, definitely since the 1940s anyway, and these dumplings have been a very economical and popular dessert through the decades.


Golden Syrup Dumplings, this recipe originally by Australian cook and chef, Maggie Beer

Ingredients for dumplings:

1 cup self raising flour

Salt to taste

20g  butter

1 egg

50 ml milk

Ingredients for Golden Syrup Sauce:

1/2 cup golden syrup

3/4 cup brown sugar firmly packed

30g  butter

2 cups water


METHOD:

  • Sift the self raising flour into a bowl and add a pinch of salt.
  • Rub the butter into the flour until it resembles breadcrumbs, and then add the whisked egg and stir to combine.
  • Slowly add the milk and mix gently until the dough just comes together and resembles a scone mix (do not over work the dough or it will be tough instead of light and fluffy.) Set aside.
  • Combine all sauce ingredients into a large frypan. Bring to the boil to amalgamate before reducing heat to a gentle simmer.
  • Flour your hands and roll the dough into the size of a twenty cent piece. Smaller dumplings will absorb more sauce.
  • Slip the balls off the baking paper all together into the syrup. Cover the frypan with foil to form a tight seal and cover with the lid. Cook for about 10 minutes before turning them over to cool for another 10 minutes on the other side. (Turning them over is optional.)
  • Remove with a slotted spoon and serve with the remaining sauce and a jug of runny cream or ice-cream or even custard. Whatever you prefer. The dumplings will steal the show anyway.


Where would we be without this Golden elixir called Golden Syrup

There is reference to a version of Golden Syrup being produced at the Spiller's Sugar Plantation here in Mackay, North Queensland, in 1868. Outback shearers and station hands bought their golden syrup in 70lb. (30 kg.) tins, naming it "Cocky's Joy". Small farmers in Australia were also called a cocky in the first half of the 20th century. Cattle farmers were called cow cockys. Golden syrup was much easier to transport in tins than jam and often used as a substitute for butter on their damper. Who doesn't love Aussie damper with Golden Syrup, especially over a campfire? This  Golden Syrup story reinforces what a culinary icon it still is in our kitchens. Mine is in a plastic bottle here but I generally buy it in a decorative tin. 

What is the most valued appliance in your kitchen my friends? I would have to say mine are my Kitchen Aid, and our Rancilio Coffee machine and coffee grinder. The slow cooker and pressure cooker are great as well, we are lucky aren't we?

I like to collect  pretty milk and water jugs, which I use so I thought I would share a few of these with you.  I also love these beaded jug covers which are very useful. I inherited these, and still use them although I wish I could crochet as a couple are in need of a little repair. 


This past 12 months of living with the pandemic, has meant that some of the survival skills needed during the 1900's to 1950's as discussed in the show have been needed in our own homes. Simple home cooking, growing our own food, making our own coffee, avoiding supermarkets when we can, and just general resourcefulness have become a saviour during difficult times. Resourcefulness and resilience is surely in our DNA if we tap into it.

I've written this post as part of the In My Kitchen series hosted by Sherrys Pickings. It is worthwhile dropping over to her posts if you haven't already.
 

Warmest wishes

Pauline