Showing posts with label bees. Show all posts

Wednesday, May 20, 2020

It's World Bee Day and Saving our Bee Hive

Have you heard the Buzz - it's World Bee Day. It's celebrated every year on the 20th May to raise awareness of the importance of bees and what we can do to help towards their preservation. When I heard on the news this morning that it was all about the bees today, I knew I would have to contribute. Having a beehive is taking conservation to the next level.

Preview

When we returned from overseas in early March, and thank goodness we came home when we did just before all of the lock downs started, our Italian Honey beehive was full of honey. However, little did we know that from here on we were on another steep learning curve, making us realise how fragile beehives can be. We extracted lots of honey from the hive on Saturday, a big day, and the following day the whole front of the beehive, bottom brood box plus 3 supers above were covered in a black mass of bees from top to bottom. We had never seen so many bees en masse,  thousands of them, and this was the ominous sign that our bees were getting ready to swarm. And they did. The next day the black buzzing population of bees had gone, but there was still some activity obvious around the hive so we remained optimistic.  However within a week we realised that we had probably lost our Queen Bee, the old queen had swarmed with the hive without a new queen produced to keep the hive going. The female bees left in the hive desperately try to produce another queen but because they are unable to fertilise the egg they only produce drones. This is the tell tale sign that the hive is queenless when a lot of drone cells appear in the middle of a frame.  We called in Keith, our friend and local bee expert, and he very calmly worked with Mr. HRK to salvage our hive. He brought a new Queen for us in a small box, with three escorts, (Keith hatches the Queens and sells them to beekeepers), reduced the hive to just the brood box, and to cut a very long story short, we have basically started from scratch again but our beehive is alive. If we had left it much longer, we would have lost our hive.

Freezer full of beehive frames
 We have our second fridge freezer full of beehive frames which will kill off any diseases present due to the weakened state of the hive after the swarming. They will also be used when our beehive is back on track to expand to another super, that is beehive terminology for another beehive box on top of the existing one. The frames will be a food source in the new box for the bees.

It appears that by the time we returned home the bees were hungry, because there had been lots of hot weather and then rain, and being a very large hive they were depending on the supply of honey in the hive to keep them sustained. Perhaps they were planning to swarm anyway, after all they swarmed to our place in the first place and perhaps the Queen had gypsy tendencies, anyway lesson learned. They didn't appreciate us extracting the hive for honey although our friends that we gave lots away to certainly did and it was beautiful honey. Since then Mr. HRK has been monitoring the hive closely, and to supplement their food sources every couple of days he feeds them sugar syrup to give them the energy to fly off in search for food. The sugar syrup is a mix of 2 cups sugar and 2 cups boiling water. He pours this into a ziplock bag and when it is lukewarm, and the sugar dissolved he places it with a couple of holes  prodded in the top of the bag in the top of the hive and the bees feed off that until it is empty which may only take a day. So I have certainly been supporting the local Mackay sugar industry with the amount of sugar I have been buying. We also bought some hive beetle baits from Keith as that is our main concern now that there is evidence of hive beetle in the hive, which eat the bee larvae. But it all appears to be working and the hive is becoming more active each day. I hope this story reinforces for you just how fragile beehives can be and that beekeepers need to be vigilant and constantly monitoring their hives as environmental circumstances are constantly changing. Beehives and the beautiful honey they produce can't be taken for granted. It's a primary industry to be protected.

This is what our beehive looks like now. 


When the hive has grown sufficiently we will add another super or box to the top. Last weekend Mr. HRK's mission was to let more sunshine into the backyard area around the hive. So the day was spent pruning, something that needs to be done regularly in tropical gardens. The Golden Penda tree and the Lychee tree were both given a good haircut. All the foliage was moved to the shredder, so that it could be shredded down to mulch, and then Murphy's Law intervened. The shredder wasn't working, so Mr. HRK pulled it to bits, but with no luck. The pile of tree and plant cuttings is still sitting there as there are no new shredders available for sale anywhere in town. Another consequence of the pandemic.

Did you know, that all of the worker honey bees are female, only live for about 28 days, and do all the work? The male honey bees (also called drones) have no stinger and do not work. All they do is mate but the health of a hive can be judged by the number of drones it has. Did you know that the Honey Bee is the only insect that produces food eaten  by humans? Interesting eh?

Honey bees are so important for the pollination of all our food crops in Australia and the hives have been hit hard recently with drought and bushfires, as I'm sure you know. Native Bees are the backup plan in case Honey Bees become decimated and so they need to be nourished as well. Moths, ants and even butterflies play a role as well with pollination. One positive bonus of the Covid 19 pandemic and isolation is that many more people are gardening and growing their own vegetables and planting fruit trees. Now that we have the beehive, every vegetable plant and flower in our garden is a potential food source for our bees and a celebration although bees are known to fly 5 kilometres in search of food. Butterflies, moths and birds are also beneficiaries. 

The following are some photos of our garden at the moment. I hope you enjoy looking at them.I planted a whole lot of seeds a month or so ago, rather randomly throughout the gardens, not having a lot of faith that the seeds would germinate but I think most of them did. So now we have lots of tomato plants growing from seeds that I dried myself between sheets of paper kitchen towel, pak choy, zucchinis, eggplant, strawberries and some herbs. I have transplanted some to better spots in the garden

Here are a few photos for you.

Red Cherry Tomatoes, I think. This one is doing well in a pot. The rest are in the garden. I noticed it's first little flower this morning.


Zucchinis
A few female flowers with small zucchinis attached are now emerging and Mr. HRK plans to give them a hand with pollination to ensure that the small zucchinis don't fall off. 


This one seems happy in a pot
Capsicum growing from seeds I dried


Eggplant which I think must have germinated from seeds in the compost heap. I have seen Italian honey bees in their flowers which is inspiring.

Some kind of bug on the Eggplant flower


This is our leafy patch, mignonette lettuces, beetroot, rocket and other greens.


"Beauty is in the Eye of the Bee-Holder" - Some flowers, to brighten up the garden and add to it's diversity.
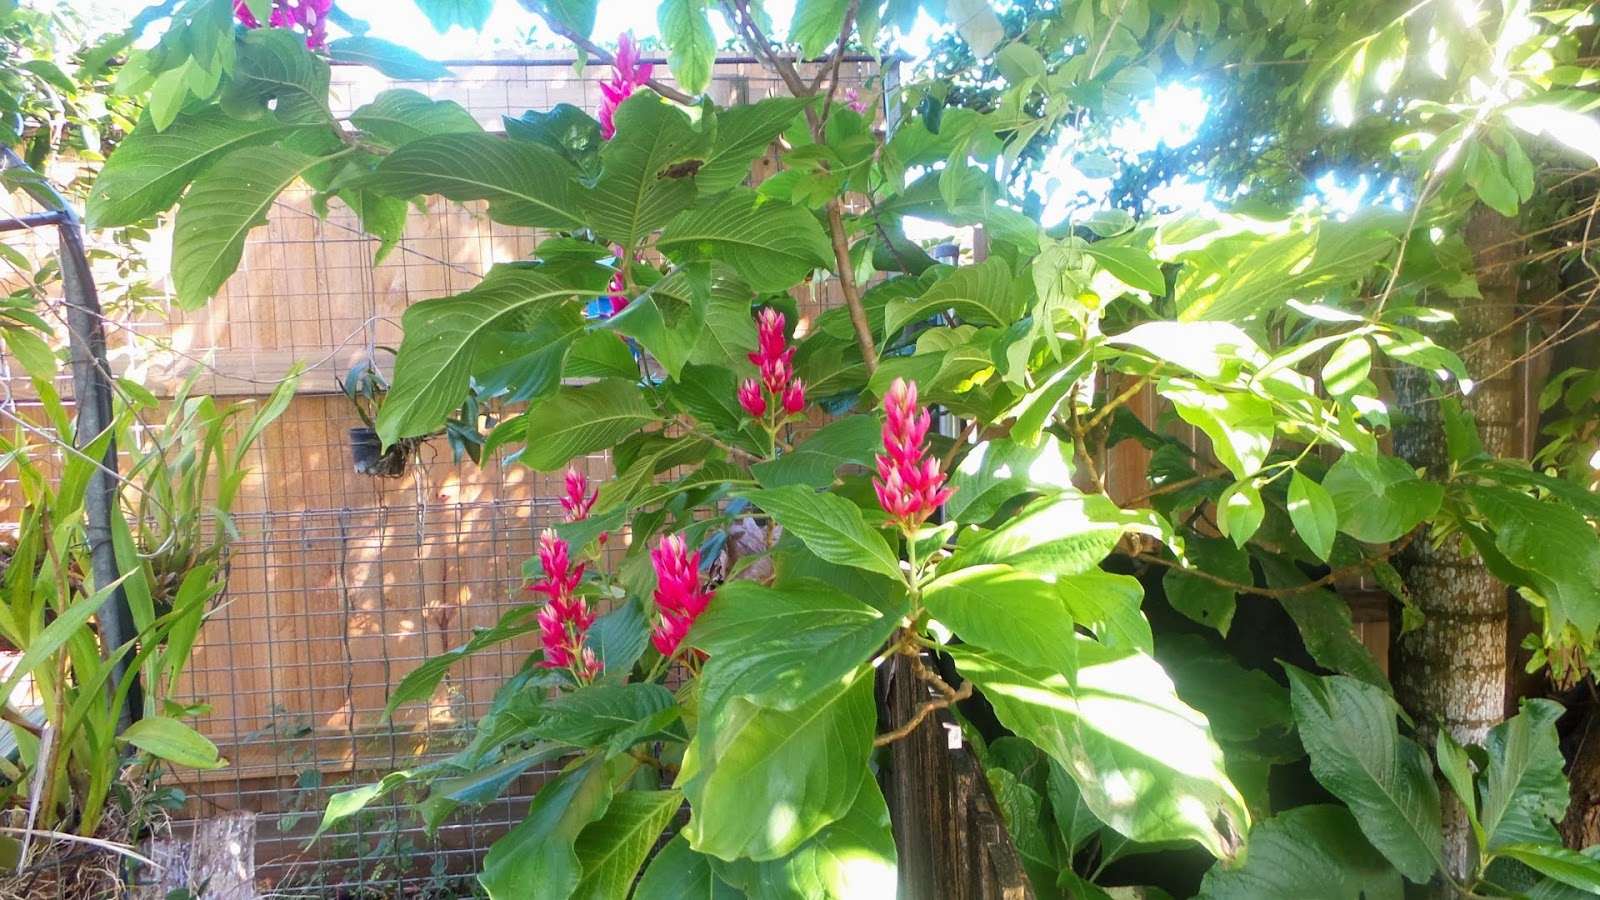
The Brazilian Red Cloak just coming into flower. This is at least 12 years old, originally from my Mum's garden in Rockhampton.
Cut flowers of the Brazilian Red Cloak I brought inside to enjoy
 If you look carefully you can see a yellow honey eater salivating over my orchids. It was difficult to get a good photo through the kitchen window.


The flower from one of my Cattleya orchids which I brought inside.

Reliable and pretty Pentas flowers that all insects enjoy. We also have a purple one.

Beautiful begonias

Perfumed Chrysanthemum

Old-fashioned Coleus flowers, almost finished and ready to be pruned but adored by bees.

  Beautiful salvia, can you see the Italian honey bee on this one? Loved also by the honey eaters, butterflies, and native bees.

 Happy World Bee Day my friends, enjoy your daily dose of honey, and the vegetables and fruits that Italian Honey and Native bees have probably pollinated just for you.

Thanks for dropping by.

Best wishes

Pauline.


Sunday, December 1, 2019

Making our Beeswax Wraps the Easy Way

Life is the flower for which Love is the Honey:-
Victor Hugo


Our beehive and bees are doing well although Mr. HRK feels it might be ready for a new Queen quite soon. As the hive swarmed to our backyard sometime over the last Christmas period, and we don't know how old the Queen was then, we are calling in a professional beekeeper next week to give us advice. Meanwhile we have harvested two lots of honey, which is a lovely flavour and a nice colour, all of the first batch and some of the second has been gifted to friends and family, and we have made two lots of beeswax from the honeycomb. We have just made a small batch of beeswax wraps as a starter and we're researching the best way to make beeswax candles. Making and using beeswax wraps is just one way I can reduce the amount of plastic usage in our home and change the footprint that we leave on this earth. If you would like to catch up on how we moved our beehive and extracted the honey, my previous stories about this can be found at these links: Part One, Part Two, Part Three.

This is the story about our first attempt at making beeswax wraps, and overall we are happy with them. They wrap well, wash well, cling well to whatever they are wrapping, and firm up nicely in the refrigerator without cracking. However I feel there is still room for improvement in our tropical climate, as when folded and stored in a drawer they become  just a little bit sticky. If they are left to hang up with the air circulating around them they are not as sticky. Perhaps I need to store them in the refrigerator, I am open to advice on this my friends if you have made some already. I was inspired by the story that I read on Going Grey and Slightly Green, where Nanna Chel the talented blog author, attended a Beeswax Wrap making demo in Toowoomba, Queensland as part of a War on Waste workshop.  I have basically used the same recipe that the workshop presenter Suanne from Green Dandelion in Toowoomba  presented at their workshop.

However  Suanne said that achieving the perfect beeswax wrap consistency can be tricky. You are telling me Suanne. The wax coating needs just the right amount of stickiness to grip, and just the right amount of flex so that it does not crack when moulded. She also emphasised that the type of beeswax you use can make a difference.  Our remaining Beeswax after extracting all of the honey needed to be rendered. Mr. HRK boiled it in water to purify it, and the beeswax then floated to the top as it cooled. I think our beeswax is very good quality, with no additives at all, as Mr. HRK boiled it down beautifully, in water, and it came out looking pure and golden. It also brought a lovely, slightly sweet and gentle aroma to the house, very similar to a beeswax candle burning.

Rendering our Beeswax
Below is the circular disc of beeswax after rendering waiting to be stored. It will still need to be processed further before it can be used. In the photo you can see a dead bee that has been caught up when the honey was being extracted. Throughout this process, unfortunately it is inevitable that a few bees will be stuck in the honey.


The only ingredient I needed to purchase to make the wraps was the Pine Rosin which is the ingredient which helps the wraps to stick and wrap better which after all is what they are meant to do. After some research, I purchased my Pine rosin online from Ballina Honey in New South Wales. I bought 400g of Gum Rosin Powder (Colophony, Pine Resin), for $26.00 plus $4.00 postage, from Ballina Honey, and it arrived within the week packaged in a brown paper bag (no plastic), in a sealed envelope. However if you want to give making beeswax wraps a try, I believe that premixed bottles of beeswax, coconut oil, and resin are available for sale at the Green Dandelion in Toowoomba, Queensland,  and no doubt at other places all over the world.

Firstly I bought some good quality cotton fabric (synthetic doesn't work) at Spotlight and washed it. Then we cut the fabric into squares using pinking shears to reduce frayed edges. In addition you will need a medium sized glass mason jar, Beeswax, coconut oil or you can use olive oil, avocado, argan or jojoba oil and the Pine Rosin. We used a solid glass Mason jar in a saucepan, and a small unused paint brush,  and double boiled the ingredients to mix and melt the ingredients together. Now there are several ways to make the wraps. You can do it in your kitchen oven at 150 deg. heat on a paper lined baking tray. Pour some of the melted beeswax onto the fabric and using a silicon brush or the back of a dessert spoon, spread the wax over the fabric. It doesn't need to be even as the oven will do the rest of the work for you.
My friends, the normal kitchen oven method isn't the method we used, oh no no no, not us,  as Mr. HRK wanted to be involved and suggested we process the fabric and beeswax in the barbecue outside on our patio. Part of the rationale behind this was to remove any risk of making a mess in our kitchen which I saw as valid, being our first attempt and the whole thing a bit of an unknown. So we melted the beeswax ingredients in a glass mason jar in a saucepan of water on the gas burner right next to our Barbecue, and brushed the beeswax onto the fabric on a large piece of granite leftover from our kitchen renovations. Hows that for innovation and further recycling eh? The thing is that all cottage industries, and projects completed at home can be changed to suit the people and layout involved. So here's how it went.

Tools laid out and prepared by Mr. HRK.


Beeswax recipe for making Beeswax wraps:

There are various ways to measure out the ingredients needed:

The Basic Ratio is 1 part Pine Rosin (2 heaped tablespoons)  to 4 parts Beeswax (8 Tablespoons) if you melt the beeswax first. Then add about 1 tablespoon of coconut oil ( or you can use Argan Oil, Olive Oil, Avocado or Jojoba), This is enough to make quite a few wraps, depending on the sizes you prefer.
If you want to start small and test if it works for you, the following is exacting and is enough to cover one piece of fabric measuring 25 cm x 25 cm. Just increase the amounts for the amount of fabric you wish to use:
  • 17 g beeswax
  • 5 g Pine rosin
  • 1/2 tablespoon coconut oil
Preheat the marble in the barbecue to about 150 degrees.

We placed the Pine Rosin, the Beeswax, and coconut oil in a mason jar in a saucepan of water and waited for it to melt. When melted, we turned off the gas, but left the jar in the saucepan so that it would stay liquid.


Meanwhile fabric was measured and cut by Mr. HRK with my orange dressmaking pinking shears.


Place fabric on the preheated piece of granite, and when the beeswax has completely melted, use a spoon and drizzle the mixture evenly over the fabric. Then using the paint brush or basting brush, spread the mixture quite thick and evenly over the fabric, including the edges and corners. If you put too much on, it will just stay on the granite after the wrap is removed and soak into the next one.


Leave the wrap on the granite or in the oven if you are using for about 2 minutes to reheat.This will also melt out any bumps or clumps. Remove wrap from the warm granite or oven tray and hang up to let set and to dry.

Here's our first Beeswax wrap hanging up to dry on a wire hanger on our patio. Looking good.


Another beeswax wrap featuring bees is finished.


Just continue with this process until all of the beeswax is used or you can store it with the lid on for later.

It's a wrap, and covering a bowl as it is meant to do, instead of Glad Wrap.


A few tips for using them:

To use beeswax wraps,  wrap up cut up fruit and vegetables, lunches including sandwiches and bread rolls, and use them to cover your plates and bowls.
To wash them, use a mild detergent in cool water. Pat them dry with a clean tea towel and dry them in the fresh air.
These aren't suitable for the dishwasher, the microwave, or the washing machine.
Better not to use them for covering raw meat.
Keep them out of direct sunlight, such as on the washing line.

Using Beeswax wraps is a different concept to what we have been used to with plastic. This is our first attempt at this and went well considering. I would love to hear from you if you have any other tips or tricks or experiences with them, and we are keen to make some more. If I am making the next lot on my own without Mr. HRK's help, I might try making them using the oven method.

When you have enough of these for your household use, they can also be incorporated into a gift and used as wrapping paper.

Thanks for dropping by,

Best wishes

Pauline


.

Sunday, June 23, 2019

Our Bee and Butterfly Friendly Tropical garden, some Exciting News, and a Delicious Quiche Recipe for you


Salvia, a perennial plant, loved by bees
We have been spending a lot of time in the garden lately, this time of the year in the
Tropics is beautiful one day, perfect the next. The mornings and evenings have turned quite cold here for us, 7 degrees minimum, but the days are sunny and clear. It is so relaxing and energising to be outside that I took some photos yesterday which I hope you will enjoy.  We have been focusing on planting annuals and perennials that our European and  visiting Native bees will be attracted to, and some herbs and vegetables,  and it is all coming together nicely. The birds and the butterflies are benefiting as well.


Basil is a mainstay in our garden, I can't have enough of it, and now that we have a beehive of busy European bees, I have let some of the bushes flower and go to seed, as the bees love the flower nectar. The native bees fly in from their hives to feast as well. Basil bushes look attractive in flower, however the bushes can become straggly, so they will need to be pruned back after flowering or just replaced if they become very woody. I haven't had much luck with sweet basil plants lately, however the Thai basil is very hardy, and is very flavoursome for making pesto. I'll be giving the sweet basil a try again soon though.


Do you remember this resilient old fashioned plant, the Coleus, which probably grew in your Grandmother's, Mother's or Aunt's garden? I think it is making a comeback and I don't know why it fell out of fashion from a lot of gardens in the first place as it is so colourful and the bees love the flowers. Frank the owner of our favourite local nursery, Country Garden's Mackay, recommended we grow it to attract the bees and they love it. It is a cinch to grow anywhere, takes very easily from cuttings, and is heat tolerant. I'm not sure how it would tolerate frost though as we don't get frost here. If you know anyone who is growing a Coleus plant, ask them if you can have a cutting or slip, plant it in the ground, and it should grow. Gardeners love to share. It needs to be pruned into shape regularly though as it grows quickly.


This pretty pink flower is a Buddleia. It is the first time we have grown it,  and we remember it growing like a weed in England, however Frank assures us it will be be a Bee magnet in our garden without any risk of it spreading like a weed, as it does overseas.


In this section of our sunny garden, the Buddleia, the purple Salvia, and the red salvia all invite the bees and the butterflies to visit. The large leafy caladiums provide a colourful contrast and the sunbirds love playing on their leaves after a heavy dew or a shower of rain as the water clings to the leaves and forms mini swimming pools for them to play in. Sorry I don't have a photo of the birds frolicking in the sun, you will just have to take my word for it. In the bottom righthand corner, are the last of the May flowering Chrysanthemums,  and some of my purple ground orchids flower all year round.

Our decorative and functional Garden wall.


The Garden Wall showcasing potted petunias is Mr. HRK's masterpiece and design. We also have lots of lilac and pink Pentas growing along the base of it.  The Pentas is a very hardy tropical plant, that the butterflies love, I am never without it.The bees fly around the Pentas but they are more drawn to the nearby basil and salvia at the moment. Orange, red and yellow Celosias in the square pot  at the end of the Garden Seat, also designed and constructed by Mr. HRK, make another nice show but don't seem to attract the insects. They just look pretty and self germinate very easily.


Our backyard Golden Penda, a tropical rainforest tree, is in flower at the moment and our bees think they have gone to Heaven. We watch them fly back to the hive covered in beautiful Golden pollen. The local Lorikeets haven't visited the tree this time so the bees can feed off the flowers uninterrupted. Whilst it's enjoyable to see the beautiful Lorikeets in the tree, they are aggressive feeders and the flowers and the leaves litter the ground after a Lorikeet feeding frenzy. The flowers also make a nice floral bouquet, if you can reach them.


Here is the Brazilian Red Cloak bush which makes a colourful addition to the backyard rainforest section of our garden, flowering in June. Whilst I don't think it is a Bee magnet, it provides a lot of beautiful red colour. Like all perennials, it responds to a good pruning after flowering.


Comfrey, or the Knitbone plant, is a perennial herb which has a long history of being used as a poultice for healing and for other medicinal uses. It's strong root system also adds valuable nutrients to the soil. I chop up the leaves and add them straight to the garden as a compost or add them to the compost heap to accelerate the composting process.  Once you have it in your garden, you will never be without it. As an added bonus, the insects love the pretty lavendar flowers.

Mr. HRK and I visited the local Riverside city markets in Mackay last Wednesday and came home with some vegetable and herb seedlings from a local grower who germinates his own and they always produce excellent plants. We don't have a large vegetable garden now, but we grow what we enjoy eating and what suits our climatic conditions.It is always a pleasure to pick some organic produce in season that we have grown ourselves.Yesterday we planted spring onions and climbing beans, and I repotted my mint and added a fresh plant to the mix and placed it in a sunnier position. In Summer it will be moved back into a protected spot. Mint is such a wonderful addition to so many dishes and drinks. We grow a lot of herbs, which I am adding to our food on a daily basis, and they also save us a lot of money.


A plate of radishes picked straight from our garden yesterday. I buy Mrs. Fothergill's seedling strips and plant those, and they have never failed. It's a fast crop and the radishes aren't as spicy as those purchased from the supermarket. Delicious and fresh.

I also thought I would share with you one of my favourite quiche recipes, because if you have been outside gardening all morning like me, something quick, easy and nutritious is the way to go.

Quick and Easy Spinach Quiche in a dish


I have just quickly made this quiche for lunch. It took no time at all and is delicious. This one is a cinch to make. If you have fresh spinach or silverbeet on hand, by all means use that, however, defrosted spinach from the freezer is easy to use and always on hand. This is perfect for a quick and easy weekend meal and serves 4. Take out the spinach a few hours in advance if possible to defrost, or use your microwave.

Ingredients:

4 eggs
100ml creme fraiche
100g grated Parmesan cheese or other flavoursome cheese
2 spring onions, diced
150g of frozen spinach, defrosted and drained (1/2 a packet)
1/2 tsp. ground nutmeg


Method:

Preheat your oven to 170 deg. C and lightly grease an ovenproof dish or use separate ramekins.
Whisk together the eggs and creme fraiche in a medium size bowl.
Stir in the rest of the ingredients and season with a little salt and white pepper.
Pour the mixture into your baking dish and cook in the oven for about 25 minutes. If you are using ramekins, bake for 10 minutes less.


Serve with a fresh salad for a light nutritious lunch.

Now for our exciting news. Last Saturday, we became Grandparents again, to beautiful little twins, a boy and a girl named Finn and Evie.  Being twins, they were born a few weeks early but thankfully healthy, however this week has been one of daily updates on their progress, lots of phonecalls from family and friends, and planning our visit to meet them. It's been busy. Premature twins require a lot of careful and tender care, however hopefully they will be able to go home tomorrow, after starting to gain some weight and overcoming a little jaundice. Our little Grandson Hugo, is so excited about his new brother and sister. We are ecstatic, and relieved that everyone is well.

I wish I was a better knitter, so that I could be making lots of warm items of clothing for our little darlings as they live in a cold Winter climate. That just might be my next challenge.

Best wishes

Pauline


Sunday, April 7, 2019

Our Backyard Honey Beehive Swarm moves into it's New Hive

One of our bees in our garden on the Salvia flowers
At last, we have moved our bees from their adopted Bird Box into their new hive, with the assistance of Keith Lang, who with his wife Denise own a local Mackay company, Pure'n Natural Honey. This has been a work in progress for a couple of months. Since I last wrote about our Bees (see previous story here), which had swarmed into the Bird Box located on our backyard Palm tree last Christmas, Neil (Mr. HRK)  has moved the Bird Box hive three times.  Down the tree, a metre at a time, at fortnightly intervals; then a metre across on trestles, toward the future location of the permanent hive; and then to a spot directly adjacent to the new hive. With minimal calming required from the smoker for each move, the bees coped remarkably well with each transition, and found the hive easily again after a day's foraging. I don't think we lost many at all.

The New Hive


Our original Bee swarm in the Bird Box on the Palm Tree

Neil has been building the boxes  and the internal frames with foundation wax, for two new bee hives, over the last couple of months, all from scratch, and all from recycled materials. The hives have been constructed from old waterbed timbers, including the bedhead and the frames that he was given. The honey extractor (centrifuge) is also built from scratch, from recycled pieces of metal and bicycle parts, except for the food grade bin. A couple of the metal components needed to be purchased online. All of that activity kept him well occupied. It is great to think this whole project has been very environmentally sustainable.

Home made State of the Art Honey Extractor (centrifuge)

The big day arrived last Sunday when the Bird Box beehive was to be relocated to the new Beehive, which is set above the ground on a concrete slab amongst the rain forest area of our garden. Keith arrived early and equipped to help us move the hive. There is a lot to it, and Keith has years of experience and knowledge with bees. In fact what he doesn't know about bees, hives and honey probably isn't worth knowing. The hive was smoked carefully and the process began. This needs to be a very gentle and slow activity, so that the bees don't get stirred up and start attacking. Keith and Mr. HRK donned their bee suits and started dissecting and analysing the combs  in the bird box. I was also wearing mine as a precaution, as I was the brave photographer.

The inside of the very full Bird Box Hive


It is important to check for disease with a hive like this one. Thankfully overall it is a healthy hive. Keith found only a few small hive beetles which he thought was pretty good and placed a bait in the hive for them. There was also a little chalk brood in there which apparently is because of the moisture which could enter the bird box, but otherwise it was all looking good.


Below are Neil and Keith checking one of the brood combs from the original hive,


The search was on for the Queen Bee and any signs of problems in the hive. Just in case he couldn't find the Queen, Keith had brought a new Queen with him. Most of the combs had been moved and the bees dropped carefully into the new hive when Neil spotted the Queen Bee, right at the bottom of the bird box. The clever girl had been evading discovery up until now.

There she is, where he is pointing.

K


A rather fuzzy closeup of the Queen Bee
Keith, who I must add has been gloveless throughout this operation and miraculously only suffered one bee sting, carefully picked her up near the head and separated her into a small box for relocation later. She was then given a dab of pink paint for easy recognition later in the hive by us.

The bees had built beautifully consistent rows inside the Bird Box which Keith attached to the frames with rubber bands and carefully placed into the new hive. All the wooden frames were constructed by hand by Neil.


Below, the brood box is successfully completed with the Queen Bee excluder in place. The second box in this picture was used to keep all the bees together and with a little smoke they retreated in to the brood box.


It's all going well and getting ready to take the extra box away.


Feeding the Bees

There was little food in the hive for them,  because of the difficult weather conditions that bees have been coping with lately.  They need some of their own honey to feast on. However Keith brought a new frame from one of his hives laden with honey that the bees can enjoy. So they will be ok.
We also made up a sugar and water syrup solution for them to eat and to help with the readjustment.

Sugar and water bee syrup  recipe: (There had to be a recipe somewhere in this story.)

Boil the kettle and measure one cup of water or use one cup of distilled water. Add one cup of sugar and stir until sugar is dissolved. When cool, add this solution to a plastic sandwich bag, and press the edge closed. Remove the lid, and place it on the top rack in the beehive and gently cut two small slots into the top plastic surface. Press the surface very gently so that a little of the solution seeps through, and watch the bees crawl toward it and start feeding. This should keep them fed for three days in addition to what they forage out in the garden. Smoke the hive, and check the sugar bags in three days, and replace until there is enough food in the hive for them to live on. We used two smaller bags as we didn't have any normal sized sandwich bags.

The metal Queen excluder which the Queen can't fit through but the honey bees can, was placed above the brood box in the hive.  The brood box contains all of the brood comb that was  inside the Bird Box.

Close up of the sugar syrup bags and the bees and the black hive beetle bait box in the background. On the left is all the comb with honey that was attached to the top of the bird box hive.


Neil cutting small slits in the bags
Shortly after the move and closure of the hive, the bees were exploring their new home. We left a small portion of the Bird box hive comb outside the entrance slit which is at the base of the box, as the bees will be attracted to it's scent and find their way home much more easily. The top goes on with the honey comb, sugar syrup and bait inside.


Neil has replaced the repaired bird box back onto the palm tree in the hope that we may attract another swarm. Keith suggested we add a couple of drops of lemon grass oil to the box as an incentive for another swarm of bees to settle there. Our bees had also built a comb outside the bird box so they were possibly looking at expanding or swarming again.

Neil and I still have a lot to learn about beekeeping, but we have also come a long way since Christmas. I hope all of the experienced beekeepers and Apiarists who read this will be kind with their thoughts about some of my beekeeping terminology. By blogging this, I hope we will also receive some interesting comments or emails from you, dear reader, and that we will continue to learn and enjoy our bees.


A Bee Friendly Garden

We are aiming for a Bee and Butterfly friendly garden, and are particularly conscious now of growing plants that will attract and feed our bees. They are loving the New Guinea bottlebrush at present, and if you look carefully you should be able to see the bee in the middle flower in this photo.


They also love the purple Salvia flowers (photo at top of page) we have growing in a few spots, and we recently purchased a few  Coleus plants. Remember that old fashioned hardy plant with a variegated leaf which our Aunts and Grandmothers always had in their gardens? It's making a comeback and the bees just love the blue/mauve flower spikes it produces. Ours is yet to flower but it shouldn't be long. Wandering Jew is another old fashioned plant that sends bees crazy with desire, however it also goes crazy in the garden and will take over so it needs to be planted in a sunny spot where it can be the boss. We are gradually adding to our garden of bee attracting plants and I'll write another story about this at a later date.

The biggest benefit for us with having bees besides the honey they will produce, is their pollination of surrounding  fruit trees, flowers,  and vegetable gardens, and for the neighbours as well. On an optimistic note, we are hoping to harvest some of our own honey by next October, for our own use and a few gifts.

Speaking of honey.......


 I am very happy to be able to promote a wonderful, local honey product, produced by Pure'n Natural Honey. This is a family owned Mackay business. Their beehives are placed in carefully selected pristine bushlands, and also move their hives to local farms growing macadamias and citrus to assist them with their pollination. The honey is 100% natural and raw and tastes delicious with well known health benefits. Also thank you to Kylie for providing me with the Pure'n Natural honey photo.

Products can be purchased by clicking on this link, or visit the Wednesday morning Farmers Market at Bluewater Quay in Mackay. The product is also sold at various Airlie Beach outlets, and is used by numerous restaurants and cafes in the region. You can also keep up to date with what is happening by subscribing to their Blog here.

We are very fortunate that Keith from Pure'n Natural Honey has provided a lot of his support and knowledge with our backyard bee hive, and as part of their business initiative, assisted us with successfully moving our hive.

Mr. HRK and I  would love to hear from you with any advice, comments etc, which you can provide either through the email box on the side bar of this post or in the Comments Section at the end of this post. Click on the title link at the top for the Comments page.

Thanks for dropping by,

Best wishes

Pauline