Showing posts with label Summer meals. Show all posts

Wednesday, November 26, 2025

Lamb chops with crushed minted peas and feta cheese


This is the perfect way to showcase tender and succulent Lamb loin chops, cooked to perfection on the outside patio Barbecue, or in your kitchen in the frypan.  Not much adornment, a simple approach, delivering maximum flavours, with just a fresh herb and vegetable side of peas, mint, pine nuts, and feta cheese. 

Friday, January 12, 2024

Vietnamese Chicken Salad

The secret to this delicious Vietnamese style chicken slaw is the perfectly balanced dressing ingredients and the wombok cabbage which forms the basis of the salad. Oh, and the juicy shredded chicken is a pleasure to eat. I've tried a few different Vietnamese Chicken Salad recipes over the years, but with this recipe Nagi Maehashi of Recipe Tin Eats fame, has really nailed it. I know that a lot of you have her Recipe Tin Eats book "Dinner" by now, and this recipe is published in that, however I have given you a few extra tips and tricks for making this salad from the perspective of the home cook. 

Sunday, May 1, 2022

Orange and Barley Salad followed by Coconut Lime Syrup Cake, it's a citrussy kind of day

This grain salad has citrussy hints of Spring cooking with orange and lemon, however in Sunny Queensland even in Autumn it is a beautiful Autumnal salad. If it's warm weather where you live, and you feel like eating a nutritious and delicious salad this is the one for you.

Saturday, November 27, 2021

Edamame Bean and Tuna Salad


Edamame beans are a delicious addition to any salad. Full of fibre, and protein, they bring green freshness, crunch and are filling to eat. Edamame are young soybeans, harvested before they turn brown. I've made this salad a few times, always with a slight variation, however this is the basic recipe I use. 

Wednesday, August 7, 2019

Rhubarb Fool with Crunchy Granola topping


This is an Australian version of Rhubarb Fool, and might I say a healthier recipe for this traditional British dessert. It also works well for breakfast, if you like yoghurt and fruit style breakfasts, even though rhubarb is technically a vegetable often served as a dessert. It is a simple dish to bring to the table, combining honey with the bright, tart flavour of rhubarb, and layering the rhubarb compote with yoghurt, or even thickened cream if you wish. The nutty granola topping exceeded  my expectations and has the wow factor, and is also great to snack on. Rhubarb is in season at the moment, so it is an economical buy and easily found at the supermarkets or Farmers Markets. It doesn't grow well where I live because of the mild Winters and humidity once Spring arrives, so I try to track down a supplier which sources well from down south.  However in cooler Australian climates and the Northern Hemisphere where you are spoilt for choice, good quality rhubarb will cook up beautifully. This is a cinch to make and a dream to eat.

When I saw the very talented Paul West, demonstrate this dish on the ABC lifestyle program Gardening Australia, I was fascinated as we have spent quite a lot of time in England over the years, but I have never been offered Rhubarb Fool to eat although I had heard of it. The Fool originated in England in the 15th or 16th century, so it's a classic. By now there are many interpretations out there of how it can be served. I like to eat elements of a dish separately, and then if I want to mix them together I can. Many of the recipes combine the rhubarb and cream or yoghurt together in the serving dish and that could be easier I suppose, but I like to be able to identify the individual flavours. How about you my friends, do you prefer to have them mixed together or served separately, and have you ever eaten Rhubarb Fool before? Is it too much of a pun to say that any fool can make this dish?

This recipe can also easily suit gluten free diets.

Let's cook:

Ingredients:

Serves 4

6 rhubarb stems or a small bunch, leaves removed and base trimmed, chopped into 5 cm lengths
1/4 cup lemon juice (Half a medium sized lemon, half an orange will also work)
1/2 cup of water
2 tablespoons local Australian honey ( or your local overseas honey)
2 tablespoons Natural yoghurt or thickened cream (A ratio of 3:1 - yoghurt and thickened cream is delicious and still on the healthy side.)
1 tablespoon finely chopped Stem Ginger in Syrup (If you are passionate about ginger like I am, you can also add some interest and heat by adding some finely chopped and drained stem ginger in syrup to the rhubarb or through the yoghurt, about 1 tablespoon, more if you like it hot)  I love to make my own Stem Ginger in Syrup and here is the link to my recipe. LINK

Method:

Place the chopped rhubarb pieces into a cold fry pan, and arrange in one layer
Add the water and lemon juice to the rhubarb
Drizzle the honey over the rhubarb
Heat the fry pan to a medium heat, and cook the mixture for about 5 minutes, or until the rhubarb is softened but still holding it's shape
Remove the rhubarb from the heat and allow to cool


Crunchy Granola recipe:

1 tablespoon coconut oil
2 tablespoons local Australian honey ( or your local overseas honey)
1/4 cup flaked or slivered almonds
2 tablespoons pepitas or linseed
3/4 cup Macadamia nuts, roughly chopped (a must)

Method:

Place your pan on a low heat and add the coconut oil and the honey.
Add the flaked or slivered almonds, the pepitas, and the macadamias. Cook over a steady heat for 5 minutes to toast the nuts.

Allow to cool.

So delicious
To serve, place two tablespoons of yoghurt into a small glass or bowl, and top with one generous tablespoon of rhubarb and a little extra syrup. Finish with one tablespoon of granola. I made this for the two of us and there were plenty of leftovers for the next two nights.

Presentation:
  • Doll it up at the end with a couple of mint leaves, or something pretty and edible. If you decide to go without the granola, traditionally it can also be served with a shortbread biscuit, just for something sweet and crunchy.
Best wishes, 

Pauline


Monday, November 12, 2018

Tropical Pavlovas and Pretty Golden Dancing Ladies


My Dancing Ladies are making a lovely golden show this year, with three of them flowering at the moment. They are from the Oncidium Orchid family, and when not flowering don't attract a passing glance at all, like most orchids probably. However when they decide to send out a long spike or two, I get quite excited knowing that in about a month a mass of golden blooms will emerge. These are all originally my Mum's orchids, and have been broken up, repotted and I've learned a lot as I went along.

Keep reading for my Tropical Pavlova recipe below.


I never water the Dancing Ladies at night, as the roots are quite fragile and like the sun to dry them off during the day. I've also learned that they like to grow either in hanging baskets, or in plastic pots with holes drilled around the perimeter of the pot so that the roots can find their way out of the pot to breathe. Despite those little tips, the photo below is of one in a terra cotta pot and it has flowered, although it didn't produce a long spike, but is a very pretty golden shade. Orchids can happily defy all established conventions when left to their own devices.


This one is a darker yellow growing in a hanging basket which needs repotting when it stops flowering.


Below is my Dove orchid, growing on our Golden Penda tree.  It began to break out into delicate white fragrant blooms on Thursday, and by Sunday it was raining. They are the most reliable weather forecaster around. A profusion of these white blooms is a wonderful sight, with the promise of showers to come. Their fragrance is delicate and intoxicating. However, along with the Bureau of Meteorology, they have been known to occasionally get it wrong, just saying, but not very often. If you have a Dove orchid, have you found this as well?


It's Pavlova time.


Everyone loves a good pav don't they, especially for dessert during the Aussie Summer. Pavlovas aren't difficult to make and the wonderful thing is that if by some chance it doesn't work out and has too many cracks in it and collapses, it can easily be converted into Eton Mess, one of my most favourite desserts. Or you can just buy meringues and make Eton Mess from them. This is my
 Eton Mess recipe. Easy peasy. A delicious and easy Summer dessert and ingredients are exactly the same. I believe the original idea came from Eton College in England, when a pavlova didn't work out and was reconstructed to become Eton Mess. I like the story anyway.

I think everyone in Australia and New Zealand for that matter, given the controversy about where it originates from, has their own Pavlova recipe in their cooking repertoire. I've certainly tried a few over the years, however these days my no fuss easy Pav  recipe to go for is this one my friends, straight off the back of the White Wings Cornflour packet. And it's great to know that if I have gluten free guests coming for dinner, cornflour is gluten free. Need to check the vinegar though. It's also nice to know that White Wings is still an Australian company, even though I notice that the ingredients in the packet are packed in Australia from imported ingredients. How does that happen?

I generally keep a container of 6-7 egg whites in my freezer. There is always something I have cooked which only needed egg yolks. Egg whites thaw beautifully for reuse.This recipe makes a marshmallow pavlova, crisp on the outside with a firm marshmallow filling. Yum.

A warning though, don't attempt to make a pavlova if there are rain showers hanging around, unless your air conditioning is on constantly, removing all of the humidity from the air. Pavlovas start to weep after cooking if their is too much moisture in the air, and then you will weep as well. If you intend to eat it straight away it should be ok.

Pavlova Ingredients

6 egg whites
1 1/2 cups caster sugar
6 tsps Cornflour
1 tsp White vinegar
To serve:
300ml thickened cream, whipped
Fresh fruit to decorate, hopefully including a couple of sweet fragrant passion fruit. I used strawberries, kiwi fruit, and blueberries. 
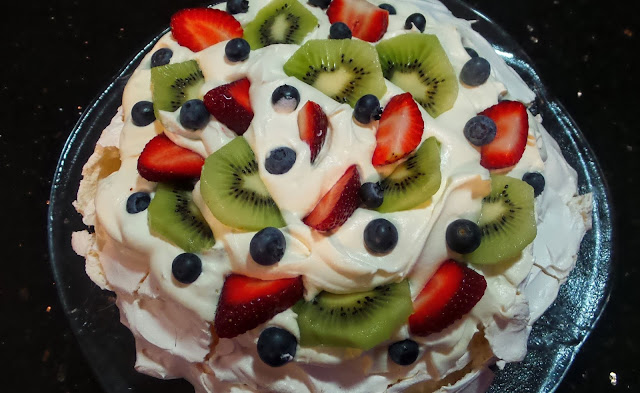
In an ideal world I would have had some beautiful passionfruit to add to the topping

Method:

Preheat your oven to 120 deg. C. conventional or 100 deg. C. fan forced. Draw a 20 cm circle in pencil on a sheet of baking paper. I use a 20 cm cake pan as a guide for this. Place the paper, with the pencil circle side down, onto a greased oven tray. Just a biscuit tray will be fine.

Have your Mix Master, Kitchen Aid or whatever you own ready to go with a whisk attached. I don't think a hand held mixer is really the go for the mixing of a pavlova.

Put the egg whites and sugar into a large mixing bowl and beat with your electric mixer on low speed for 1 minute. Increase the speed to high and beat for 15 minutes or until the mixture is thick and glossy. Then add the cornflour and the vinegar and beat on low speed  for 1 minute longer.

Spoon the thick eggy mixture onto the prepared and lined tray, spreading carefully out to a 20cm circle to fit your pencilled shape.

Tricky part is over.

Bake in your preheated oven for 2 hours or until crisp. Don't worry if you see a couple of fine cracks in the crust. Turn your oven off. Then cool the cooked pavlova in the oven with the door left ajar for 1-2 hours.

Hold your breath, (just joking) and transfer the pavlova carefully to a serving plate. A miracle has occurred, it will be delicious.

Cover with whipped cream and decorate and enjoy.

Warm wishes, keep smiling and I hope you enjoy your Monday.

Pauline


Wednesday, October 10, 2018

Beetroot Hummus, a delicious vegetarian dip


In Australia, Summer doesn't officially commence until December 1st and continues through the three hottest months of the year until the end of February. Here in North Queensland, though, it feels as if Summer has arrived, although by December 1st it will probably be much hotter, unless we receive some much needed rain. I think it's fair to say though that in my part of the world, the Barbecue season has begun, which also involves invitations to Barbecues at friend's houses. Different cultures have different ideas about what to take to a friends house when invited for a BBQ (the Aussie abbreviation for a barbecue), however here in North Queensland, we always ask what the host would like us to bring, which is generally some beer or a bottle of wine, or a salad, or a dessert, or just a dip. Beetroot Hummus isn't just a dip, it is the perfect dip to take and there is a fair chance that not many people there will have already tasted it, not one homemade from scratch anyway.

If I have time, I always make this dip from scratch, which involves buying the fresh beetroot from the Farmer's Markets, boiling them, allowing them to cool and then removing the skins, chopping them up, and whizzing them up in the food processor with the other ingredients. The flavours are earthy and sweet, and the colour is a vibrant rich pink, one of my favourite colours for lots of things. Beetroot hummus can also be made from tinned or bottled beetroot which is fine, but the natural earthiness of the beetroot is slightly camouflaged by the pickling vinegar. Take this to a BBQ or even to a dinner invitation with some flatbread, sourdough bread, chopped vegetables or even crackers, and it will be a winner. I try to keep a batch in the refrigerator as a snack in between meals if we are feeling peckish, as it is very healthy and keeps for a couple of weeks. It also freezes well. I hope you try this recipe this weekend as I know you will enjoy it.

Ingredients:

450g freshly cooked, cooled, peeled and chopped beetroot, or tinned or bottled chopped beetroot
400g freshly cooked chickpeas, or  tinned chickpeas
2 garlic cloves, roughly chopped
1 tablespoon tahini
1 tablespoon lemon juice (or 2 for more of a tang)
2-3 tablespoons Extra Virgin Olive Oil

Method:

Place the cooled and chopped beetroot, chickpeas, tahini, lemon juice and garlic in the food processor bowl and whizz up until thoroughly mixed to a paste.

Keep the motor running and slowly add the olive oil though the chute of the bowl. The mixture will thicken up and become smooth and start to develop some shape from the blades. Add a little more oil and lemon juice if it is still too thick.

Season with salt and pepper to your taste, mix again and spoon into your serving bowl.

Serve with warm sliced Turkish bread or Sourdough bread.

 I like to garnish mine with black and white sesame seeds and chopped parsley.


For more hummus recipes see:
Home made chickpea hummus
Parsley hummus

Add some pickled zucchini as well to the platter for extra pizazz.

What do you like to take to a BBQ if you are invited to one, and has your BBQ season started yet?

Hoping you have an enjoyable day in your part of the world, and keep smiling.

Best wishes,

Pauline