Wednesday, August 31, 2022

Spring Lamb and Vegetable Shepherd's Pie


 On a cold and wet day, leading into Spring, and we're having a few of those right now, this Shepherd's Pie will be your favourite go to comfort food, a nutritious feast of lamb and vegetables and lots of gravy, topped up with creamy mashed potato baked until it is golden and crispy, and drizzled with butter and grated parmesan. I don't generally follow a recipe when I make this pie at home, drawing on what's already in my head, but when I started to write it up, I realised there are quite a few steps involved. However, the lamb mince can be cooked in advance the day before, or even frozen, and assembled with the potato just before baking. The best part is that once it's in the oven there's no other prep work needed. Just pop it on the table for everyone to enjoy. Because I've made Shepherd's Pie more times than I can remember, I was wondering if this lamb recipe was actually blogworthy, that is until I made it this time, and all over again I fell in love with the piquant deliciousness of the dish. Simple as that.

September is Spring Lamb season here in Australia, and that's right now, when the best lamb should be on offer for the consumer, so now is the time to start planning some lamb meals. Just to clarify, Cottage Pie is made with Beef and Shepherd's Pie is made with Lamb. There, that's settled. Except for the difference between using lamb or beef, they are basically the same recipe. So I hope it doesn't confuse you if I say, a Shepherd's Pie made with beef is a Cottage Pie, and a Cottage Pie made with Lamb is a Shepherd's Pie. The type of mince is interchangeable. And as beef mince is generally more reasonably priced than lamb, I can understand why a Cottage pie would be the preferred option. However, I just love the unique flavour of lamb mince in a Shepherd's pie. 

With the cost of meat and fresh vegetables skyrocketing now, how do families with children afford to buy enough food for nutritious meals? With this in mind, I based this recipe on 500 g of lamb mince and added lots of vegetables so that this meal feeds 4-5 depending on meal portions. I am always a bit reluctant to categorically say how many people a main meal feeds, as it depends on meal portions so I always say this as a minimum, however to play safe this fed three of us comfortably for the main meal and then there was enough leftover to feed us all for lunch again the next day, so with all of the vegetables added, this feeds 6 people.

I like to taste as I cook to get the seasonings just how I like them, however by the time I have finished cooking, it is difficult sometimes to really know how it tastes. Do you find that? So Mr. HRK often very obligingly does a taste test for me at the end of the cooking time, and generally he is happy with the result. The quantities in this recipe suit my tastes perfectly, I like a little sharpness in the gravy that the Worcestershire sauce gives.

With the weather forecasters predicting a wetter than normal spring for us here in Queensland, and Winter on the way in the Northern Hemisphere, there are going to be plenty more opportunities to make this delicious dish. I've been making Shepherd's pies and Cottage pies for as long as I can remember cooking, and before that it was a favourite of my Mum's on the dinner table during cooler weather as well. I heard Taylor Swift say in a speech the other day that everything old is new again! If this can apply to music, I believe it can also apply to cooking, just not tripe, please.

Ingredients:

Feeds 6 people

500 g lamb mince, or beef mince

1/2 tablespoons olive oil

1 large onion, peeled and finely chopped

1 large carrot, peeled and finely chopped

1 stalk of celery, strings removed and finely chopped

125 g mushrooms, coarsely chopped

1 chopped red capsicum

2 garlic cloves, finely chopped

1/2 tablespoon mixed herbs (or if you grow the fresh stuff, 2 sprigs fresh thyme and 1 small sprig rosemary, leaves finely chopped, add 1 tablespoon fresh chopped parsley as well if you have it)

1/4 cup (25 g) plain flour

1 tin chopped tomatoes

1/2 cup red wine (optional)

1 cup beef stock

2 tablespoons Worcestershire sauce

1 tablespoon tomato sauce (or use tomato paste if you prefer)

1 bay leaf

1 cup frozen peas

Salt and pepper

Mashed Potato crust ingredients

1 kg potatoes or (I used about 5 big ones for this recipe) peeled and cut into 3 cm cubes

2-3 tablespoons grated parmesan

1 tablespoons butter

2/3 cup (165 ml) whole cream milk 

Fresh thyme leaves to garnish if you have them

White pepper

Method:

The basis of a delicious and flavoursome mince, soup or stew is the soffrito, which means fried slowly, and is the combination of slowly sauteed onions, garlic, carrots, and celery.

Heat the oil in a large frypan to a medium heat, and add the onion and garlic, and cook until the onion starts to look a little transparent. (You may need to lower the temperature, so the onion doesn't cook and brown.) Add the carrots, celery, capsicum and the herbs. Cook all of this on a gentle heat for about 3 minutes until softened. All of the vegetables will be turning sweet at this stage.

Increase the heat on your hotplate to high, add the lamb mince. Cook, breaking it up with a spoon along the way, until the meat is browned and all of the ingredients are nicely mingled.

Add the tomatoes, red wine, tomato sauce, beef stock, Worcestershire sauce, mushrooms, peas and bay leaves. Stir well. All the ingredients should be in the pot at this stage. Bring this mixture to a rapid simmer on a medium heat. Cook for about 30 minutes, keeping an eye on it and stirring occasionally, until the liquid reduces and all the vegetables are cooked. At this point we haven't added any flour for thickening.

Thickening the lamb mince mixture:

I prefer to make a mixture of flour and water to add for thickening, starting with 1/4 cup of plain flour and adding enough water to form a smooth paste. By the end of the cooking time, the amount of liquid determines how much flour paste to use. On a low heat, add this paste gradually to your mince mixture until it is the consistency you like. It will thicken up very quickly. It's important not to thicken it too much so there is still a lot of rich delicious gravy. However, the consistency of your mince after thickening is what it will be after the end of the cooking time for the pie, so ensure it is thick enough, we don't want lamb soup. I've added this amount of flour to play safe, but I don't always need to use it all, or I might need more. You will need to be the judge.

Place the mince in your pie plate, cover and refrigerate. It's important that the pie mince is cold or at least cool, before adding the potato. If you are running short on time, pop the dish into the freezer to cool down, while you are making the potato.

The Potato Layer

Preheat oven to 180 deg. C/350F.

Cook the potatoes in salted boiling water until soft. This will depend on the size of your cubes or slices however about 15 minutes is the minimum to cook them. Definitely test them after 15 minutes.

Drain the saucepan, then return saucepan to the stove, steam dry the pot for about 30 seconds to remove any water, then add enough milk to the pot to cover the base, about 2/3 cup. Bring this milk to the boil in the pot, remove the pot from the stove immediately. Add the butter, a little white pepper, and start mashing. This method always ensures a creamy potato. It's important that the potato is spreadable and smooth, but definitely not sloppy. Too much milk and water left in the pot will make it sloppy.

Spread the mash onto the pie. The potato needs to be hot so that it spreads well onto the cold mince. I use a fork to draw squiggles onto the surface of the potato, which ensures all of those little peaks will crisp up and brown up. My friends, this is an essential step, and is a tradition going right back to the Shepherd Pies I remember as a child. Sprinkle with the parmesan cheese or any other grated cheese, and drizzle with a little melted butter.

Bake your pie for 35 minutes, until golden on the top, and the mince will be bubbling around the edges. I always place a baking tray on the bottom of my oven to catch any overflow, just in case a little bit drizzles over the edge. That is quite normal.

Leave it to cool for 5 minutes on a cooling rack, sprinkle with thyme leaves if you have them and serve, with a side of green broccoli or whatever vegetables you have on hand. However, that's not totally necessary when the pie contains so many hidden vegetables.

Recipe notes:

  • Red wine, yes definitely as an option
  • You will have noticed that I mentioned to remove the strings of the celery. I had no idea that the strong strings of the celery can aggravate a sensitive gut, until I visited a dietician recently. I had started to take the easy path of not destringing celery, of not peeling cucumbers, thinking that we should be eating every part of the vegetable that nature has provided us with. However, there are dietary aggravators which we can do without, particularly as we get older, so I'm going with my newly acquired knowledge, however it is up to you.
  • My Mum used to place a layer of seasoned sliced tomato on top of the mince, before adding the potato, which we all loved, however cooked tomato in this kind of recipe can be a bit divisive so I haven't added it to the ingredients or method. If you aren't adverse to cooked tomato give it a go, you will be pleasantly surprised. I am smiling to myself as I write this, as I know which of my friends and readers will be grimacing at the thought of the tomato, ha, ha.
  • The cooked mince needs to have plenty of flavour, so add a touch more sauce and seasonings until it suits your taste. Or pull in another adult in the house who isn't doing the cooking and give them a fresh taste to see what they think. Potatoes are cheap to buy, so load up the potato topping I say. Everyone loves the mashed potato with the crispy crust.
  • Some cooks prefer to add the flour for thickening to the mince mixture before adding the sauces, stock and wine. I've just always done it the way I described above. I don't think it makes a lot of difference. Either way, extra water or stock can be added if necessary for the perfect gravy, or it can be further thickened.
  • It's preferable to cook the mince mixture in advance so that it can be refrigerated before assembly. This makes it easier to layer the potato crust onto the mince.
Warm wishes to you all, and I hope this lands in your inbox for Spring, or Autumn in the Northern Hemisphere. A change of season is always a nice thought and I love Spring and the Spring flowers. It really puts a spring in my step. I hope it does for you as well.


As I hit the button to publish this post, the sun is shining. Wonderful!


Pauline xx

Wednesday, August 17, 2022

Parsley, Pumpkin and Beetroot Hummus: a superb trio of flavours and colours

 My kitchen has been humming this week, I've been making lots of hummus, using up excess parsley in our garden, and the rest of that large pumpkin I bought a couple of weeks ago. Remember those pumpkin scones I made just recently, well what with  pumpkin being such a versatile vegetable, it has now been mashed again and whizzed up and transformed into some very tasty and healthy hummus.

I nearly didn't manage to make any hummus at all, as my food processor stopped whizzing, actually it never started. The clicking attachment on the lid which secures it to the bowl broke, and I was sure that this time it had really bitten the dust. It had been repaired once before already. Mr. HRK walked in just as I was about to toss it out quite ceremoniously, and prepare for a shopping excursion to buy a new one, and then he confidently announced he could fix it. I really thought he had buckleys of repairing it again. Oh, ye of little faith. So my 30 year old food processor, perhaps I'm exaggerating but it is quite ancient, and was still working perfectly before it broke, was whizzed off to the man's shed. 2 hours later after much drilling, and toing and froing to the kitchen for testing purposes, the lid was fixed. There is now  a new metal piece inserted in the lid which clicks beautifully into the bowl and my workhorse of a food processor is now working even better than before. So it's had a complete clicking mechanism replacement. Good to go while the motor can keep running.

This photo is from a previous post I wrote, but the story is new.

I've been happily giving away lots of flat leaf parsley over the last few weeks, as we have been fortunate to have four large plants which are thriving. The secret to our success we think, is the  cow manure which Mr. HRK shovelled from the driveway of a friend's cattle property, liquefied it, and dug it into our garden in preparation for Winter planting. So I've also made a couple of batches of this parsley hummus and it is delicious, with a fresh vibrant green hue, the colour of life.

PARSLEY HUMMUS

Ingredients:

2 garlic cloves, roughly chopped
2 cups well cooked chickpeas (garbanzo beans), drained and rinsed
1/4 cup lemon juice
3 tblsp. good quality extra virgin olive oil
3 tblsp. reserved chickpea liquid or water
1 1/2 cup parsley leaves, packed down, not the stalks
1/2 tblsp. cumin powder
1 tblsp. tahini
1/2 teaspoon ground black pepper
Salt to taste

Method:

Place garlic in the food processor and process until chopped.
Add the chickpeas and grind them up before adding other ingredients.
Add the liquid ingredients and process until well mixed together.
Add the parsley and the remainder of the ingredients.

Add extra equal quantities of olive oil and water very slowly through the chute until the a nice spreadable consistency is achieved. It will start to flow around the bowl when it is the right consistency. Chickpeas that I have cooked myself often require additional liquid to be added. Taste it and add extra seasoning, lemon juice, or spice if you think it needs it.

Pumpkin and Parsley hummus were delicious on our cheese platter

PUMPKIN HUMMUS

Makes approximately 440 g or 2 cups

250 g (1 cup/9 oz) cooked and mashed pumpkin

400 g cooked chickpeas, or 1 tin of purchased chickpeas

3 garlic cloves, finely chopped

3 tablespoons lemon juice

2 tablespoons hulled tahini

1 tablespoon chickpea cooking liquid or water

1 1/2 tablespoons Extra Virgin Olive Oil

2 teaspoons ground cumin

1 1/2 teaspoons smoky paprika

1 1/2 teaspoons salt

Method:

Place the chickpeas, garlic, lemon juice, water, and Olive oil in the food processor bowl, and process until smooth.

Add the remaining ingredients and process until smooth. Add more water or chickpea cooking liquid for a thinner consistency, and taste the mixture to see if more lemon juice is needed. 

I always taste the hummus after the final mix and sometimes add a little bit extra of a few ingredients to achieve the taste I like, but the quantities in this recipe are how we like it. 

Cooks notes:

  • Canned chickpeas purchased from the shop can be used, but for best results you will need to measure out 400 g of actual chickpeas, not just the contents of one 400 g can. Reserve the liquid from the tin to thin out the hummus if necessary.
  • To cook your chickpeas, cook 200 g (7 oz) dried chickpeas in lots of water with 1 teaspoon bicarbonate of soda for 30-40 minutes, or until tender, drain off the liquid for using later, and use.
  • I used mashed Kent pumpkin (Jap) for my hummus.
  • This pumpkin is using the last of my whole pumpkin which I bought from the farmer to make Pumpkin Scones during International Scone Week

BEETROOT HUMMUS

This hummus  has a sensational flavour and so much colour. I promise you it will bring pizzazz to your plate. I have revived my previous recipe for this post.

Ingredients:

450g freshly cooked, cooled, peeled and chopped beetroot, or tinned or bottled chopped beetroot
400g freshly cooked chickpeas, or  tinned chickpeas
2 garlic cloves, roughly chopped
1 tablespoon tahini
1 tablespoon lemon juice (or 2 for more of a tang)
2-3 tablespoons Extra Virgin Olive Oil

Method:

Place the cooled and chopped beetroot, chickpeas, tahini, lemon juice and garlic in the food processor bowl and whizz up until thoroughly mixed to a paste.

Keep the motor running and slowly add the olive oil though the chute of the bowl. The mixture will thicken up and become smooth and start to develop some shape from the blades. Add a little more oil and lemon juice if it is still too thick.

Season with salt and pepper to your taste, mix again and spoon into your serving bowl.

Serve with warm sliced Turkish bread or Sourdough bread.

 I like to garnish mine with black and white sesame seeds and chopped parsley.

Add some pickled zucchini, in the background,  to the platter for extra oomph.

I'm posting this quickly before I start packing. Not my favourite activity, packing that is, but it's a means to an end and the thought of a road trip North has us excited. It's the perfect time of year to head to Far Northern Queensland, it's still much too cold further south for us tender Queenslanders. We'll leave that until later in the year.

Thanks for stopping by,

Warm wishes

Pauline


Tuesday, August 9, 2022

Pumpkin Scones: celebrating International Scone Week 2022 #ISW2022

It's International Scone Week 2022, where bloggers from all around the world unite to bake scones and share recipes through their blog posts. I've decided to bake some delicious and golden Pumpkin Scones for this event.

Thanks to Tandy from Lavender and Lime who is hosting #ISW2022 on her food blog. This is a wonderful reason to get stuck into some serious baking, and it's given me the incentive to bake some Pumpkin Scones, 3 dozen of them in fact, yes it's been a baking frenzy here, and Mr. HRK is loving it. They also freeze very well. Once you are organised, these scones are super fast to make and bake. This morning as one batch was baking, I made a second batch, and they were ready to place in the oven just as the first batch was cooked. 

2nd batch

I've chosen to make an iconic Queensland recipe, Pumpkin scones. I'm calling it a Queensland institution rather than an Australian one as Lady Florence Bjelke-Petersen is best known for her Pumpkin Scone recipe. Even though she was the wife of a former Queensland Premier, Sir Joe, and they were prominent and quite controversial political figures, her scones are her true legacy.  Regardless of any particular political persuasion, most women and men who bake scones often, know of her recipe, and here it is. I've been meaning to make these scones for years. 

Before you start baking pumpkin scones, don your apron, and organise your ingredients, because my friends it can be somewhat of a fun flour fest in the kitchen during scone baking, particularly pumpkin scones because it is a moister dough. Flour needs to be spread over your kitchen bench or baking sheet, your baking tray needs to be spread with flour, and your hands need to be dusted with flour to make handling the scone dough easier. I even dipped my scone cutter in flour each time. Unlike some other scone mixtures, this one can be a little sticky, but still very manageable. I used a Jap pumpkin (Kent variety) for my scones. We bought a very large one which cost $11.00, from the farmer's truck on the weekend,  but after three batches of scones, I am getting my money's worth out of this richly coloured, and flavoursome pumpkin. It's a beauty. Some people swear by using a Queensland Blue variety, but the Kent is much more available here where I live and we love to eat it baked, mashed, and in a variety of ways really.

Before I started these scones I did some food research, as I always do, and compared different pumpkin scone making methods, including talking to a couple of friends, and I am confident that this recipe is the best I have found. The main thing is to ensure a minimum of liquid with your steamed pumpkin, and place it in a colander while it is cooling to allow all the liquid to drain. Iconic Australian cook, Stephanie Alexander suggests steaming the pumpkin until soft, then drying it off in the oven and then pureeing it. I haven't actually dried it in the oven, and I'm not using her recipe, even though it's very similar, however that tip is worth a try.

Before starting your scones, Lady Flo's words can guide you through the process:

"the most important piece of advice I always give to people attempting to make scones is that you must treat them with tender loving care. Don't knead them, instead press them lightly with your fingertips. This helps your scones to turn out nice and light." 

Ingredients:

Turn on your oven to 240 deg. C. scones need a very hot oven.

Serves 10

1 cup mashed pumpkin (cold)

1 tablespoon butter

1/2 cup sugar

1/4 teaspoon salt

1 beaten egg

2 cups self-raising flour

Method:

Beat together the butter, sugar, and salt with an electric mixer until light and fluffy. This won't be creamy.

Add the beaten egg, then the pumpkin and mix in.

Stir in the flour by hand until just mixed.

Turn the dough onto a very well floured bench, and pat gently with floured hands into a square shape, which is 3 cm thick. This square will measure about 15 cm by 15 cm., or even 16 cm.

Cut into rounds with your scone cutter. Scone cutters can vary from 5 cm to 7 cm, mine is 6 cm.

Place scones individually on a well floured tray.

Place the tray on the top shelf of a very hot oven (240 deg C - 250 deg C.) for 15-20 minutes

Remove from the oven, allow to cool on a cooling rack and serve with butter, or jam and thick whipped cream.


This is my very first batch made with a smaller 5 cm scone cutter as  an experiment. These would be perfect for little folk for after school home baked snacks, and bigger folk who are trying not too eat too many, still very delicious.

Cook's notes:

  • If the mixture seems dry, you may need to add 2 tablespoons of milk gradually, however with a wet mixture, just add an extra tablespoon of SR flour at a time until it is manageable. I added one extra tablespoon of SR flour to mine each to each batch because the pumpkin is very rich. 
  • The pumpkin needs to be cold and straight out of the frig when you start using it.
  • The egg can be cold, not room temperature
  • The secret is to work quickly when making scones
  • A minimum of handling of the scone dough gives the best results
  • 240 deg. C is the perfect temperature in my oven for baking scones, for 15 minutes
  • I use my small electric mixer and beaters to mix the butter, sugar and salt together in a medium size bowl rather than my Kitchen Aid.  This gives the best result as the mixture isn't large.
  • About 250 g - 300 g of pumpkin will give you 1 cup of mashed pumpkin depending on the type of pumpkin
Crazy Chows, my Mahjong hand

Who doesn't love a delicious scone with a cuppa? Hope you enjoy some scones during International Scone Week. I hosted Mahjong this afternoon at our home, and of course I baked Pumpkin scones for afternoon tea.


The table was set for a Devonshire Tea with the Mahjong Ladies, whipped cream and a a selection of jams, all homemade, Rosella, Strawberry and Plum. Mr. HRK very kindly made Flat White Coffees. It was so nice for us all to sit around the table, chat, and enjoy some home baked scones. There were 6 of us playing this afternoon.


Warm wishes

Pauline


Saturday, August 6, 2022

Baked Granny Smith Apples

Baked apples for dessert can be cooking away while you are eating your main course, and can be prepared well in advance. It is the perfect dessert, as it not only ensures that you eat at least one serving of fruit in your day, but apples are also a great  dessert for the whole family, healthy and delicious. Baked apples are quite the old-fashioned sweet, and our Grannies, even our Great Grannies, back in the day, were happily baking apples with various fillings to stretch the budget and present a delicious and welcome dessert for everyone. Desserts with every meal were the norm in my Grandmothers day. Back then, the cavity was sometimes just filled with sugar, and cloves were placed around the apple for spicy flavour, or a date or a few raisins or sultanas could be placed in the base of the apple, before filling it with sugar. They knew how to make the most of what they had on hand in the pantry. All that sugar and no guilt. They probably served them with custard or homemade ice-cream if they had an icebox, and everyone was happy.  

I've taken the dried fruit ingredient to the next level in this recipe, as I baked my Fruit Mince Teacake a couple of weeks ago, and had a quarter of a large jar of fruit mince leftover in the frig. It is the perfectly spiced fruity filling for baked apples. Apples are such a ubiquitous fruit, that so many wonderful dishes can be cooked with them, however when it comes to baking, the Granny Smith apple performs the best. Did you know about 60,000 tons of Granny Smith apples are harvested in Australia each day?

Legend has it that Maria Ann Smith, also know as Granny Smith, was an Englishwoman who emigrated to Australia in the mid-1800s with her husband Thomas. She was doing some weeding one day in Tasmania, and was composting I like to think, and dumped a crate of old rotten Crab apples from their orchard at the back of their garden. Many months later she noticed a sapling growing, which subsequently produced the green and slightly sour fruit,  which became known as the Granny Smith apple. I'm really pleased that the botanists haven't decided to change it's name. Granny Smith lives on, but she died never knowing that the apples she discovered would be popular the world over, thanks to their resilient qualities. There are many versions of the origin of the Granny Smith apple but they all agree that Granny Smith was responsible. 

 I enjoy eating fresh apples, but these baked apples exceeded my expectations, especially with fresh cream.

 Ingredients:

4 large Granny Smith Apples (the green ones)

80g unsalted butter, diced and softened

1/3 cup (65g) brown sugar, firmly packed

1 tsp ground cinnamon

1/2 cup fruit mince or mixed dried fruit

Pure (thin cream) to serve

Method:

Preheat the oven to 180 deg. C

Find a baking dish that the apples fit snugly into.

Core the apples. To prevent the apples bursting during cooking, cut a thin line around the circumference of each apple with a sharp knife.

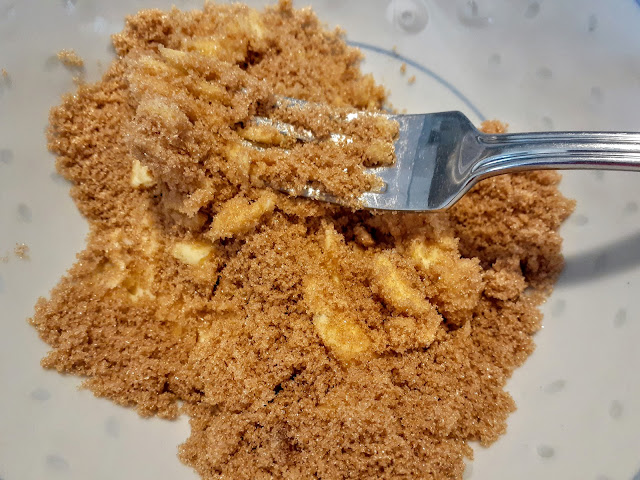
Mash the softened butter and brown sugar together in a bowl with a fork until combined. 

Then add the fruit mince and the cinnamon until well combined.

Spoon the fruit mixture into the cavity of each apple, and press it down well.

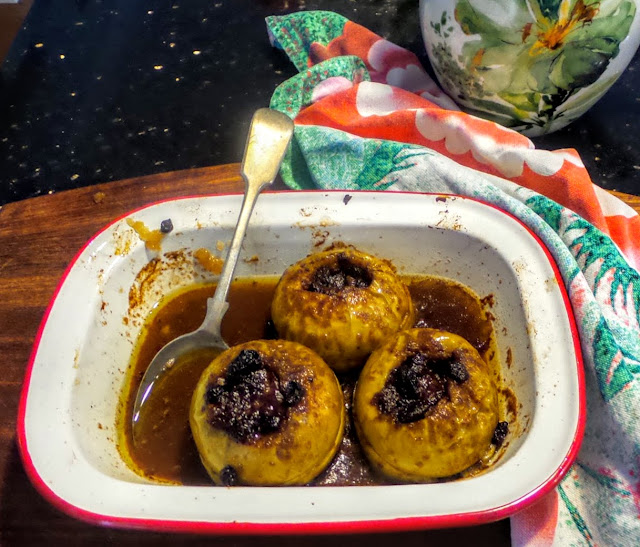
Pour 1/4 cup water (60ml) into the base of the dish. Bake for 30 minutes or until bubbling and until the apples are just starting to soften.


Place the apples on 4 serving plates, small or large, and drizzle the juices from the baking dish over the apples, and top with a lot of cream.

 Serves 4

I have Granny Smith apples in my frig crisper, and some dried fruit in packets, so dessert is sorted for tonight.  We'll be very happy to enjoy a rerun of this dessert, whilst there is still a hint of cool weather left, however this dessert is still light enough to be eaten in Summer.

Hope you have a wonderful weekend. 

Warm wishes,
Pauline