A steamed jammy pudding is the loveliest surprise dessert that you can cook for the special people in your lives. Every mouthful brings back nostalgic childhood memories for me, as my Mum often cooked steamed puddings with various toppings: jam, golden syrup and treacle, and probably mainly in Winter, however, change of seasons in either hemisphere is still the perfect time. Cherry Jam is the perfect topping, sweet and yet very slightly tart, but any thick homemade jam would also work.
Hello, I'm Pauline, a passionate home cook with over 40 years of recipe development experience and over 12 years of food blogging. I live in Tropical North Queensland. What began as a simple way to document family recipes has grown into Happy Retiree's Kitchen, a trustworthy source for achievable, delicious recipes. I'm a self-taught cook and food and travel blogger, and have spent over a decade perfecting how to make home cooking achievable, flavoursome, and very accessible. Let's cook.
Monday, August 28, 2023
Monday, November 21, 2022
Mexican Chicken and Capsicum Tray Bake
Mexican food is always full of flavour and colour, and when the ingredients can be combined into a homemade Mexican style traybake, with a few shortcuts, then it's a winner in my humble opinion. The first time that I cooked this dish we all loved it, I honestly couldn't fault it.
Wednesday, September 14, 2022
Tropical Beef and Mango Chutney Chow Mein
This is the perfect minced beef and vegetable dish for a busy weeknight, fuss free, it's loaded with lots of healthy vegetables, spices, and it takes less than half an hour to cook. With a recipe like this, you can fly through the week stress-free, with an easy flavoursome meal that will give your family a gourmet experience on the cheap. 500 g of minced beef can be stretched to feed 6 people.
Saturday, November 14, 2020
In My Kitchen, November 2020
![]() |
| Beautiful Jacaranda trees growing in our street |
![]() |
| Dancing Lady orchids |
![]() |
| All the ingredients are in the pot, ready for cooking |
![]() |
| My latest batch of mango chutney still to be labelled and stored. |
Just before we left for Rockhampton, I made this delicious Chicken, Tomato and Basil traybake using up some fresh tomatoes given to me by my wonderful friend Irena. It was delicious. I'll put up the recipe one day soon.
My sweet Italian basil is growing beautifully this year, so I made some pesto from it. It was so delicious, the best pesto I have ever made, mainly because I think the basil was so fresh. The pesto is all gone, so I need to make some more. However here is the recipe I used from River Cottage Veg everyday, written by Hugh Fearnley-Whittingstall. A great recipe book and never far from my kitchen.

Thursday, July 16, 2020
Roasted Eggplant (Aubergines) with Anchovies and Oregano, and a quick batch of Sweet Chilli Jam
My friends who grow eggplants, often find themselves with too many to use and are always looking for easy and new ways to use them. Or if you are given some by a generous friend this recipe is also for you. I found myself in that situation when my Lebanese eggplant bushes yielded 1 1//2 kilos in one harvest. They stay fresh for days so I wasn't under too much pressure to cook them however I tried out this new way of using them as a side dish which was delicious. I'm so pleased I harvested them when I did though, as two days later when Mr. HRK and I were checking the bushes, four of the eggplants had been eaten out, presumably by possums. I can't imagine how raw eggplant would be too tasty, however the texture is quite crispy and they are a mild flavour so I suppose it depends how hungry the possums were. I had to laugh though as we have Locky, our large chocolate Border Collie, sleeping very comfortably in his bed on the patio at night, just near this garden. Need I say anymore, so much for being a watch dog, he is more of a big cuddly bear. He will bark though if he doesn't know our visitors just to alert us, but then the tail starts wagging.

Ingredients:
Serves four as a side
4 medium black globe eggplants or 1kilo of any other variety (sliced into 2 cm thick discs)
100 ml olive oil
20g anchovy fillets in oil, drained and finely chopped
1 tbsp white wine vinegar
1 small garlic clove, crushed
1 tbsp fresh oregano leaves
5 g parsley leaves, roughly chopped
salt and black pepper

I chopped the eggplant up into short pieces, however next time I think I will cut this variety into long thick pieces, more for presentation than for any other reason.The globe eggplant is best sliced lengthwise into 2-3 cm pieces
Method:
Preheat the oven to 220 deg. C fan forced.
Place the eggplants in a large bowl, and mix in 1/2 teaspoon salt.
Then using your hands, if you wish, mix through 70 ml of olive oil to coat them all thoroughly. However if you don't like the idea of using your hands, transfer the eggplant slices to two large baking trays, lined with baking paper, and brush each slice on both sides with the oil. I think the first method is much quicker.
Bake for 35 minutes, and check after 20 minutes just in case they are cooked. Mine were because I was using much smaller slices. They should be cooked through and browned up.
Now for the delicious anchovy dressing. In a small bowl, whisk together the anchovies, vinegar, garlic, 1/8 teaspoon salt and 1/4 teaspoon of pepper. Slowly pour in the remaining 2 tablespoons of oil, whisking continuously, until combined.
Leftovers of this dish are even more delicious heated up or brought back to room temperature, and served the following day. This one isn't for freezing though. It's lovely as it is, spooned on top of toasted sourdough and also works as a side dish to all kinds of mains.
A batch Sweet Chilli Jam
Ingredients and equipment:
(A large batch)
30 medium mild red chillies (or any combination of other mild chillies you might have),including seeds
8 small Birds Eye chillies (very hot), including seeds
3 red capsicums
4 large brown onions
4 cloves crushed garlic
2 cups of white sugar
1 cup of white cooking vinegar
1 cup water
juice of 3 lemons or limes
2 teaspoons fish sauce
Pair of plastic gloves for hand protection
7-8 medium jam jars for this recipe
METHOD:
Wash the chillies and dry them.
Have your food processor ready to use on your kitchen bench.
(At this stage I generally have my small jam bottles on a short cycle in the dishwasher so that they will be sterilised and nice and hot when the jam is ready and I can just ladle in the hot, sweet and spicy finished jam. Or you may prefer to have them washed in soapy water, and ready to sterilise in a warm oven set to 120 deg F.)
I took all of the chillies, capsicums, and onions, 2 cutting boards and a couple of bowls outside onto my patio, made a cup of tea, and then sat down in a comfortable chair at our outside table in the sun and started chopping, enjoying the beautiful day outside.

Top and tail the chillies, and don't bother removing the seeds, except in the capsicums.
I chopped them all up roughly outside.

Place the chopped chillies, capsicums, onions and garlic in your food processor and blitz until they are chopped into small pieces.

Add the contents of your food processor to a large saucepan, add the sugar and other liquid ingredients.

Bring the jam slowly to the boil, which will dissolve the sugar. This is where you test the taste to check if it is too hot or not sweet enough. Very carefully take out a teaspoon of the jam, taste it, being careful not to burn your mouth, and if it is too hot and spicy, add another chopped capsicum. Or if it's not spicy enough for you, add another hot chilli.

Let the jam cook on a rolling boil for 45 minutes. To quote Rhonda from her Down to Earth blog, "a rolling boil is when the jam boils and even when you put a spoon in it to stir it, it continues boiling, but won't boil over". Very important.

After 45 minutes on a rolling boil and being stirred, the jam should be the right consistency.
Ladle it into the hot jars, put the lids on straight away and tighten them.
Leave them out on the kitchen bench to completely cool, label, and then store them in your pantry. The vinegar and sugar will act as very efficient preservatives. The jam should last for about 6 months in the pantry.
I always place a bottle in my frig straight away to use, as I will have already tasted it.
You might hear quite a few of the jar lids popping over the next few hours, ensuring the jars are well sealed.
This batch was just how we like it, suitable to eat as a condiment at anytime of day, with the taste of chilli but not too much heat. Add more Bird's Eye chillies if you like it really hot. You can find my original recipe for this jam here, and I changed this recipe slightly to an extra lemon and an extra capsicum as I always end up adding another capsicum to the original two anyway. The pectin in the extra lemon helped it to set even better than before.
These two recipes aren't mutually exclusive, as we ate this Eggplant dish as a side with my
Tuna Kedgeree, and a dollop of the Sweet Chilli Jam. Delicious. I think it's pretty hilarious and quite wonderful, that my daughter was telling me the other day that our son-in-law Daniel, has really taken to my Sweet Chilli Jam, and my Mango Chutney. More often than not, they will be sitting down to dinner, and he will say, "Do you know what would go really well with this dish, Pauline's Sweet Chilli Jam." So off he goes to the frig and comes back with a bottle and adds some to his plate. Needless to say they have now run out, so some of this batch will be heading to Cairns very soon.
Here in Queensland, we are feeling very relieved for the economy and everyone's mental health that it is almost back to business as usual, whilst southerners are chafing at the bit to get into Queensland, despite the borders being closed. We are all hoping and praying that there won't be a recurrence of the virus in Queensland and if everyone behaves themselves and remains vigilant there shouldn't be. However the staggering increase in daily infections, albeit all around the world, is very sobering, and reminds us that we are not yet in the clear here in Queensland by any stretch of the imagination.
Stay well and happy,
Warm wishes
Pauline
Friday, May 18, 2018
Sweet Chilli Jam

Saturday, January 6, 2018
Strawberry Jam Drops, a weekend biscuit treat
Happy New Year to my readers of this recipe. I hope 2018 is healthy and fulfilling and everything you wish it t be.
Jam Drops are a great way of using up extra jam, which sits patiently bottled in the refrigerator waiting to be noticed. We returned from Cairns this week, to shockingly hot weather, exacerbated by a very hot Northerly wind blowing which we aren't used to at all. However, I needed a sweet treat with a cuppa and rather than make a whole cake, I thought of biscuits which are quick to make and bake, and also to eat, although I can stop at one. These biscuits are nicely crisped on the outside, and chewy in the middle. I used my homemade strawberry jam in these which is quite thick, however any jam will do. To bring them up to children's party status in the past, I have also added hundreds and thousands or some other colorful decoration to the top of the jam filling, nice for a change. I'm sorry I didn't think to do that this time for an interesting photo.
The trickiest part with making these biscuits is rolling them into the right sized shape in the coconut. The mixture spreads during cooking, as you can see in my first cooked tray below, so they do need to be spaced out well. The ideal Jam Drop is round, with the shape not affected by it's closest neighbour. However it depends on how you are feeling as to how particular you want to be, and the shape doesn't affect the deliciousness of them at all. The second tray of 5 biscuits, is more like how they should look in an ideal world. There were 6 on that tray before Mr. HRK sampled them.
This is a recipe and a biscuit to be enjoyed whilst relaxing with your feet up.
Ingredients:
Makes about 25
1//2 cup softened butter
1 cup sugar
2 eggs
2 cups sifted SR flour
1 teaspoon vanilla essence
1 cup desiccated coconut
115g (1/3 cup)strawberry or raspberry jam
Method:
Preheat oven to 180 deg. C.
Beat butter and sugar to a cream.
Add well beaten eggs one at a time. Then add vanilla essence.
Lastly add sifted flour.
Take teaspoonfuls of mixture and roll in coconut.
Place each uncooked Jam Drop on a greased tray about 5cm apart, or on a tray lined with non-stick baking paper.
Use your lightly floured finger to make an indentation in each ball. Add 1/2 teaspoon jam into the centre of each biscuit with a small spoon.

Place tray in oven.
You may need to turn tray around halfway through cooking for even browning.
Bake in preheated oven for 15 minutes, until biscuits are cooked through and light golden.
Store biscuits in single layers between sheets of non-stick baking paper, in an airtight container in a cool place if possible for up to 2 days. They won't last much longer.

6 cooked on a second tray and one missing already whilst still hot.

Below is the riginal handwritten recipe from my Mum's recipe book. This is the full extent of the recipe. What occurred to me when I was looking through her old recipes was how simple and briefly worded they were. Most of them were hand written and handed on through the family or friends. The specific instructions on how to cook the recipe was communicated verbally and still is to a certain extent, and there was also an understanding that who you gave your prized recipe to could cook. Recipes in books and on line now often include so much detail, aimed at the beginner cook to those more experienced. Ingredients are also more complex requiring explanation. What are your thoughts on this? Is there sometimes too much wording and detail in the recipes of today? Or do you find all of that extra detail interesting as I do.

This was the complete recipe in my Mum's recipe book. Just four ingredients and a brief method. How times have changed.
Keep cool or warm depending on which Hemisphere you are living in.
Thanks for dropping by.
Best wishes,
Pauline
Wednesday, November 22, 2017
Beef, Sauerkraut and Mango Chutney Goulash
Sunday, November 5, 2017
My Green Mango Chutney recipe, it's spicy and sweet

Friday, September 29, 2017
Slow cooker Tomato Sauce, Rustic Tomato Soup, and a loaf of Sourdough Bread, perfect.
![]() |
| Rustic Tomato Soup |
Saturday, December 17, 2016
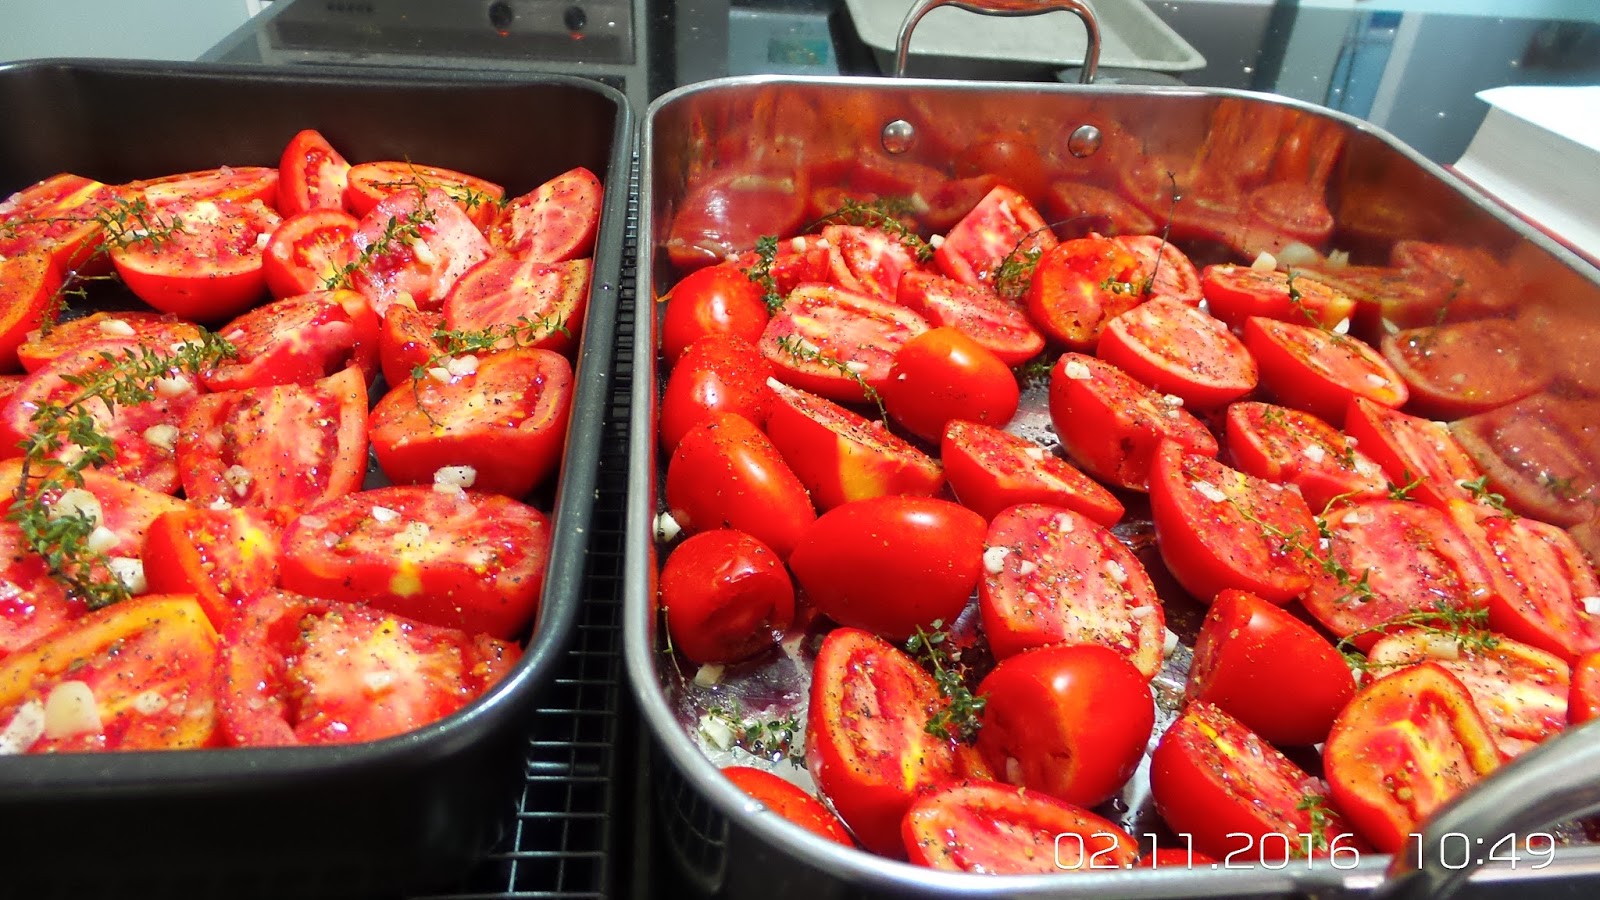
Oven Roasted Tomato Sauce

Tomatoes, luscious ripe Roma tomatoes, are still in abundance thank goodness in North Queensland, but soon it will be too hot, and the season will be finished. So much of my cooking at present is about preserving what is seasonal, so that I have it either in my freezer or my pantry when those particular items become too expensive. However, at times I weaken and use those supplies, like last night when we indulged in homemade pasta and whilst I had made a delicious bolognese sauce as well, I just had to try my new Roasted Tomato sauce. I think everyone enjoyed it.
It is so easy but lots of tomatoes are required, so I think it will be a trip to the markets again to buy some more.
Dear friends do you find that you preserve excess quantities of fruit and vegetables for the future but find yourself dipping into them for convenience. I think it just makes life easy at times and takes the pressure off if guests are arriving, After all isn't that what a lot of restaurants do?
This Tomato sauce recipe is a River Cottage classic, obviously made over there with a selection of British tomatoes and this can be the mainstay of a lot of delicious meat based and vegetable cooking.
![]() |
| Trays and trays of tomatoes waiting to be roasted |
This recipe makes about 500 ml of sauce
1.5-2 kg ripe tomatoes, larger ones halved (A selection can be used but I used all very ripe Roma tomatoes)
3 garlic cloves, finely chopped
A few sprigs of thyme
A couple of sprigs of marjoram if you have it but not essential
2 tablespoons olive oil or canola oil
Sea salt and freshly ground black pepper

Method:
Preheat the oven to 180 deg. C. Lay the tomatoes, cut side up if halved, on a baking try. Scatter the garlic and herbs over the top, trickle over the olive oil, and season with plenty of salt and pepper.
Put the tray in the oven for about an hour, until the tomatoes are completely soft and pulpy, and starting to crinkle and caramelise on top. Yum!
Take the tomatoes out of the oven and set aside the baking tray on a cooling tray for about half an hour or so. Depending on the tomatoes, you may not need to rub them through a sieve with a wooden spoon, or use a traditional mouli. I found that my tomatoes just popped out of their skins making it easy to simply process the tomato pulp into a sauce.
Bolognese Meat Sauce recipe
Homemade pasta recipe
Saturday, July 11, 2015
Rosella (Wild Hibiscus) Harvest and making Rosella jam
Monday, December 29, 2014
Christmas Seafood in the Tropics and a Seafood Sauce Recipe
Wednesday, September 3, 2014
STRAWBERRY JAM FLAVOURED WITH ROSE GERANIUM
| That is enough strawberry picking for now, let's have morning tea. |
| Neil and Paul picking strawberries. |
After all, strawberry jam has been around forever and it is time we became a little bit more creative with its flavour. Luckily, I have also been looking for another culinary use for my rose scented geraniums, besides enhancing chocolate cake, and Neil agreed that the rose geranium would be a nice, subtle, flavour enhancer to the strawberry jam.
The daily fragrance of the Rose Scented geranium when I water the garden also takes me back to my time living at home when my Mum and I used to visit the old-fashioned St. Aubin's herb farm in Rockhampton near the airport, now a village nursery, and where the mesmerising smell of the rose scented geraniums always wafted above the other herbal aromas to greet us and say goodbye. Perhaps I have tried to recreate the essence of that memory in my own garden. Enough reminiscing, let's make jam.Spring is in the air.
Ingredients:
2 kg small ripe strawberries
1.7 kg sugar
Juice of 2 lemons
1 50g sachet of Fowlers Jamsetta with Pectin
8 average sized jam bottles
A handful of rose scented geranium leaves (optional)
A square of muslin
Kitchen string
- Hull the strawberries and discard any spoiled fruit.Set aside about 10 of the smallest berries, and then mash the rest up into a rough pulp. Put them into a wide, thick-bottomed pan, add the the sugar, and the lemon juice and leave for 30 minutes to soften the sugar and bring the strawberries to room temperature.
- Meanwhile, prepare your bottles and lids for sterilising in the oven or the dishwasher. Place 2 saucers in the freezer for testing the setting point later.. This quantity makes about 8 average size bottles of jam. Prepare your geranium leaves by tying them up in a square of muslin, as you would with Bouquet Garni, and secure with string. Or if you would prefer a little bit of extra texture in your jam, chop them very finely and add to your mixture as you bring it to the boil. I might try this next time.
- Add the Fowler's Jamsetta Pectin Powder, and geranium bag to the mixture and bring the pot to the boil on a high heat. Boil the jam for about 15 minutes, stirring regularly, and checking the setting point every minute or so during the last 5 minutes. Do this by placing a teaspoon of jam on the cold saucer from the freezer, and put it back in the freezer to cool a minute. Take it out and if it wrinkles when you push it with your finger, then it is done.It should be ready after five minutes of testing if not before. However, don't be tempted to overcook the jam, as it can move past its setting capacity.
- Strawberry jam is unlikely to set very solid like marmalade, and is difficult to tell if it is set from the mixture in the pot. If you think it is setting on the saucer, have faith that it will set in the bottles when it cools.
- Take the pot off the heat and skim off the pink scum. Pour into warm sterilised jars through a wide funnel, and cover with sterilised lids, or Fowlers Vacola Kleerview transparent preserve covers and rubber bands, if you are out of lids.
Tuesday, July 22, 2014
ROSELLA JAM
Rosella Jam making is a lesson in chemistry, botany and good time management but is good fun and very rewarding. I think it is the most delicious jam on the planet. Rosella jam is made from the red fleshy calyx surrounding the green seedpods. These pods need to be boiled to extract the valuable pectin, essential for the thickening of the jam. Not all homegrown Rosella fruit ripen at the same time and can be collected gradually and stored in the freezer until you have enough to make a worthwhile quantity of jam.
Separating the seedpod from the calyx can be a time consuming and tricky procedure. Courtesy of a helpful neighbour of mine, we used a modified empty bullet shell to push the seedpod up through the calyx from the base of the fruit in a very simple operation. Quite primitive but very effective. There are many homemade devices that have been used for this operation or you could just use an apple corer. Wear firm fitting gloves when removing the calyx.