Sunday, October 29, 2017

Carrot, Ginger and Turmeric Soup and some Birdwatching


The Aussie Backyard Bird Count

We've been doing some Bird Watching and twitching this week and entering our findings on the Aussie Backyard Bird Count app, which has been remarkably easy to use and a lot of fun. Unfortunately it finishes today. I missed doing it the on first two days, which didn't matter at all and then once I worked out how to use the app it was easy. Mr. HRK is the more knowledgeable twitcher in our family, however this has been great not only for contributing to a better understanding of  the populations of Australian birds and aiding with their conservation nationally, but also increasing my knowledge of the bird population in our very own backyard and frontyard. The watching and counting was done at 20 minute intervals, so armed with our Bird identification book and my phone on which the app is loaded, we sat out in the cool of the afternoon near the bird bath mostly, and managed to identify and name correctly all of the birds we saw. There is also a Bird Identification section on the app however I found it easier to use our book.

The following photos are the ones off the app, from just one of the sessions although photos didn't appear for the Torresian Imperial Pigeon or the Yellow Honeyeater. Each day we identified a couple of additional species and at this point in time in our backyard, we have sighted 17 different bird species, and 111 birds. Throughout Australia, 628 different species have been identified; 1,812,067 birds have been sighted; and 52,602 Checklists have been submitted. What a great effort.


Rainbow Lorikeet

Willie Wagtail

Magpie Lark

Australasian Figbird

Brown Honeyeater

Noisy Friarbird

Torresian Crow

Spotted Dove
It is quite exciting, that we also have the Figbirds, the Magpie Larks, the Friarbirds and the Brown Honeyeaters  nesting in trees in our yard. I'm pretty sure the Willy Wagtails are nesting very close as well. We do our best not to encourage the crows to take up residence, I hope that doesn't sound mean, however the Willy Wagtails ensure that the Crows don't hang around for long as well.


It might seem strange to you that I am also writing about soup as we enter into Summer here in our Great Southern Land. I made this when there were lingering rain showers, and the evenings were really cool. We had also been eating a lot of meat for various reasons, and I felt the need for as many healthy vegetables as possible and also healthy spices such as ginger and turmeric, which I have a lot of in my pantry. As carrots have been in abundance, and I had quite a few carrots still lurking in my frig, this soup came together nicely on a coolish night. This also reminds me of how our neighbours in the Northern Hemisphere are experiencing cooler evenings now.

I hope you enjoy it and give it a try.


Carrot, Ginger and Turmeric Soup

Ingredients:

3 tbsp olive oil
1 red or white onion
2 tsp ground turmeric, or a piece of fresh root, about 2cm.
1 tbsp root ginger, chopped, about 35g will give the right amount of heat
2 garlic cloves, chopped (depending on the size of the clove)
500g carrots, thinly sliced or into chopped into 2cm chunks
400ml good quality, preferably homemade Chicken stock
Juice of 1 lime


Method:

Sweat the onion in olive oil with a large pinch of salt in a large pan, for 5 minutes
Add the turmeric, ginger and garlic and cook for 1-2 minutes.


Add the carrots and stir in the stock.


Bring the mixture to the boil, then reduce the heat and allow to simmer covered, for about 25 minutes.
If you like a smoother soup and I do, blend the soup with a hand blender  until there are no lumps.
If you think the soup is too thick for your tastes, add the lime juice, more stock and water and then some organic Coconut Milk until it is the desired consistency.
It is nice to finish off the soup for serving with a swirl of Coconut Milk anyway.

Season with rock salt and white or black pepper to taste.
Serve with some chopped parsley or mint.

Best wishes

Pauline


Friday, October 20, 2017

How to Make Vanilla Extract or Essence from the Vanilla Orchid Bean from scratch


In the Tropics where I live, it is possible to grow your own Vanilla Beans. It is just like growing an Orchid because that is what it is, a Vanilla Orchid. Vanilla Extract  is an essential ingredient in most cakes and if you also like making custards and ice-cream you can't do without it. I can' go without it, and the good news is that you don't need to use very much of it in most cooking. I like to cook from scratch when I can, and as I have a few extra vanilla beans on hand, why not make my Vanilla Extract from scratch as well. So easy. I have two vanilla orchids growing, one is climbing up our Golden Penda tree, the other one is clinging to the mesh on the inside of a covered raised garden, as protection from the Summer heat. The second one has a lot of potential, as it will be much easier to access the flowers and pollinate each flower individually. The Vanilla bean originated in Mexico and Latin America and to this day is the only Orchid that is edible. The Aztecs in 1427, in Central Mexico, were the first people to use vanilla in Chocolate drinks for which they are still famous. 

Vanilla extract on the first day of making.


I bought my first Vanilla plant at the Farmer Markets in Bowen just North of here, a couple of years ago and attached it to the large Golden Penda tree in our Rainforest garden section in the backyard. It is steadily climbing through the tree, and has sent a long root down the tree to the ground, which is what they do for extra nutrition and stability I suppose. The root should be fertilised every couple of weeks with an Orchid fertiliser. When the vine starts to grow out along a sturdy branch, I will need to let it hang down off the tree rather than let it climb further up the tree, so that I can access the pale lemon flowers for pollination.

Vanilla Bean Orchid
Yellow, fragile and waxy Vanilla Orchid flowers. Photo courtesy of Dan Sams-Getty Images

 Roots from the vanilla vine growing on our sturdy Golden Penda tree and heading for Earth.


Below, Vanilla Vine, No. 2 is  growing on the front right inside the hutch. Galangal is growing on the other side of the hutch, and is enjoying the rain showers.


A close up of the Vanilla vine.


This second one was given to me by my friend Chris,  who also gave me the three home grown vanilla beans I have used in this Organic Extract flavouring brew. Chris now harvests an annual crop of Vanilla Beans from her vine, quite an achievement, and it is the vine that mine is a derivative of, which she then dries and processes herself to produce her high quality organic Vanilla Beans. Chris and her husband were away on holiday for a couple of weeks this past fortnight,  and Mr. HRK and I, after a "training" session, visited the vine early each day to pollinate the flowers. This needs to be done before 11am each day or they will wilt and drop off the vine before being pollinated. We don't have the essential bee in Australia to pollinate the flower so it needs to be done by hand, meticulously. The stingless Melipona Bee is native to Mexico and is the only insect capable of pollinating the flower. Hence, the high cost of good quality vanilla pods to buy commercially. So with our recent experience  with pollinating the Vanilla orchid flowers, we are ready for when our vines decide to start producing flowers, and ultimately pods, hopefully next year. However it could take another couple of years.

This is how the vine attaches and secures itself to the mesh.


Let's make some Vanilla Extract  from scratch


Ingredients:

Easy Vanilla Extract

3 Vanilla pods
1/2 cup Vodka, (or Rum or Brandy or Bourbon) (alcohol)
1 long, narrow bottle or jar (I used a sterilised capers jar)

Method:

Split the vanilla pods down the middle lengthwise.
Place them in the bottle, and cut them in half to easily fit if necessary.
Cover with the vodka, or whatever alcohol you are using.
Seal your bottle and give it a shake. Small pieces of vanilla seed will swim through the vodka.
Label your jar with today's date, so that you will know in 4 weeks that it is ready to use.
Find a dark place in your cupboard and store it there.
Remember to give it a shake a few times a week.
It will get stronger the longer you leave it and you can keep topping it up with . Keep adding more vodka as the bottle empties, or just add another pod or two as the flavour wanes.

After you use the vanilla pod seeds, you can add these pods to the bottle as well, in addition to adding them to your Caster Sugar for flavouring. Waste not, want not.

You may remember my last post was about the Ginger cake I cooked for the Mahjong ladies during the week. Well talking about recycling, we still have some of the cake left and it is Mr. HRK's birthday today, so we are about to have some Coffee and leftover Ginger cake. He loves the combined flavours of Tarragon and Ginger so I have decorated a large slice of cake with edible tarragon flowers and edible viola flowers. The flavours of tarragon and ginger marry perfectly together. Voila, it is now his Birthday cake, and this is all we really need to celebrate this morning when we have no family around. Let the celebrations continue.


Have a special weekend everyone.

Best wishes

Pauline


Wednesday, October 18, 2017

Ginger cake with Lemon Icing and Delicate Blue Bromeliad Flowers, and So the Day Goes


It is an amazing phenomena how a fairly ordinary Bromeliad plant on a tree, can suddenly transform into a bird attracting and beautiful specimen by producing these delicate blue and pink flowers. Yesterday morning during a garden meander I noticed these flowers, but I wasn't fast enough to grab the camera and snap the sun bird which was burrowed into the blue flower lapping up the nectar. I've learned from that as our garden is always full of wonderful surprises that I need to have my camera or phone on me at all times. It makes me realise how patient and prepared nature photographers must be. Birds don't hang around to be photographed. 


I think that a large part of my gardening enjoyment are  the memories of who gave me what. Mr. HRK's cousin Judy, who lives on a lovely property in Maleny in Southern Queensland,  gave me this bromeliad around 8 years ago.  I attached a piece to our Golden Penda tree, which it has now completely encircled and it is now flowering. We always called in to see Judy when we travelled through to Brisbane, and as we don't drive to Brisbane much now, we haven't spoken recently. When I saw the sun bird and the flowers I was so excited that I called Judy on the phone to tell her about it. She is a real nature lover and a keen gardener so she was really thrilled to hear from me. Communicating with like minded friends and relatives is just another dimension of gardening. Judy doesn't think this brom has an actual name, so if you know it and it has a name I would love to hear about it.


My day progressed into icing a cake that I made the night before, as the Mahjong ladies were coming that afternoon. I made my favourite ginger cake recipe, as it looked like rain and what is better on a wet day than ginger cake. This time I decided to ice it with a lemon icing rather than use a ginger syrup and that worked well. Here is the recipe if you haven't already seen it. It is such an easy cake to make and I always add about 6 chopped up pieces of crystallised ginger to the batter  for extra oomph.

The cake was delicious and so was the lemon icing.

Ingredients:

120 g unsalted butter
250 ml golden syrup
2 1/2 cups self-raising flour, sifted
2 heaped teaspoons ground ginger
1 teaspoon mixed spice
220 g caster sugar
1/2 teaspoon salt
250 ml milk
2 free-range eggs, beaten
2 cups of icing sugar
juice of a large lemon


Let's Cook

Preheat oven to 160 degrees C.
Grease and line a medium sized square cake tin. Melt butter and golden syrup over low heat; remove. Sift flour, ginger, mixed spice, sugar and salt into a large bowl.
Add milk and egg and mix until smooth. Gradually add butter mixture and stir.
Pour batter into tin; bake for 50-55 minutes or until risen and firm to touch.

Allow to cool before icing.

I often make this  cake with a Ginger syrup instead of icing, less sugar, I wish.  This is a link to my original post with the recipe using Ginger syrup which is also absolutely delicious.

https://happyretireeskitchen.blogspot.com.au/2015/05/ginger-syrup-cake.html


It is nice to eat cake with proper cake forks, especially when I have friends over so I cleaned them and some of the other silver cutlery I own. There are still droplets of water on the cutlery in the photo.

It is almost cup of tea time, it was an early start. I hope you find time to put your feet up today and enjoy a nice cuppa.

We are supposed to receive significant rain today so here's hoping. So far we have only had about 15 ml. Fingers crossed.

Best wishes

Pauline


Wednesday, October 11, 2017

Our Fraser Island Creeper flowers to celebrate Australia's inaugural National Gardening Week


This week is Australia's inaugural National Gardening Week from the 8th-14th October, 2017, and to celebrate it in my part of the world, I would like to share with you  a few photos of the first waxy pink, bell shaped flowers from our beautiful  Fraser Island Creeper, "Tecomanthe hillii".  We transplanted the plant from a pot last year to a strong trellis at the back of our property which faces North and now has a dedicated sprinkler system and it is flourishing. Location and water are everything. It is a native and quite rare plant, endemic to Fraser Island situated off the Queensland Coast, which is the largest sand Island in the world and World Heritage listed. Amazingly rainforest grows in the sand on Fraser Island and so does this spectacular woody climbing vine, which flowers along the length of the vine. The flowers are pollinated by native bees, insects and honey eaters and seem resistant to pets and diseases. It is also very suited to climbing up a well established tree. We are so thrilled that it has decided to flower, and each morning we visit it to check for more blooms.


National Gardening Week was launched at the Melbourne International Flower and Garden Show this year, to highlight the associated environmental, social and health benefits of gardening, and the improved mental and physical well being that gardening brings. Is it a coincidence then that it coincides with Mental Health Awareness Week as well? What a wonderful synergy that these two events can bring to a lot of people.


Most people who are avid gardeners will tell you that despite the physical benefits, they feel so much more relaxed and at peace with the world when they step out into their gardens and start gardening. I know that I do.

So that we can continue to enjoy our garden, and so that it doesn't become a burden, Neil and I are starting to be mindful this Summer of the need for low maintenance plants, water wise plants, plants that attract the birds and beneficial insects, and less vegetables which require a lot of attention. However I still need to have lots of herbs growing in Summer, as these are quite easy to maintain and with all the cooking I do they save a lot of money by being easily accessible from our garden. I also gain a lot of pleasure from flowers in the garden and they are also essential for attracting the bees so that they can pollinate our Passionfruit vine and other herbs and vegetables.

My tropical orchids are a nice interest and will still survive if left to their own devices for a while, as long as they are watered in the hot months, however I try to give them lots of TLC. An automatic sprinkler system is essential in that regard. I try to fertilise them every two weeks throughout the Summer months.


Just a couple of my orchids flowering out on our patio.


Dendrobium Farmerii Thrysiflorum "Colette"

Lots of the very old-fashioned Lilly bulb are planted throughout our garden so the flowers just explode at this time of year. They don't last long, so I enjoy them whilst we can.


This is Blue Salvia which the Sunbirds hang from daily whilst drinking in the rich nectar. I have just pruned the bush back and because it is such a strong plant, gifted to me by a very generous former neighbour, I have taken cuttings and  potted them hoping that some of them will strike. We fertilised it after pruning it, and already it is shooting.


Last but not least, this is the flower of the spring onion, or eschallot. I allow it to flower as it attracts the native bees which are so important for pollination in the garden. I hope that one day they will decide to build  a hive nearby.


This is a slightly shorter post as I am finishing here because our WiFi and Internet are off and on at the moment pending the imminent installation of the NBN. I really hope it all goes smoothly as we are all so dependent on WiFi these days and if it works at a faster speed as promised that will be wonderful.

Enjoy the rest of your week everyone,

Happy gardening,

Pauline

Monday, October 9, 2017

Sticky Chicken Legs with Brown Rice and Stir Fried Vegetables


Who doesn't love sticky chicken wings or chicken drumsticks that are finger lickin' good? The weekend is the time when I am really drawn to more casual meals that are easy on preparation, but definitely delicious, and can still be cooked from scratch. This is a good weekender meal. However admittedly the Hoisin and Soy sauces for this dish come out of a bottle. I think that is ok sometimes, don't you?

 I realised I still had a full bottle of Hoisin sauce in the pantry after making gyozas a few months ago. I had bought extra sauce at the time and thought I would try it in combination with other typically Chinese sauce ingredients this time to use it up and it worked beautifully. If you like more sauce, all of the ingredients except for the chicken can just be doubled. If you have the time and think of it, the chicken would be even tastier marinaded for 6-12 hours beforehand, however this is isn't essential.

Serves 4
Ingredients:

1 kg chicken legs, about 8,  or 16 wings if you prefer
1/2 cup Hoisin Sauce
2 tablespoons low salt soy sauce
2 tablespoons Honey
4 chopped garlic cloves depending on their size
1 tablespoon finely chopped ginger, peeled
1 teaspoon dried ginger or galangal as well for extra oomph, optional
2 cups brown or white rice

Method:
Preheat oven to 200 degrees F.
  1. Mix together well the soy and hoisin sauces, honey, garlic and ginger in a medium sized bowl
  2. If you have time, marinate the chicken in this mixture overnight in the refrigerator
  3. Because this is a sticky mixture, I lined an average sized baking tray with two layers of alfoil to prevent any leakage and gooey sauces sticking on the tray
  4. Place the chicken pieces on the tray and cover each chicken piece with the sauce
  5. Transfer the tray to the oven and bake for 50-60 minutes depending on your oven. Turn the chicken pieces every 15 minutes to prevent burning. The chicken should be caramelised and cooked through.
  6.  I serve this with brown rice (for health reasons) although white tastes great, and  stir fried vegetables, such as capsicum, zucchini, broccoli or bok choy if you have it, and whatever else you have that is colorful, tasty and healthy.
There are lots of recipe variations out there on sticky chicken legs however this one is so easy with minimal ingredients required.

Dear friends, I hope your week is going well.

Best wishes

Pauline


Thursday, October 5, 2017

Stuffed Italian Summer Zucchini with Yoghurt Sauce


  Italian Summer zucchini, somewhat larger than desired,  found their way onto our kitchen bench, bequeathed  from a kind friend. So what do I do with these generously sized vegetables, I stuff them. That is what I have done, and baked them in a yoghurt custard,  and they are delicious. The zucchini are halved, hollowed out a little to hold some stuffing, and the scooped out flesh can be added to the stuffing to make more filling if necessary.


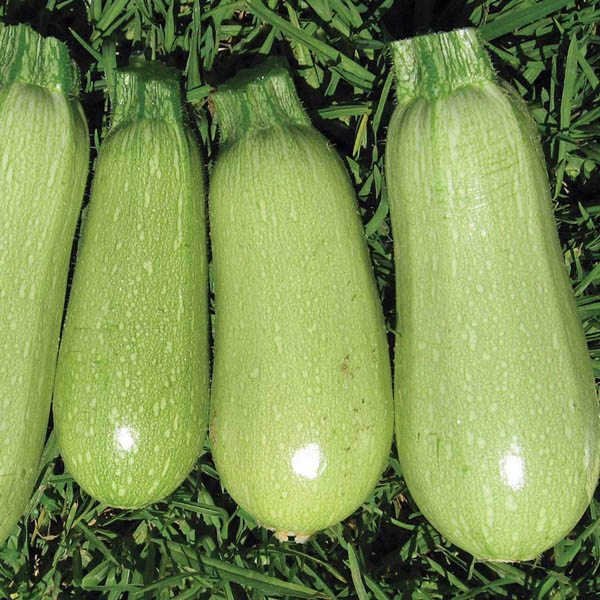
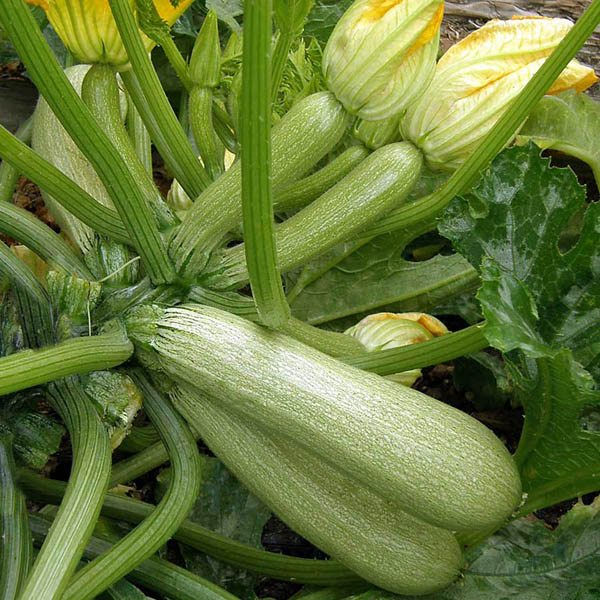
They should be harvested when they are still young and tender, however turn your back on them for a week or so and they can grow to the size of a football, begging to be baked. This variety is pale speckled green, more bulbous than the common zucchini, and are most often found in Middle Eastern cuisine.

When I did some research on them, I discovered they originate from the Cucurbitaceae family, an early Italian variety. "Zucca" is the Italian word for squash, which is why zucchini are sometimes called "Italian soft skinned squash". Whilst we call a pumpkin a pumpkin in Australia, and a spade a spade as well,  in many overseas countries they are called a squash,  a hard skinned Winter squash, and they are not always meant for human consumption, but are fed to the animals.

We don't have much luck growing zucchinis in our vegetable garden once the summer humidity arrives, however our friend has a hot and dry Northern facing garden which suits various varieties of squash. Home gardens and Farmer's markets are treasure troves for different types of vegetables not usually found at the Supermarkets, and I enjoy the opportunity to cook with different types of vegetables and fruit requiring some research into what I can best achieve with them. They might not look perfect like those in the supermarkets,  but looks are only skin deep.

These Italian Zucchini pictured below have been harvested when they can be eaten as a tender vegetable. I also have a couple which were picked early that look just like these, well almost.


These 2 Photos of Italian Summer Zucchini copied with permission from this website:
https://australianseed.com/persistent/catalogue_images/products/zucchini-italianlightgreen.jpg

Image result for australian summer squash

These plants also produce lots of wonderful and highly prized zucchini flowers

Below is the Italian Zucchini I was given weighing 1 kilo. It's a little battle scarred but still ok for baking.


Pictured next to two fairly normal sized ones from the same garden

Let's cook:

This recipe Serves 4

Ingredients:

1 or 2 large Italian Zucchini (Summer squash) or bush marrow, cut in half lengthwise ( or just any overgrown zucchini)
1 teaspoon ground allspice
2 teaspoons ground cumin
500g minced lamb ( or beef if you prefer)
1 large onion
1/2 cup Fine Bourghul
Olive oil, 1 tablespoon
1/2 cup finely chopped mint or parsley (I used mint)
Salt
Pinch of cayenne pepper
(Next time I will add 1 tablespoon of currants for a piquant addition to the filling.)

Yoghurt Sauce

3 cups plain Greek yoghurt
1 egg white
3 cloves garlic, chopped
1 teaspoon dried mint, or 4 chopped teaspoons of fresh
salt
20 g butter

Let's cook:

Preheat oven to 180 deg. C.
Soak Bourghul in water for 5 minutes, then squeeze it dry.

Meanwhile make the sauce:

Whisk the yoghurt and the egg white. Then simmer uncovered for 10 minutes whilst stirring until it is rich and creamy. I don't cover it as one drop of water will spoil it.

Saute the garlic, mint and salt in the butter for 1 minute, and then stir it into the yoghurt mixture.

(I found this Yoghurt Sauce in Stephanie Alexander's book, "The Cook's Companion". Yoghurt will quickly separate when heated, due to it's delicate acid balance, so it needs to be stabilised before using, or stir it into hot, already cooked foods just before using. That is why I am adding 1 egg white and salt to stabilise it. Yoghurt should never be whipped without a stabiliser added as it will break up the curd, and cause the whey to separate out.

To make the Mince filling:


Saute the onion in olive oil until golden. Mix the onion with the remaining ingredients except the zucchini and fry up a small amount to test the seasoning.


Pack the mince mixture into the zucchini halves, then rest them in a large baking or gratin style dish.
Pour over the yoghurt sauce and bake for 45 minutes.


This dish can be served hot, or warm or cold, with some finely chopped parsley.


Have a great Friday.

Best wishes

Pauline