Showing posts with label August. Show all posts

Thursday, August 21, 2025

The Lemon Bar Slice


I thought about calling this a Lemon Curd slice because the lemon topping tastes just like delicious lemon curd to me. If you love the tangy and sweet flavours of lemon curd, then you will adore this slice. However, as I didn't make the lemon topping the same way that I would make a batch of lemon curd, either in the microwave or on the stovetop,  I thought it might be misleading. Despite the deliberation, here we have a beautiful lemon curd like topping on a crunchy biscuit base, all in one. What could be better?

Tuesday, August 6, 2024

In My Kitchen, August 2024 - July the month that was

 What an incredible month July has been. We were in Cairns in Far North Tropical Queensland for most of July, away from our family home and my kitchen in Mackay. However it's hard for me to stay out of the kitchen, so read on to hear all about what I've been up to.

Friday, August 4, 2023

In My Kitchen, August 2023

 In our part of the world, the Tropical Queensland Winter is such a great time to cook, eat and be merry,  to garden, read great books, listen to music, play the piano, and attend concerts etc. There are lots of favourite pursuits competing for my time, however cooking in my kitchen is my happy place when the weather is nice and cool. Our garden thinks it's Spring already, as the temperatures by Winter standards have been quite warm. I'm still slightly under the influence of my recent French experience, so I'm still sharing with you a few treasures and memories from the two months I was over there with my son and his family.

Wednesday, August 17, 2022

Parsley, Pumpkin and Beetroot Hummus: a superb trio of flavours and colours

 My kitchen has been humming this week, I've been making lots of hummus, using up excess parsley in our garden, and the rest of that large pumpkin I bought a couple of weeks ago. Remember those pumpkin scones I made just recently, well what with  pumpkin being such a versatile vegetable, it has now been mashed again and whizzed up and transformed into some very tasty and healthy hummus.

Tuesday, August 9, 2022

Pumpkin Scones: celebrating International Scone Week 2022 #ISW2022

It's International Scone Week 2022, where bloggers from all around the world unite to bake scones and share recipes through their blog posts. I've decided to bake some delicious and golden Pumpkin Scones for this event.

Saturday, August 6, 2022

Baked Granny Smith Apples

Baked apples for dessert can be cooking away while you are eating your main course, and can be prepared well in advance. It is the perfect dessert, as it not only ensures that you eat at least one serving of fruit in your day, but apples are also a great  dessert for the whole family, healthy and delicious. Baked apples are quite the old-fashioned sweet, and our Grannies, even our Great Grannies, back in the day, were happily baking apples with various fillings to stretch the budget and present a delicious and welcome dessert for everyone. Desserts with every meal were the norm in my Grandmothers day. Back then, the cavity was sometimes just filled with sugar, and cloves were placed around the apple for spicy flavour, or a date or a few raisins or sultanas could be placed in the base of the apple, before filling it with sugar. They knew how to make the most of what they had on hand in the pantry. All that sugar and no guilt. They probably served them with custard or homemade ice-cream if they had an icebox, and everyone was happy.  

I've taken the dried fruit ingredient to the next level in this recipe, as I baked my Fruit Mince Teacake a couple of weeks ago, and had a quarter of a large jar of fruit mince leftover in the frig. It is the perfectly spiced fruity filling for baked apples. Apples are such a ubiquitous fruit, that so many wonderful dishes can be cooked with them, however when it comes to baking, the Granny Smith apple performs the best. Did you know about 60,000 tons of Granny Smith apples are harvested in Australia each day?

Legend has it that Maria Ann Smith, also know as Granny Smith, was an Englishwoman who emigrated to Australia in the mid-1800s with her husband Thomas. She was doing some weeding one day in Tasmania, and was composting I like to think, and dumped a crate of old rotten Crab apples from their orchard at the back of their garden. Many months later she noticed a sapling growing, which subsequently produced the green and slightly sour fruit,  which became known as the Granny Smith apple. I'm really pleased that the botanists haven't decided to change it's name. Granny Smith lives on, but she died never knowing that the apples she discovered would be popular the world over, thanks to their resilient qualities. There are many versions of the origin of the Granny Smith apple but they all agree that Granny Smith was responsible. 

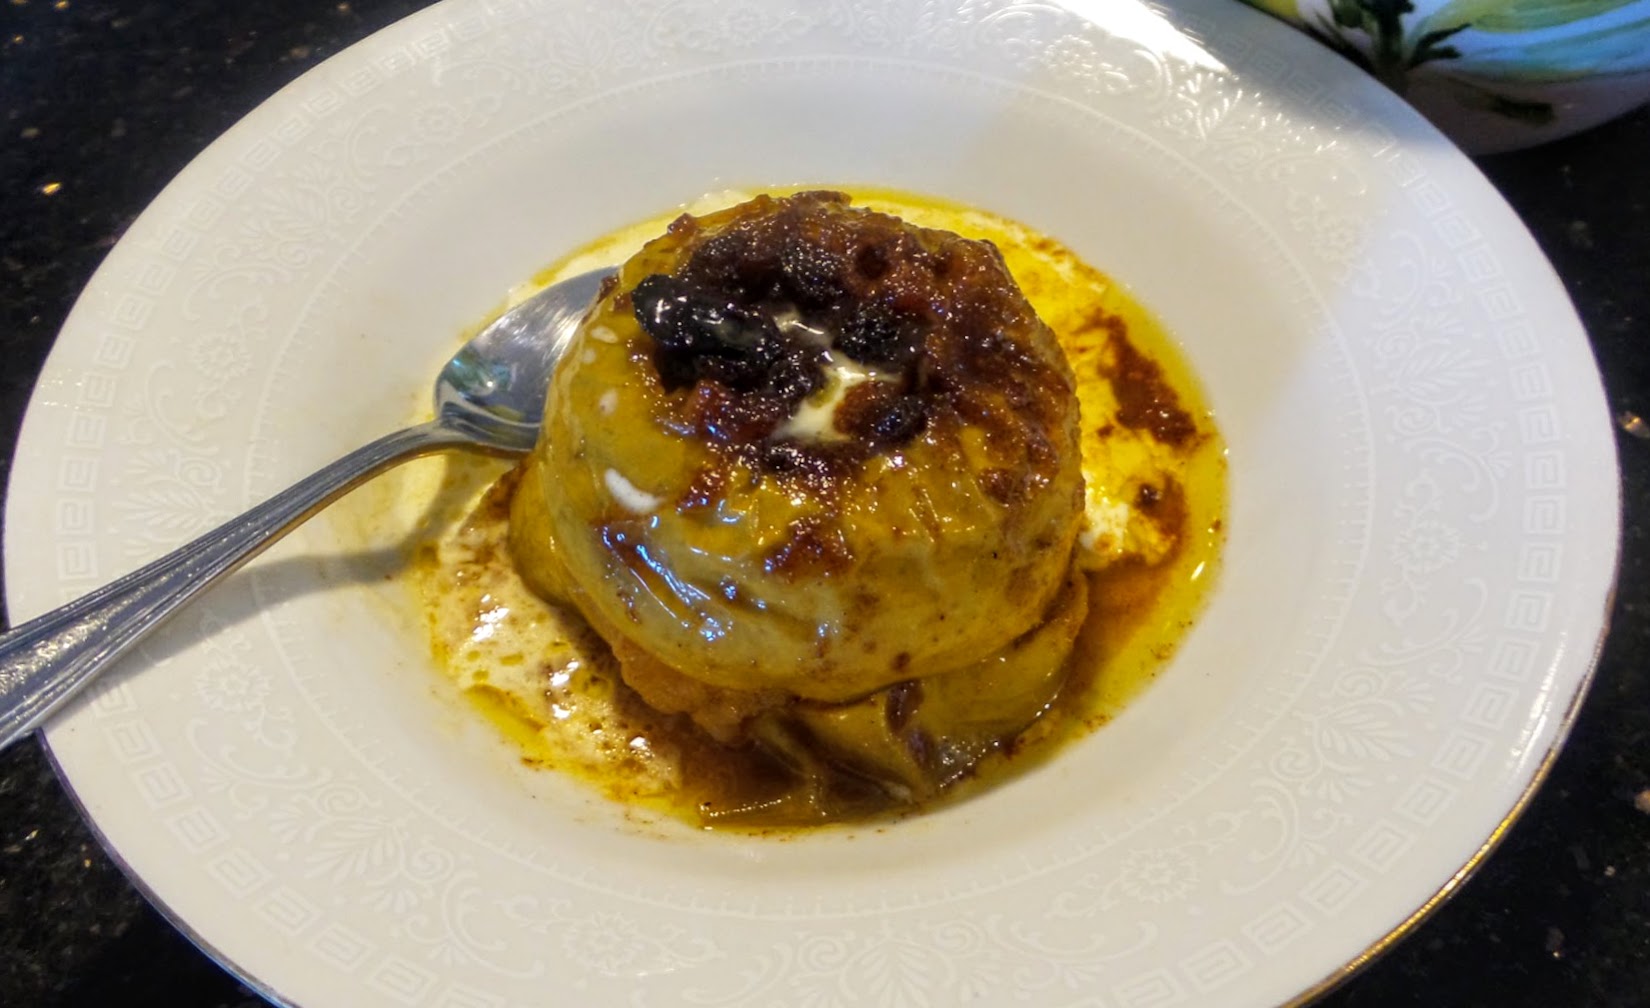
 I enjoy eating fresh apples, but these baked apples exceeded my expectations, especially with fresh cream.

 Ingredients:

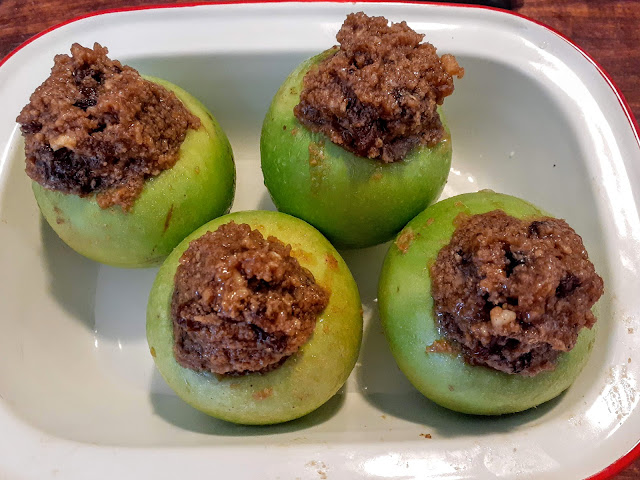
4 large Granny Smith Apples (the green ones)

80g unsalted butter, diced and softened

1/3 cup (65g) brown sugar, firmly packed

1 tsp ground cinnamon

1/2 cup fruit mince or mixed dried fruit

Pure (thin cream) to serve

Method:

Preheat the oven to 180 deg. C

Find a baking dish that the apples fit snugly into.

Core the apples. To prevent the apples bursting during cooking, cut a thin line around the circumference of each apple with a sharp knife.

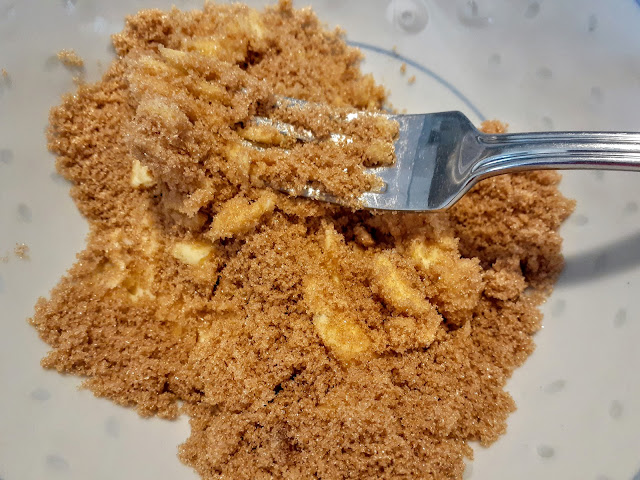
Mash the softened butter and brown sugar together in a bowl with a fork until combined. 

Then add the fruit mince and the cinnamon until well combined.

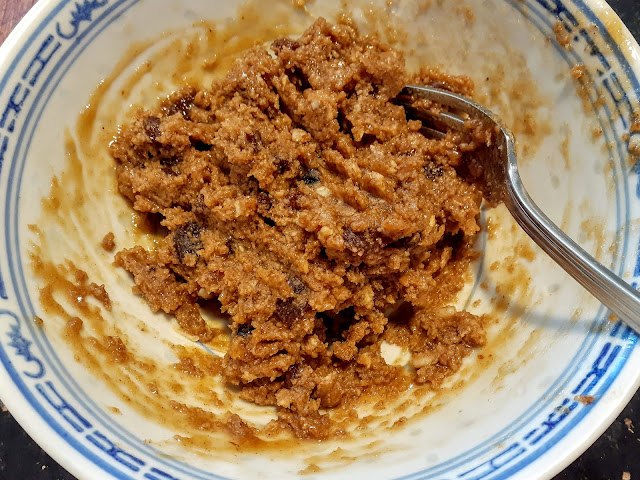
Spoon the fruit mixture into the cavity of each apple, and press it down well.

Pour 1/4 cup water (60ml) into the base of the dish. Bake for 30 minutes or until bubbling and until the apples are just starting to soften.


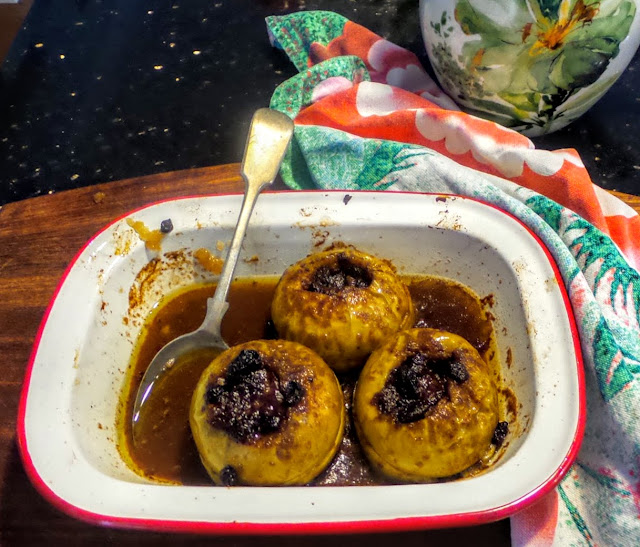
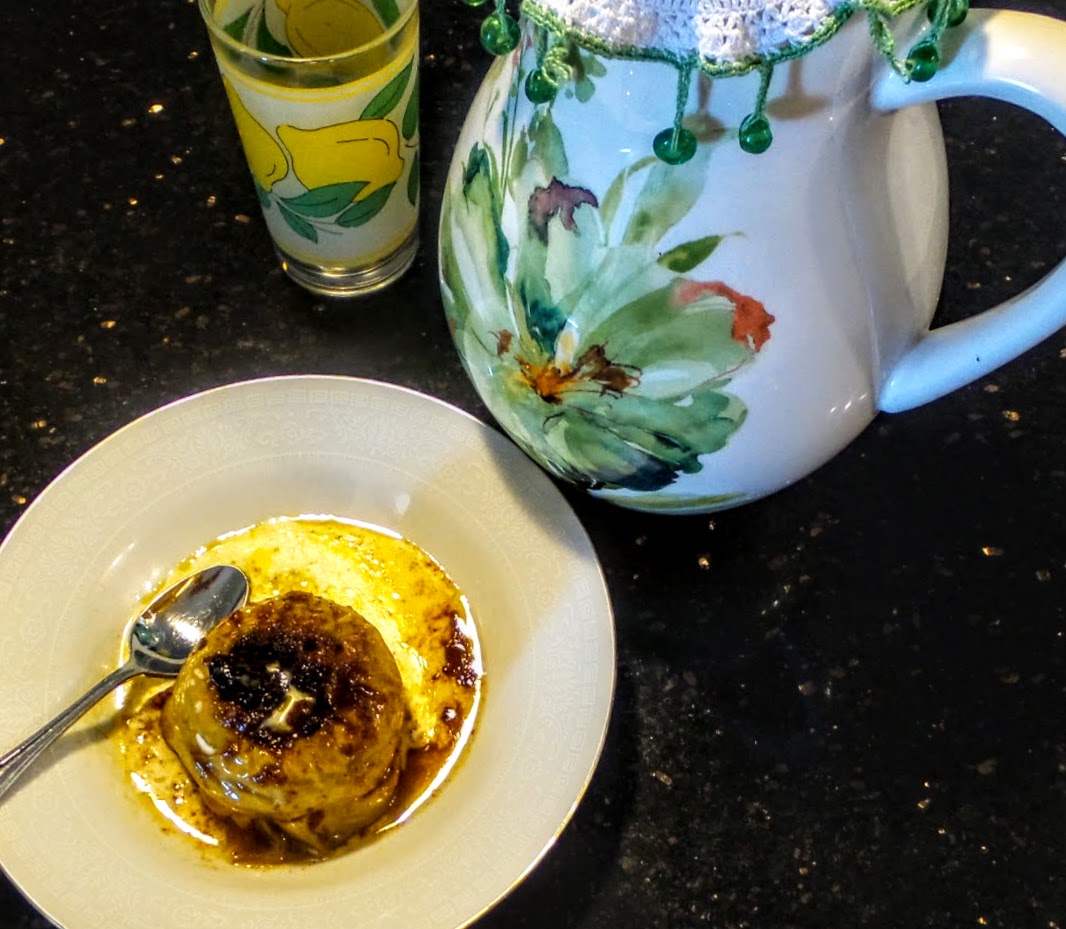
Place the apples on 4 serving plates, small or large, and drizzle the juices from the baking dish over the apples, and top with a lot of cream.

 Serves 4

I have Granny Smith apples in my frig crisper, and some dried fruit in packets, so dessert is sorted for tonight.  We'll be very happy to enjoy a rerun of this dessert, whilst there is still a hint of cool weather left, however this dessert is still light enough to be eaten in Summer.

Hope you have a wonderful weekend. 

Warm wishes,
Pauline


Tuesday, August 31, 2021

Homemade Pasta Bolognese sauce, it's Italian, it's gut friendly and it's delicious


 I've made many versions of pasta sauce over the years, but this is now my favourite. When I have the time and I want a really rich sauce full of Italian flavours, and also minus the acid that some tomato based sauces contain this is the sauce I cook. If you can't tolerate rich tomato based sauces, yet love the rich flavours of Italian herbs, red wine, and pancetta, then this is the dish for you. 

Friday, August 20, 2021

Microwave Shakshuka Eggs Recipe


Shakshuka, also spelled Shakshouka or chakchouka, cooked  in the microwave oven is a real game changer. One morning, when we were in a hurry for brunch, and I had all the ingredients on hand including some very fresh free range eggs, I decided to experiment with cooking Shakshuka in the microwave.  Whilst this is delicious cooked on the stove top or in the oven it can take at least 30 minutes to cook after the initial preparation, but in the microwave it took inside 3 minutes, with the egg whites set beautifully, and the yolks just how I like them. However even better, the eggs can be cooked to everyone's individual taste, very easily this way in individual serving dishes.

Shakshuka  is a popular dish in Israel, although it is supposed to have originated from Tunisia in North Africa. If you are into having fun with words and pronunciations, Shakshuka is pronounced "shahk-SHOO-kah". This recipe is a riff on my original  Shaksuka with Eggs for a Weekend Breakfast or Brunch, which is cooked in the oven or on the stovetop. You will also find  the complete backstory on this dish at this link. If you've never eaten Shakshuka my friends, I hope you give this a try, as it is a delicious way to eat eggs in a very healthy way as well, and it will transport you to exotic locations beyond our reach at present. Treat yourself to this on the weekend when you can enjoy the preparation and the food at your leisure. Think Shakshuka, and think Middle Eastern. Go as simple as you like with this dish, or add extra ingredients to really rev it up.

Cooks tips:
  • Cook up a large amount of the tomato and vegetable sauce, separate it into portions and freeze it to make life easier for when you want to make your shakshuka. Then you will just need to add your eggs and fresh herbs.
  •  Substitute cannellini beans drained and rinsed for the tomatoes for a more hearty meal if you don't like tomatoes, or just add some beans to the tomatoes.
  • Chickpeas are a great addition as well.
  • For a more wholesome dinner dish, and to add more "hidden" vegetables, also add 1/2 a small grated zucchini and 1/2 a grated carrot or 1 finely chopped small eggplant and cook with the capsicum, chilli and garlic for about 5 minutes before adding to the tomato mixture. Increase the width of your microwave bowl if you do this. If the zucchini, carrot and capsicum are grated or chopped very finely, they can be cooked all together at the same time in the microwave with the eggs.
  • Add some chopped green olives for even more flavour if you have them on hand, not essential though.
  • I hope you realise now just how versatile shakshuka is to make, depending on what supplies are in your pantry. Eggs are generally a staple for most people aren't they?
Ingredients:

This recipe is for one serve, so just double or triple the ingredients for extra serves. This is where it's useful to have a large quantity of sauce already cooked and ready to use if you are cooking for a family.

You will need 2 medium sized microwave safe breakfast or dessert bowls to cook these in the microwave for two people.

 1 tablespoons Extra Virgin olive oil
1/4  red capsicum, deseeded and thinly sliced
1 garlic clove, crushed
1/4 mild long red chilli, sliced finely or a dash of tabasco sauce if you like a bit of heat
1/2 teaspoon sugar
1/2 can diced tomatoes, or organic cherry tomatoes (delicious), or use tomato passata (about 200 ml)
2 large eggs per person
1/2 teaspoon sweet paprika
1/2 teaspoon cumin
1/2 teaspoon freshly ground coriander (optional)
1/4 teaspoon salt
1/4 teaspoon black pepper
Tasty grated cheese
( I like lots of flavour, so if you are a bit timid about using spices reduce the amount to 1/4 teaspoon each of sweet paprika and cumin.) 
Freshly chopped mint and coriander

Method:

Coat a microwave safe breakfast or dessert bowl with olive oil using a pastry brush.

Add the tomatoes, capsicum, garlic, chilli or tabasco sauce. Using a small sifter, sift the cumin, paprika, and salt over the tomatoes for even distribution. Add the ground coriander. Season with the black pepper.

Place 2 large evenly spaced indents into the mixture with the back of large spoon, and crack an egg into each indent. Pierce the yolk of the egg with a skewer  or the end of sharp knife. (This is very important so that the egg doesn't explode in the microwave)
(This dish can  also be baked in the oven in individual ramekins if you have them, by adding some of the tomato mixture to each ramekin and then adding the eggs. )

Sprinkle tasty mature grated cheese and 1 tablespoon chopped mint over the mixture but not the egg yolks. I love grated cheese over my shakshuka.

Cover the bowl with cling film or a plate or microwave lid, and then microwave for 1 minute.

Microwave twice more for 20 seconds each, and then check if the whites are setting. Keep microwaving for 20 second bursts until the whites are set, and the egg is cooked to your individual taste. This could take about 2 minutes all up to cook. My eggs were perfect after 2 minutes.
Two small breakfast bowls should fit into your microwave for cooking at the same time.
To serve sprinkle with freshly chopped mint and coriander, and hot buttered sourdough toast, or to keep to the Middle Eastern theme, serve with Toasted Turkish bread.


Shakshuka is delicious for breakfast, but my preference is to serve it for brunch on the weekend. I also plan to make it for Sunday night dinner next week and I think I will also add a small chopped eggplant to the tomato sauce for extra flavour and texture. Eggplant  will need to be cooked prior to microwaving, it can be steamed very quickly.

This dish is healthy, full of flavour and not expensive to make. I have made a quantity of the tomato mixture to freeze so that next time I want to make it for brunch I can just defrost the tomato base, and add the eggs and make it very quickly. 

Have a wonderful weekend and thanks for dropping by,

Warm wishes
Pauline


Sunday, August 8, 2021

In My Kitchen, August 2021

It's been a very good Winter for citrus this year, and we've been given bush lemons, limes and cumquats by friends which I've really appreciated, and which I've loved being able to cook with in various ways.


Lemon Delicious Pudding is a very popular self saucing pudding here, and I used a couple of the Bush Lemons I was given to make this during the week, however any lemons will be suitable. This recipe produces a luscious and creamy lemon sauce topped with a soft lemon flavoured sponge which is an absolute joy to eat. It is also a cinch to make. The recipe is straight out of the iconic Stephanie Alexander's cookbook, The Cook's Companion. Some Lemon Delicious Puddings don't create enough sauce for my taste, but this one does. It is also very easy to prepare quickly, and can be placed in the oven when the main course is resting. I love puddings that can be cooking while we are eating our main course, they are so easy to coordinate.

The Best Lemon Delicious Pudding recipe:

Ingredients:

Juice of 2 lemons and the zest of one
60 g butter
1 1/2 cups castor sugar
3 eggs, separated
3 tablespoons self-raising flour
1 1/2 cups milk
Method:

Preheat the oven to 180 deg. C. and butter a 1 litre ovenproof basin or serving dish. 
Zest 1 lemon and juice both.
In a food processor, cream the butter with the zest and the sugar, then add the egg yolks.
Add the flour and milk alternately to make a smooth batter.
Scrape the mixture from the side of the processor bowl and blend in the lemon juice.
Tip all of this mixture into a bowl.
In a separate dry bowl whisk the egg whites until firm and creamy and fold them into the prepared basin.
Stand the basin in a baking dish and pour in hot water so that it comes halfway up the sides of the basin.
Transfer the basin and dish carefully to the oven and bake for 1 hour. Check it however after 45 minutes, and when the sponge is browned and firm to the touch, it is cooked.
Serve when it has cooled slightly.
It is delicious served with ice cream or pouring cream.


I posted the recipe for my microwave lemon curd recently and here is the link to that if you missed it. I've frozen a couple of bottles which should last 12 months in the freezer, and I made these lemon curd tartlets using some bought sweet pastry shells for convenience, and decorated  them with dehydrated slices of cumquat. They were fun to make and delicious to eat. Lime juice makes delicious curd as well.


Speaking of citrus, I also made some delicious cumquat marmalade last week and here's the link to the recipe if you missed it.  That's the end of my story about citrus.

Cumquat Marmalade

 We've been spending a lot of time in the garden, as its been a perfect month for gardening with lots of Winter sunshine, and this orchid flowered a few weeks ago which was a real surprise for me. It's still in flower which is the nice thing about orchids, they stay in flower for a long time. I bring it inside to the kitchen for a couple of days and then take it outside again for some extra light.


We have a nice selection of herbs growing in sunny spots in the garden. Parsley and basil are growing close to our back door in large pots. This basil plant is nearly finished but I have a few more sweet basil plants growing in the courtyard. Shallots are also growing well here.


Sweet basil, parsley, lemon thyme, oregano, and sage are growing in pots in our sunny courtyard. I use a selection of these most days in my cooking. They are very easy to grow in full sun as long as they are watered every couple of days.


Some cheery marigolds provide a burst of colour near the herbs.


My two Phaius tankervilleae or Swamp Orchid plants, have long spikes on them, the best yet, so I am hopeful they will flower beautifully this year. The bugs eating them have been a problem in the past.

Small pies are an economical way to use up leftovers and make great comfort food. I had made a batch of chill con carne mince, very tasty and not very spicy, and it made a delicious pie filling for some Sunday night pies. We bought a pie maker when we were on holidays in Cairns a few weeks ago, just a reasonably priced one from K Mart, and made 30 small beef stew pies the first time we used it up there. There were 6 people for dinner and they all disappeared, the pies that is. I don't feel guilty at all using this occasionally as the pies are delicious and I feel as if I am having a night off when I use it.  Pies always seem to be a treat.


Fill the pastry base, top it with a circle of pastry, wait about 8 minutes and these delicious pies are the result.


The Pie Maker

Given what is happening in the southern states at the moment with lockdown, and the virus showing no signs of slowing down there, I feel as if I have a lot to be thankful for. With almost 300 new covid cases a day in New South Wales, the lockdown will continue there for a while longer, and could continue into the regional areas. Melbourne is into their sixth lockdown, which has been so disruptive, and very difficult for school children with their end of year exams looming. Hopefully the lockdown in Brisbane finishes this weekend. We are well here, we can move around freely without wearing masks, we have our own lovely home to relax in, and a garden which we enjoy, and lovely friends to spend time with, and Locky, our Border Collie dog who brings a lot of joy to our lives. When we have our second Covid injection in a week's time,  I will feel a lot happier though, and more confident about taking a holiday within Queensland when lockdown finishes. If only it were easier to travel overseas to visit our son and grandchildren who we adore. Hopefully that will be achievable in 12 months time, however there are many other grandparents in the same situation. I just have to be strong. Meanwhile, we are enjoying a simple life, and also hope to start another beehive in a couple of weeks, which we are looking forward to. We finished our last bottle of our own honey last week, so now we are buying it from a local beekeeper, who was very supportive when we had our own bees and lost them to disease.

I am sending this post to Sherry of Sherry's Pickings for the In My Kitchen event.  If you would like to join in, send your post to Sherry by 13th of the month.  Or just head over to her blog to visit more kitchens

Sending love and hugs to you wherever you are,

Stay safe,
Pauline


Tuesday, August 3, 2021

My Homemade Cumquat Marmalade

"Cumquat marmalade is the best of all breakfast preserves, with a scented sharpness and a golden glow all of its own. " Stephanie Alexander, 1996. 

This is a lovely marmalade, and I don't know why I have resisted making it for so long. Possibly because my Mum made perfect Cumquat (Kumquat) marmalade and I wasn't sure that I could match hers. Never mind, I've made a batch now and I couldn't be happier with it, albeit a small batch though which often works best.

Tuesday, August 25, 2020

Pear, Pistachio, and Rose Cake


This is Nigella Lawson's recipe which lives up to every expectation of what a cake should be. The flavours are perfectly balanced, fresh, and with just a hint of rosewater. The topping of apricot jam, lemon juice and rosewater is delicious. I haven't made a cake apart from those in my normal repertoire for a little while, so it was nice to try something new. I'm never sure how successful a cake with just ground almonds and no flour ingredients will be, but the additional ground pistachios provide the perfect consistency. This cake is a cinch to make, the only challenge is to choose pears which are at the edible stage but not too ripe. I used day old pears from the supermarket and they were perfect, and they don't need to be peeled. How sensible is that. With the start of Spring surprising us very soon, this seemed the perfect cake to make.

I thought I would add some edible rose petals to decorate the cake, and on my morning walks with our dog Locky, I walk past a lovely rose garden in the front yard of a duplex property. I often stop to smell the roses. They are always in flower. I took the plunge one morning, knocked on the occupant's front door and asked her if I could buy one of her roses to decorate a cake She wouldn't hear of my buying it from her and said when I was walking past on the day I was decorating the cake to just take one of the roses. So I did, but I took one which had been in bloom for while. I still felt a little guilty about it but the rose was about to be put to very good use. However I have learned from this, that rose petals need to be a bit smaller to look good on a cake. Anyway I had fun with it, and the Mahjong Ladies loved the idea, and the cake. It is nice to decorate a special cake with nuts and edible flower petals for a special occasion, don't you think? This is the pink rose bush in the front that the petals came from. One day I will take the plunge and plant some roses, even though growing them in the tropics requires careful selection and care.


INGREDIENTS

Makes 8-12 slices

FOR THE CAKE
  • vegetable oil (for greasing) 
  • 200 grams caster sugar
  • 100g/ 3/4 cup pistachios
  • 450 grams (approx. 3) pears - not too ripe (cored and cut into chunks, skin still on)
  • 200 grams ground almonds
  • 1 1//2 teaspoons baking powder (gluten free if required)
  • 6 large eggs (at room temperature)
  • 1 1/2 teaspoons rosewater
FOR THE TOPPING
  • 2 teaspoons apricot jam
  • 1/2 teaspoon fresh lemon juice
  • 1/2 teaspoon rosewater
TO DECORATE
  • chopped pistachios
  • edible rose petals


LET'S COOK:

Use a 1 x 20 cm / 9 inch springform cake tin

  1.  Preheat the oven to 180 deg. C/160 deg. C Fan/350 deg. F. Grease the sides and line the base of your springform cake tin with baking paper.
  2. Put the sugar and 100g/ 3/4 cup of pistachios into a food processor and blitz until the pistachios are finely ground, with a few nubbly bits, too.
  3. Add the remaining cake ingredients and blitz until everything is smoothly combined and the pears have been pureed into the batter. Remove the blade, scrape down the mixture and use the spatula to help ease every bit of batter into the prepared tin.
  4. Bake for 40-50 minutes, though take a look at 35 and if the cake looks like it's browning too fast, loosely cover with foil. When the cake is ready, it will be brown on top, beginning to come away at the edges and a cake tester will come out with just a few damp crumbs sticking to it.
  5. Sit the cake on a wire rack and leave to cool completely in the tin; like all flourless cakes, it will sink a little (not too much though). When the cake is completely cold, unclip, remove the base and transfer to a cake stand or plate.
  6. Mix the jam, lemon juice and rosewater together in a cup, then brush this glaze over the surface of the cake, removing any small blobs of apricot if there are any. I didn't really worry about this too much though. Scatter with finely chopped pistachios and strew with rose petals, then sprinkle a few more pistachio crumbs on top.
I think it's time for cake. 

 Best wishes

Pauline


Thursday, August 20, 2020

SHOWCASING IN MY KITCHEN : August 2020

Where has this month gone or in fact the year? I am way behind with In My Kitchen this month, partly because I was thinking about what I could write, have I done anything exciting enough to warrant a post, and now because of the procrastination I hope I'm not too late? I've just spent the morning in the garden with Mr. HRK which is the routine for us this week if retail therapy isn't enticing me out of the house, and it's warming up so we definitely need to back inside by 11 am for a cuppa. However there's been lots of cooking with fresh fruit and vegetables, sourdough bread making, lots of gardening, and a visit to a strawberry farm nearby to pick some strawberries.

Wednesday, August 19, 2020

Cheesy Green Broccoli Coconut Soup


 I couldn't live without soup, particularly during our Winter, which sadly is almost over, here in the North of Queensland.  Using Coconut oil to saute the vegetables brings a very subtle coconut flavour to the pot. It can consist of whatever left over or frozen vegetables you have in your refrigerator, as long as they are green. I am not generally pedantic about these things, but green it is. Just 6 cups of chopped green vegetables and you almost have a soup. Broccoli and zucchini are generally the star ingredients, and at the moment in our supermarkets broccoli  is under $3.00 a kilo, so I went for it and bought heaps of broccoli before the price goes up again. Now we also have a good stock of this in my freezer for those cold or rainy nights, or just those nights when cooking isn't on the agenda. Did I also mention that not only is it extremely healthy, it is also extremely delicious, particularly served with a slice of toasted rye sourdough bread.


1 onion, roughly chopped
2 cloves garlic, chopped
3 tablespoons coconut oil, ghee or butter
6 cups roughly chopped green vegetables , zucchini, broccoli, celery or whatever you have. (However, it works best with zucchini and broccoli.)
1 litre vegetable or chicken stock (homemade is best if you have it)
1 cup rocket or watercress (optional)
1 cup roughly chopped herbs, such as coriander, basil or flat-leaf parsley leaves
Pinch of salt
Juice of ½ to 1 lemon (Test the taste after adding juice from ½ a lemon and add more if required.)
½ cup crumbled sharp cheddar

Method:

Sauté the onion and garlic in the coconut oil in a large saucepan for a superior flavour. (if you are really in a hurry omit this step and just add to the rest of the vegetables, it will still taste great). Add the green vegetables to the onion and garlic and stir for a minute, then pour in the stock and bring to the boil.
Broccoli and zucchini are now recognised as being key vegetables for people suffering from high blood sugar and Type 2 diabetes or pre-diabetes. Without going into too much detail about it, broccoli is a rich source of Chromium, a mineral which helps to improve insulin action in pre-diabetes and control blood glucose, an important factor for everyone these days I think. Never has it been more important to keep healthy and boost our immune system. Green vegetable soup is also quite creamy when pureed, thanks to the texture and structure of the versatile zucchini. This soup makes it so easy to include broccoli in your family's diet in a very appetising way, and control weight as well. However, for some variety and to be economical, use up green leftovers and bits and pieces in your crisper by adding celery, beans, chives, eschallots, peas, spinach or silverbeet, a mix of herbs, or anything green and edible.

You can also add some tasty cheese to your bowl, and if that happens to be a blue cheese well so be it, it will take the whole experience to a new level.


Reduce the heat and simmer for 10-15 minutes.  Stir in the rocket, herbs and salt. (I have used basil, oregano and coriander and they are great in this soup.) The only disappointment with this soup is that it doesn't retain the colour of the beautiful green broccoli when it is cooked, but just becomes a very soupy colour. Never mind, all of the goodness is there.

Changing colour
Turn off the heat and puree until smooth using a stick blender, or pulse in a normal upright blender when it has cooled slightly.

Whisk in the lemon juice and stir through the cheese, or omit the cheese and top with a dollop of yoghurt or basil pesto. I like to garnish with lot of fresh and green herbs such as parsley.

Soup for a freezer stockpile
Serve it up hot my foodie friends and enjoy.

Thanks to Sarah Wilson for this recipe.

Best wishes,

Pauline


Thursday, August 6, 2020

Afghan Biscuits, a delicious New Zealand confection


Afghan biscuits have no connection to the Afghan people or their country of origin, which seems very strange. Surprisingly they originate from New Zealand, from over the ditch, and are their counterpart to our Anzac biscuit, according to the locals. However this is a delicious biscuit, and shouldn't just be enjoyed on Anzac Day. They are really a chocolate, butter and corn flake confection, although weetbix makes a very suitable substitute for cornflakes in this recipe. I had never heard of Afghan biscuits until last April, when  our good friend Christine invited us for coffee on the 26th April, the day after Anzac Day. She had made Afghan biscuits with weetbix which were absolutely delicious. Some New Zealand friends of her daughters make them every year and this is the recipe that she gave me. I have been wanting to make them ever since.
I don't really buy Corn Flakes just to eat as a cereal, as I can't see many nutritional benefits, however Mr. HRK is happy to eat a bowl of them whenever he is feeling like cereal. I bought these a couple of weeks ago to make these biscuits and here they are finally. I love the crinkly texture of these biscuits when I eat them. I made them with weetbix a month or so ago, and a young friend who was visiting said it was just like eating chocolate crackles, remember those? Great children's party food. Those ones weren't iced though. So I had to make another batch and ice them, and add the walnut, so that they look pretty for a photo. 

ICING TIP:
I loved working with the icing for these biscuits. It came together beautifully and I adore chocolate icing, such a guilty pleasure. Here's just a small tip with icing these biscuits. I made the icing quite firm, whilst I was baking the biscuits and left it in the bowl until the biscuits cooled. I then added just a few drops of warm water which was enough to make the icing more spreadable. Then using an old tip from my Mum, I placed a bread and butter knife in a cup of hot water, and used the warm blade of the knife to carefully spread the icing on the biscuits. A hot knife makes icing much more spreadable and it doesn't drizzle off the biscuit. You don't want that. The trick is not to have runny icing for biscuits. This amount was perfect for 18 biscuits. 

These are the fastest biscuits to make. This batch took me 30 minutes from beginning to end, not including the icing. That's the beauty of baking biscuits.

Ingredients:

Preheat oven to 180 deg. C. (350 deg. F)

Makes 18 biscuits

200 g (7 oz.) butter, softened or melted

1/2 cup or (75 g, 3 oz) sugar
1 1/4 cups plain flour
1/4 cup cocoa
2 cups cornflakes ( 50g or 2 ozs) or crushed weetbix
1 teaspoon vanilla essence

Chocolate icing:

1 1/2 cups sifted icing sugar
1 heaped tablespoon sifted cocoa (sift with the icing sugar)
1 teaspoon vanilla essence
1 teaspoon melted butter
1-2 tablespoons water
18 walnut halves

Cornflakes added to mixture

Method:

Preheat oven to 180 deg. C. (350 deg. F.)

Prepare a large oven tray by greasing or spraying lightly with cooking spray, and covering with baking paper. I used a large one and a smaller one.
Cream butter and sugar until light and fluffy, about 4-5 minutes.
Sift flour and cocoa. Stir into creamed mixture, and add vanilla essence.
Fold in cornflakes or weetbix. It will form into a ball.


Take tablespoon sized amounts and roll into balls and spread evenly on the tray. Flatten balls lightly with a fork or your finger.


Bake at 180 deg. for about15 minutes or until set. They will be a little soft when they come out of the oven but will crisp up. Allow to stand for 5 minutes before transferring to a wire rack to cool completely.


To Prepare the Icing:

In a medium bowl combine the sifted icing sugar and cocoa, vanilla and melted butter and mix.

Slowly add the water a little at a time until a firm consistency is reached. If you add too much water, just add some more icing sugar until the desired consistency/.

When cold, ice the biscuits and decorate with a walnut half.
Store in an airtight container for 3-4 days.


It's time for afternoon tea, so I am having a cuppa and one of these biscuits. Please take care during these difficult times.

Thanks for dropping by,

Pauline

p.s I just found this after I posted my first recipe. My friends, if you are running short of time and need to make an even faster batch of biscuits, this recipe for Afghans is taken from the Edmonds Cookery Book, New Zealand's no. 1 cookbook, first printed 1955.

Easy Afghans

1 packet Edmonds Chocolate cake mix
50 g (2ozs) Butter, melted
2 cups cornflakes
2 tablespoons water

Combine all ingredients to form a stiff dough. Drop teaspoons of mixture onto a greased oven tray. Bake at 180 deg. C (350 deg F.) for 15 minutes in a preheated oven. When cold, ice with chocolate icing if desired.


Saturday, August 31, 2019

Chocolate Eggplant Brownies, a Father's Day surprise package


Eggplant in Brownies, what next? When I saw this Brownie recipe including eggplant, and I had a large glossy black eggplant languishing in my fruit bowl which needed to be used,  my interest was piqued. This is the result. I seem to be including fruit and vegetables into the cakes, and desserts I make more and more these days, reducing calories, adding fibre, trying to stay healthy,  which also means I can still feel as if I'm indulging on a regular basis  without feeling guilty. Do you know what I mean? There is a plethora of Brownies recipes in circulation now, some including cooked beetroot, pears, or whatever your little heart desires really. I wanted to make Mr. HRK something nice for a Father's Day treat, as our children aren't in town, and Father's Day is a good excuse to make something special.

Thursday, August 29, 2019

Moroccan Orange Blossom, Cardamon and Yoghurt Bundt Cake


 This is a special occasion Bundt cake combining aromatic cardamon and cinnamon, with orange blossom water and yoghurt, and some pomegranate seeds for glamour.It might sound fancy, but it's a cinch to make as no electric mixer is required for this recipe just a whisk, a mixing spoon, a large bowl and a Bundt cake tin. It tastes so amazingly good, that I am tempted to change years of tradition at Christmas this year, and replace my fruit cake with this light and exotic taste sensation, or perhaps I will make two to suit all tastes.  Add some red ribbon, ornaments and other adornments and we could have a Christmas cake.  

A slice of Bundt Cake with Mahjong anyone? Regular readers will know that most Tuesday afternoons I play Mahjong with a group of ladies, and an important part of the afternoon's enjoyment is that we also enjoy coffee and cake made by our hostess. It was my turn this week to have Mahjong at our place and so I decided it was time to make this cake again.

Bundt cakes have a firmer consistency than a lot of cakes and so they release from the tin very easily. They are called Bundt cakes because they are baked in a fluted style of tin with a hole in the middle which originated in America, however the denser type of cake mixture has more European roots from countries such as Germany. My tin isn't as fluted as some of the ones out there so the Bundt shape isn't as obvious. By any standards though it is a delicious cake and only takes 30 minutes to bake in the oven. The whole cake can be prepared and cooked quickly which will be great in our Summer heat.


I mention Mahjong occasionally and some of my reader friends express an interest in it so I thought I would give you a glimpse of some of the winning hands from last Tuesday, a mini Mahjong Masterclass if you like. I was lucky enough to win two of the games. It is surprising how many people are playing Mahjong now, and it doesn't need to be as competitive or as time consuming as the game of Bridge. I am told though that playing Mahjong on the computer is very different to playing with other people in the Western style like we do. We learn amongst ourselves and have two excellent books to refer to written by Patricia Thompson and Betty Maloney called The Mahjong Players Companion, and The Game of Mahjong illustrated. Some community groups including U3A also teach it if you are interested. I thought you might enjoy the names of the various hands which were the winning hands for us last Tuesday. So after the very pleasant Twittering of the Birds, which is the name for the shuffling of the tiles as they click away, we built our wall of tiles, aka the Great Wall of China, which can't be broken or the bad spirits will enter apparently,  and then the games begin.

Crazy chows.
The range of winning hands is vast however this is one of our favourite hands, and possibly one of the easiest as it gives players a lot more flexibility to move the tiles on their rack around . The tiles on the board below are from a winning hand of Crazy Chows. The tiles on this rack are made up of the three Mahjong suits, Spots, Bamboos, and Cracks, and are all numbered. This was one of my winning hands. A chow is a run of three tiles eg 3,4,5, however in Crazy chows the chow is made up of a tile from each suit. 

Crazy Chows

Crazy Chows again
A player is only allowed to win once with a Crazy Chow on any afternoon.

Ordinary Mahjong Hand. This hand might be called an ordinary hand but it is far from ordinary, and here we have tiles all in the same suit. Bamboos, Spots or Cracks and also some Winds and Dragons are part of the hand if we are dealt them. Achieving this hand is very satisfying, and a lot of fun, and because tiles can be picked up from the discard pile to add to your hand, it means more control over the game for the player with an ordinary hand. Before trying to learn the plethora of other Mahjong hands, I think this is the first hand a player should try and learn, providing a good foundation for the game.


An ordinary Mahjong hand, one of the most popular hands


In this ordinary hand we have a Pung of 3 spots, a chow of 4,5,6 spots,  a pair of East Winds, 3 Green Dragons (F), and 3 South Winds (S). 

Triple Knitting, which is matching one from each suit with the same number. This was also one of my winnning hands. I have to say that I knit better at Mahjong then with knitting needles.

Triple Knitting

Three Philosophers. This hand is made up of a chow in each suit, a mixed chow, and a pair in any suit. We all like this hand and it is easy to remember.


Another winning hand of Three Philosophers
A serious game in Progress here


The tiles are being dealt out to the players here. Each player has 13 tiles, the dealer starts with 14.


Big Robert. Lou won this hand below with a Big Robert. I don't know who Robert was but there is also a hand called Little Robert.This hand needs three runs of 4 tiles with a run in each suit, and a Pair of Winds. It's not an easy hand to achieve.

The Wind tiles are East, South, North and West, E.S.N.W, and feature in a lot of the hands.

Big Robert
Other popular hands are Wriggly Snake, Gerties Garter, Moon at the Bottom of the Well, Five Odd Honours, Green Jade, Hovering Angel and many more. The challenge is to remember the various hands and choose the right hand to suit the tiles you are dealt. I am also very fortunate that Mr. HRK made my wooden Mahjong racks from scratch, and they are state of the art with indicators at the corners of each one to help with building the wall straight. He's taking orders if you would like a set made, he just doesn't know it yet:) I'm not sure what he would charge though. He really does a beautiful job.

Well after this little introduction to the game of Mahjong which I hope you enjoyed,  I think we should cook don't you?

Let's Cook:

This recipe requires a 2L (25cm)  bundt cake pan and Serves 6.

Moroccan Orange Blossom and Cardamon Yoghurt Bundt cake recipe


Ingredients: 
1 ⅓ cups (200g) self-raising flour, sifted
1 cup (125g) almond meal
⅔ cup (150g) castor sugar
1 tsp baking powder
2 eggs
1 cup (280g) thick Greek-style yoghurt
150ml sunflower oil
Finely grated zest of 1 lemon
1/2 tsp ground cardamon
1/2 tsp ground cinnamon
2 tsp orange blossom water

Icing:
1 1/2 cups (225g) icing sugar, sifted
2 tbs milk
1 tsp orange blossom water
I decorate this cake to serve with Pomegranate seeds or chopped pistachio nuts

Let’s cook: 

Preheat your oven to 180 deg. C. Grease and flour a 2L (25cm) bundt cake pan.

In a separate bowl, whisk the eggs, yoghurt and oil until well combined, then stir into the dry ingredients.


Fold in the lemon zest, and 2 tsp orange blossom water. 

An important tip to remember when using a bundt pan is that you must grease and flour every area of the baking dish before you pour in the cake batter. Then before placing the pan in the oven, thump it a couple of times on the bench to remove any air bubbles from the batter. (Don't worry if you forget this step, I did.) Spoon mixture into the greased and floured bundt pan and bake for 30 minutes or until a skewer inserted into the cake comes out clean.


Cool the cake slightly, then turn out onto a wire rack to cool completely.


The only thing I was worried about with making this cake was removing it from the pan when it was cooked. As it happened, this was simple. I eased a few of the edges away from the tin with a knife, tipped it upside down on a plate, and hoped for the best. It came out beautifully. 


Phew, out of the tin and it didn't stick to the sides at all.


The Icing on your cake:   

Stir the icing sugar, milk and remaining 1 tsp orange blossom water into a small bowl until you have a slightly firm but drizzling consistency.  Pour the icing into a jug, then drizzle over the cake, so that it covers the surface and drizzles over the side of the cake. This will also be easier if you rotate the cake slowly as you pour the icing over the surface.When the icing is nearly set, sprinkle over the pomegranate seeds, or even just chopped pistachio nuts, or both, then serve. 

Below is a photo of the same cake I made almost four years ago now, and I think this is possibly a better photo than my latest one, but not as much icing. Bundt cakes don't necessarily need any icing, but I do like icing with my cakes don't you?


My daughter is getting married in two weeks in Cairns to a wonderful young man, so yes I am in somewhat of a spin, and working through a list of things to do, and we are very excited. I sent her a photo of this cake thinking it would be nice for Christmas in Cairns suiting the warmer weather, and she has suggested it would also be nice to have in the house as a prewedding cake, so I will be making another one shortly. 

Warm wishes and stay safe,


Pauline


xx