Showing posts with label Nigella Lawson. Show all posts

Wednesday, May 28, 2025

Nigella's Apricot Almond Cake with Rosewater and Pistachio


There's only one Nigella Lawson, and this delicious, fragrant and beguiling cake is one of my all time favourites of her many cakes. With the apricots shining like jewels on the surface along with the chopped Pistachios, and the beautiful flavours of Rosewater and Cardamon within, this cake could proudly be served as the finishing touch to a Middle Eastern Banquet, or as an afternoon tea treat.

Wednesday, September 13, 2023

Very Smart Strawberry Streusel Cake


A highlight of my sweets baking recently is this very smart Nigella Lawson Strawberry Streusel cake, marbled with beautiful strawberry puree,  a combination of fresh strawberries and strawberry jam.  Why is this recipe very smart? Because besides the very easy strawberry layer, one dough does double the work, it becomes the cake batter and the streusel. This isn't the kind of cake that I would tackle at the end of a long day at the office. This cake requires a calm mind with my favourite music playing in the background, a clear head,  and plenty of time at my disposal. Cooler weather also helps to keep the butter chilled. Whilst strawberries are in season, this cake will be on rotation in my kitchen and will be quite simple to make next time. I can't wait. This recipe was also featured in the New York Times.

Saturday, April 8, 2023

Easter Chocolate Fudge Cake with Malted Buttercream

This fudgy chocolate cake with a decadent Malted Buttercream icing is the real deal for an Easter extravagance. It's not too late, this cake doesn't take long to make. I've previously posted this Chocolate cake with Nigella's Coffee Buttercream, and because I am absolutely smitten with this cake, I am posting it again with the Malted Buttercream. 

Thursday, April 6, 2023

In My Kitchen April, 2023


The Easter Long Weekend starts tomorrow, and as I write this, I am under the lifesaving ceiling fan, as the Northern tropical heat hasn't abated like it's supposed to over Easter. I am in beautiful Cairns, in Far North Queensland at our daughter's home, and I know there is lots of chocolate "hidden" in the refrigerator waiting for Easter Sunday to be enjoyed by all of us. I the Easter bunny coming to your house? Delicious chocolate goodies and Hot Cross Buns are the theme of foodies and food bloggers around the world leading up to Easter, there's so much Easter excitement. However, my go-to fudgy, double layered Chocolate Fudge Cake will be our baked chocolate indulgence of choice over Easter. It will be the third time I've baked this beauty over the last few weeks. Whether it's iced with Malted Buttercream, or with Nigella Lawson's Coffee buttercream, it's a winner. 


This is my April submission to the #IMK series hosted by the wonderful Sherry from Sherry's Pickings. Each month food bloggers from around the world gather to share what is new in their kitchen.  I don't buy a lot of new merchandise for my Kitchen, just mainly food ingredients, but I love cooking and baking. This is a sample of what I've been very happily cooking In My Kitchen.

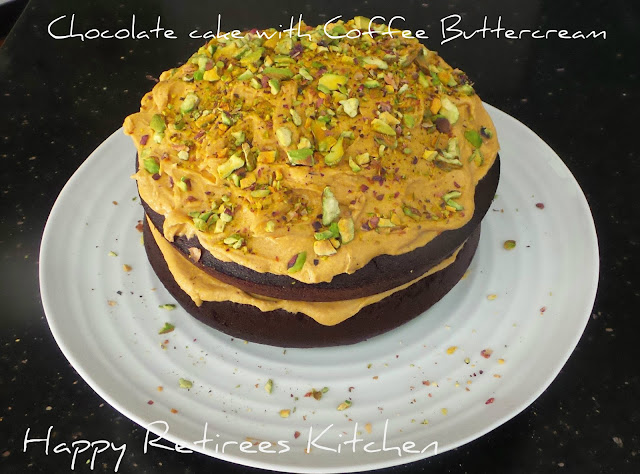
Chocolate fudge Cake with Nigella Lawson's delicious Coffee Buttercream


Mr. HRK prefers Nigella's Coffee buttercream version for icing. I also love a chocolate cake with just the old-fashioned chocolate icing which is so easy and very heat tolerant. It was almost Death by Chocolate when I made the Malted Buttercream version of the Chocolate cake for Jenny's birthday recently, so delicious, chocolatey and fudgy, and slightly challenging to transport in the North Queensland heat but we made it. Buttercream needs to be refrigerated, so as soon as I iced this cake which is the photo at the top of this post, it was in our frig, and she stayed there until it was transported very carefully over to Jenny's refrigerator to be eaten for dessert that evening. Here's the link to the Chocolate Cake and Coffee Buttercream recipe, and I'll post the Malted Buttercream recipe shortly.

On a more Savoury note, I made these cheesy vegetable muffins four days ago and I am thrilled with them, not only for how they tasted when first baked, but how after being refrigerated for a few days and now being reheated in Cairns for morning tea they are still light and fluffy in texture and even more improved in flavour. If you take a look at the recipe, you will see the various vegetable combinations that are possible for these muffins.


I baked a few loaves of sourdough bread in the morning and made Herbed Mushrooms with Goats cheese for lunch which was delicious on toasted sourdough.


I found a silver Beetroot server when I was in Brisbane shopping at my favourite Antique shop in Annerley. It's perfectly designed for serving Pickled Beetroot allowing all the beetroot juices to drain through. Let's face it, beetroot juice can be very messy. Here's a batch of my Pickled beetroot which is infused with cinnamon. It was really tasty.


And on a cooler, rainy day at home I made chicken soup. Here's a photo of the stock in the soup pot.


I think of Boiled Fruit Cake as contingency baking. If there's a boiled fruit cake in the pantry or the refrigerator there's always cake on hand to have with a cuppa for surprise visitors. 
This Cherry and Brandy Fruit cake recipe makes two 20 cm cakes. One has travelled to Cairns with us, and the other one is in the refrigerator at home. It'll be there on our return. I've made this cake so many times, as whole round cakes and muffins, it's my friend Mr. P's Mothers recipe and is a real goody. 


Sometimes it's handy to have a retro recipe up your sleeve, and Salmon Rissoles or fishcakes are very retro, but these have a couple of optional surprise ingredients. Anyhow they were really good, coated in egg and breadcrumbs and pan fried and very crispy, what's not to love. Besides being tasty, retro food generally also stretches the budget, that's pretty important right now don't you think?


Those of you who know me well will be expecting a new Traybake in this edition. Here it is my friends, Moroccan Baked Chicken with Fennel and Chickpeas.  Very tasty.


Creamy French Tarragon Chicken transported me to France, which was my intention and this dish lived up to expectations. I'm hoping the airlines do the same for me in a couple of weeks. I'm off to France, to visit our son and my beautiful grandchildren, and hopefully sample some delicious French cuisine while I'm there. Did you know Cuisine is the French word for cooking? Seems obvious, doesn't it? 


Mr. HRK gave a couple of little visitors a tour of our beehive. They loved it, morning talk about bees coming up. We're hoping there will be fresh honey to harvest in Spring. Usually our bees are quite placid, no gloves needed, however they didn't appreciate being visited at 4 pm in the afternoon and were quite angry for some reason. Mr. HRK was stung twice, once on his face and on his hand. His hand really swelled up for a couple of days. Thankfully the girls were well covered and were standing right back from the hive. After all, bees are wild insects.


Gracing my daughter's dining area, is this newly acquired and endearing painting and drawing of an owl gifted to her for her birthday, by a talented friend. Aren't the eyes just full of so much expression? 


Mr. HRK picked these flowers from the garden this morning while he was pruning. Tropical flowers are just so colourful.


Hoping you have a very special, restful and meaningful Easter. Safe travels if you are travelling.

Warm wishes,
Pauline

Monday, March 20, 2023

Chocolate Fudge Cake with Coffee Buttercream

"If the answer is chocolate, who cares what the question is."

Chocolate Fudge Cake with Coffee Buttercream

I'm in "Chocolate Heaven" with this cake. I might have mentioned previously that I've been working through chocolate cake recipes in my quest to find what I think is the perfect chocolate cake for all occasions, my go-to no fuss chocolate fudge cake, my signature cake. This is it for now, my perfect chocolate cake. MasterChef Winner Emelia Jackson says that this cake will always produce the same amazing result, whether it be for a birthday party, or a casual get together with friends where dessert is required, just decorate it accordingly. Dress it up with a heavenly ganache or go simple with a dusting of cocoa or icing sugar, and a serving of cream. Bake it into cupcakes, use it in a trifle, loaf cakes, there is no limit to how you can bake it or use it. Instant coffee is the secret weapon in this cake, it enhances the flavour of the chocolate without adding its own coffee flavour. I also like that there's no melted dark or milk chocolate in this cake batter, just rich, dark Dutch cocoa.

I have been debating whether or not to post this recipe just yet as there is another buttercream that I would like to fill and cover this cake with, and hopefully that is coming when the weather continues to cool down. I'll let you know when that happens, because Emelia's Malted Buttercream that I'm talking about looks like a real showstopper for a special occasion. This cake recipe is extracted from "First Cream the Butter and Sugar", by Emilia Jackson, and I can't wait to try some more of her recipes, because I love this cake. Needless to say, I couldn't wait and had to share the recipe with you.

Mahjong table setup in the air-conditioning and waiting for my Mahjong friends to arrive.

I chose to make Nigella Lawson's Coffee Buttercream this time because I love it, and I've made it before with a different chocolate cake recipe. I was in a bit of a rush because I'd made this cake for the Mahjong afternoon tea at home, it comes around quickly, and I wanted a buttercream that I could depend on when made in advance. Even though the air-conditioning was on at home the day I iced this cake, there were a lot of other things going on around me. Aren't there always though?

Ingredients:

Makes a 20 cm two tier cake 

380 g light brown sugar

250 g cake flour (store bought or see tip below for making your own)

100 dark Dutch cocoa powder (I used Plaistowe premium Dutch processed from Woolworths)

1 1/2 teaspoons baking powder

1 teaspoon bicarbonate of soda

1 teaspoon fine salt

2 teaspoons instant coffee powder

200 ml boiling water

100 ml neutral-flavoured oil, such as vegetable or canola

200 g sour cream

4 eggs

chocolate shavings to garnish (optional)

Method:

Preheat the oven to 160 deg. C (140 deg. C fan forced)

Line two 20 cm round cake tins with baking paper

Whisk the brown sugar, flour, cocoa, baking powder, bicarbonate of soda and salt to ensure that there are no lumps. (No need to sift)

Dissolve the coffee in the boiling water in a largish jug, then add the oil, sour cream and eggs and whisk until thoroughly combined. Make a well in the centre of the dry ingredients and pour in the egg mixture. Fold until just combined. We want a lovely tender cake, with a good crumb, overmixing will prevent this from happening.

Split the batter between the cake tins and bake for 50 minutes. This was perfect for my oven but test it with a skewer inserted into the center of the cake. If it comes out clean, the cake is cooked.

Leave the cakes to cool for 15 minutes before turning them out onto a wire rack to cool completely.

Pauline's baking notes:

Adding coffee to the cake batter enhances the flavour of the chocolate. You can't taste the coffee.

What I also love about this cake is that it doesn't sink in the middle as some do.

Cake flour: After making this cake, I am really on board with using cake flour, for a superior and tender cake crumb. Cake flour is a low protein flour that creates a very tender fluffy and light cake. You can make your own. Just measure out 430 g plain flour, then add 70 g corn flour and sift together. By adding the corn flour, the gluten content in the plain flour is reduced from 11 per cent to between 7 and 9 per cent. (Emelia Jackson). I've started making it in a large batch so I am always prepared for a cake making session.

For medical reasons the only nuts I eat now are walnuts as they are the softest nut, so I didn't add any chopped nuts to the photo of the cake. However, it looks and tastes lovely with chopped pistachios on top of the buttercream.

Nigella Lawson's coffee buttercream

Generally, when I make icing for a cake, I just do it the traditional way as I have always done and add the ingredients until it looks, feels and tastes right. However luscious Buttercream is a different story so I followed this recipe.

Ingredients:

350g icing sugar.
175g soft Unsalted Butter. softened
Instant Espresso Coffee Powder, 2 1/2 teaspoons, dissolved in 1 x 15ml tablespoons just-boiled water
(All of my tablespoon measurements are 20ml and that is what I probably used in this recipe with no problems)
This icing is a cinch to make in a food processor. Because it is warmer and more humid where I live than where this recipe was probable tested, I thought I might have problems with the icing melting all over the cake, but it held its consistency beautifully.

Method:
  • Pulse the icing sugar in your food processor a few times to remove any lumps but make sure the feeding funnel on the lid is covered so that icing dust doesn't fly everywhere:)
  • Add the softened butter and blitz to mix, scraping down the bowl once or twice.
  • With the motor running again, pour the coffee down the funnel of the processor and quickly blitz. Remove the blade carefully and scrape down the blade with a spatula.
  • Place one of the cakes on a serving plate or stand, flat side up. It is probably better to place the highest cake as the base. Spread the lower layer generously with half the coffee butter cream, then make a sandwich with the second layer, with the top of the cake facing upwards.
  • Pile the rest of the buttercream on top and use a wide icing knife or spatula to spread the icing, over the cake. Nigella uses the word "swirlingly" to describe this technique which I love.


The bottom layer of the Chocolate Fudge Cake is iced. 

One iced layer of the cake might be enough for morning or afternoon tea, so sometimes with a double layer cake I freeze one of the layers for another occasion.


This is a different chocolate cake recipe that I made a few years ago when I used the Coffee buttercream as well.

Cake bakers say that money can't buy happiness, but a divine chocolate cake can. Decorate as you wish. I sometimes use smashed pistachio nuts, or you could use chocolate covered coffee beans as Nigella Lawson did or white chocolate buttons for contrast. It is your choice.  There is so much to choose from.

I think I need to tell you all that I'm not a chocaholic, in fact I rarely eat chocolate at all, however I love a delicious chocolate cake. How about you?

Warm wishes, 

Pauline


Wednesday, December 14, 2022

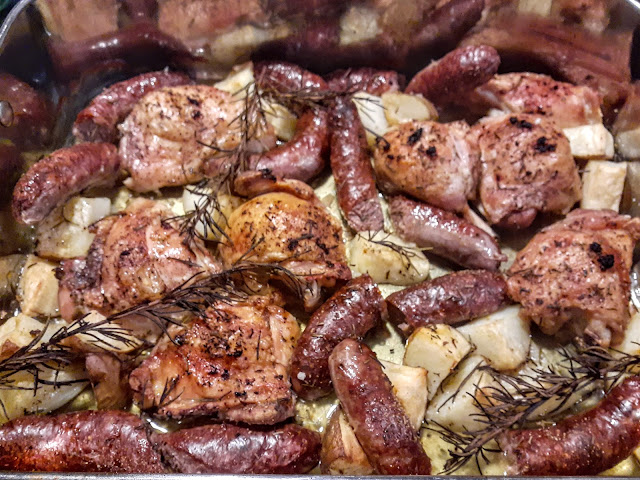
Italian Chicken and Sausage Tray Bake


Chicken and sausage Italian Tray bake, one tray cooking, originates from the Italian Tuscan Hills with enormous Mediterranean flavours. This is an adaptation of Nigella Lawson's Italian Traybake recipe from her Nigellissima cookbook, published in 2012. This cookbook still stands proudly on my bookshelf. I can't remember how many times I have baked this dish since I first bought this book shortly after it was published, and it has never failed me. In fact I am more of a fan than ever. 

Thursday, November 3, 2022

Honey Chocolate Cake, Bee Keeping in the Tropics, and our Honey Harvest


Hello to all Chocolate Cake lovers. I'm not a chocoholic, in fact I can give or take chocolate most of the time, but it is one of life's little luxuries along with honey. However, I do love a slice of Chocolate Cake. On the weekend, when I had a craving for chocolate and chocolate cake I was unaware of what was to follow.  I think this was a premonition that we would need lots of cake and extra energy the following week as dramas with our beehive erupted. I was also hosting Mahjong on Tuesday, so my friends happily indulged me in my visceral desire for some chocolate cake and we all enjoyed a slice for afternoon tea. More of our evolving bee story later, because firstly I need to divulge to you the recipe for one of the most delicious chocolate and honey cakes on this planet.

This is a Nigella Lawson recipe, and I chose to bake this one flavoured with honey in appreciation of our bees and all hardworking bees and their bounty of beautiful honey and as a dedication to our Queen Bee Lizzie who swarmed from our hive with her bees during last week. They are wild insects, and they were Lizzie's bees, not ours. The honey used in this cake was produced during her reign as Queen Bee. Despite all of this, the honey we harvested from our hive, two days before the bees swarmed is beautiful in this delicious, moist and very soothing chocolate honey cake.

Let's Bake:

INGREDIENTS

Serves: About 10 slices

100 grams dark chocolate (broken into pieces)

275 grams light brown muscovado sugar

225 grams soft butter

125  millimetres (1/2 cup) runny honey

2 large eggs

200 grams plain flour

1 teaspoon bicarbonate of soda

1 tablespoon very fresh cocoa powder

250 millimetres boiling powder (1 cup)

FOR THE STICKY HONEY GLAZE

60 millilitres water

125 millilitres runny honey

175 grams dark chocolate

75 grams icing sugar

METHOD

All the ingredients need to be at room temperature, so take them out of the refrigerator in plenty of time.

Melt the dark chocolate (100 g) from the cake ingredients, in a good-sized bowl, I did it in the microwave, but you can melt it in a good-sized bowl suspended over a pan of simmering water, ensuring no water or steam at all gets into the chocolate so that it doesn't seize.  Set aside to cool slightly.

Preheat your oven to 180 deg C/160 deg C Fan forced or gas mark 4. Butter and line a 23 cm / 9 inch springform cake tin.

In your mixing bowl, beat together the sugar and soft butter until it is creamy and light, and then add the beautiful runny honey. Add one of the eggs, let it beat in the butter mixture while adding one tablespoon of the flour. Then add the other egg, and another tablespoon of flour, 

Fold in the melted chocolate, followed by the rest of the flour, and the bicarbonate of soda.

Push the cocoa through a tea strainer to ensure no lumps and add to the batter. Strangely this worked.

Finally beat in the cup of boiling water. 

(At this point in her recipe, Nigella says that she supposes there is nothing stopping from doing all of the steps so far in the food processor, blitzing everything except the boiling water, and then pouring the boiling water down the funnel with the motor running.) I felt much happier mixing this cake in my Kitchen Aid.

Mix the runny cake batter well to ensure it is smooth, pour into the prepared cake tin.

Cook for an hour and a half. Check it after 60 minutes to ensure it's not catching and if it is, cover the top lightly with foil and then check every 15 minutes. If you pull the oven tray out too early to check the cake, it may sink slightly in the middle.

Let the cake cool completely in the tin on a rack.

ICING OR GLAZING, that's up to you.

This cake has such a soft crumb and a beautiful flavour with a hint of honey, and could be served uniced with a sprinkling of icing sugar over the surface if you feel so inclined.

However, I do love an iced chocolate cake, and I know many of you do as well, and as we were in the middle of a heat wave here, I elected to ice the cake rather than glaze it, so I will give you Nigella's glaze recipe in case you would like to glaze instead of ice.

My Traditional Chocolate Icing:

This is how my Mum always iced her chocolate cakes. To ice the cake, I mixed up 4 cups of icing sugar in the food processor to remove any lumps. To that I added 4 tablespoons of cocoa and gave it a quick mix.

Transfer the icing sugar to a medium sized mixing bowl.

I melted 2 tablespoons of butter and mixed that into the icing mixture.

I then warmed up 1/2 cup of full cream milk in the microwave, and slowly added that to the icing sugar until I had the stiff consistency I was after. I wanted to be able to ice the cake the day before I needed it, and be sure that it wouldn't run off the cake in our tropical heat. It didn't. It was the perfect consistency and even retained the decorative squiggles I made in the icing with a fork.  To spread the stiff icing on the cake, firstly put dollops of the icing on the cold cake, then dip a knife in a glass of hot water, and use your hot knife to spread the icing evenly over the surface of the cake. I then used a fork and drew lines of squiggles through the icing. 

I decorated the cake with my home grown Dianthus flowers, which are edible.


You might find this is too much icing for your tastes, so just use what you need and save the rest in a covered container in the refrigerator for another time.

A glaze would have been very difficult to manage, unless I put the cake straight in the frig.

Nigella Lawson's Chocolate Sticky Honey Glaze:

Bring the water and runny honey to a boil in a smallish, though not tiny saucepan , then turn off the heat and add the finely chopped chocolate (70 per cent cocoa solids buttons work well.) Swirl it around to melt in the hot liquid. Leave it for a few minutes then whisk together. Sieve in the icing sugar and whisk again until smooth.

To apply the glaze, select your cake plate or stand and cut out four strips of baking paper and form a square outline on the cake plate. This ensures that even in the perfect climatic setting, the icing will not run out all over the plate. Unclip the tin and place the completely cooled cake on the on the plate you have prepared.

Pour the icing over the cold honey chocolate cake and with a cake spatula smooth it down the sides.

Glaze it about an hour or two before you want to serve the cake, so that the glaze can harden a little.

When you are ready to serve it, you can just very carefully slide out the pieces of paper to show a clean plate.

When Nigella Lawson wrote this recipe she included instructions of how to make bees from marzipan to decorate the cake. One day I might do this, as it looks like fun, and is a perfect way to decorate a honey cake. Just flick to her website to find the instructions for making decorative bees.

Cook's notes:

  • I baked this cake a day ahead, iced it and stored it in an airtight container. It can also be frozen, uniced, and wrapped tightly in a double layer of food wrap and a layer of foil for up to 3 months, which sounds like a great idea. Unwrap and thaw at room temperature for about 3 hours. Ice or glaze and decorate on the same day of serving.
  • Leftovers will keep for up to a week in an airtight container in a cool place, that would have to be the refrigerator in North Queensland, and there's no way that leftovers will last that long in our home.
  • I couldn't find any light brown muscovado sugar, so I used equal quantities of raw sugar and dark muscovado sugar which I have on hand.
  • I have closely followed Nigella's recipe here, but I would sift the bicarbonate of soda with the flour at the very beginning, so that I don't forget to add it and to ensure it is evenly added throughout the flour. Is there any reason not to add it to the rest of the flour at the beginning that I don't know about?


    BEE KEEPING IN TROPICAL NORTH QUEENSLAND, part 2

You might remember in a previous post I wrote that it is swarming season for bees. We don't really blame Queen Lizzie or her bees for leaving home as the hive was chockabloc full of bees, and we were just two days late with adding new frames and another box to the hive to create more space for them. This was because we were waiting for new frames to be delivered by Australia Post. Once a hive has decided to swarm, it's impossible to change their mind, however apparently the hive can be lured to a nearby location by hanging some honeycomb frames from the nearby washing line for example, while hoping they will be attracted to it.  They can then be relocated to another hive or back to the original hive where there is more room. All of this happened during a heat wave so conditions weren't ideal for a crowded hive or for anybody.  Lesson learned, bees aren't patient.

Below is a photo of the bees bearding at the front of the hive, and preparing to swarm. We think they flew away during the night. At the time, we thought they might have been bearding because of the heat.

Then it all became the perfect storm as the hive was weakened due to the swarming. Militant Robber Bees hungry from another hive were attracted to our hive and were after our honey, but our hive was too weak to fend them off. They were intent on taking our honey and killing our bees in the process. Then Hive Beetles bred in the hive, normally we can keep them under control, but they laid a lot  of eggs because our bees and the hive beetle bait couldn't keep them under control either. The hive beetles created a lot of larvae in the hive which was an awful sight. The larvae ridden frames were removed as soon as Mr. HRK found them. What a shock! 

After the robber bees arrived, Mr. HRK was wrapping the hive in a wet blanket, and turning the sprinkler on it frequently in the heat of the day, so that the robber bees would lose the scent of our hive and also to cool down the hive. The rest of the ruined honey frames had to be removed and placed in the freezer to kill the Hive Beetle maggots, and after four days it seemed we might be on top of the situation. We installed a new Queen Bee in our hive yesterday, so now we are hoping there are enough bees in the hive to support her. Fingers crossed. Gosh, this was all just bad luck, but we are on that continuous learning curve when it comes to bees, along with most other backyard beekeepers.

I've named our new Queen Bee, Sissi, after the famous 19th century Austrian Empress, whose first name was also Elisabeth, but was fondly called Sissi. We have just watched Empress, the story of Sissi, on Netflix, and really enjoyed it. I hope our new Queen Sissi is as sassy, innovative and hard working as the beautiful Austrian Empress was.

This is how Queen Bee Sissy arrived in her small capsule or carriage, accompanied by a few ladies (bees) in waiting.
They will eat their way out through a sugary opening in the top of the capsule. Sorry for the blurry photo. My camera wasn't coping.

I am also calling this divine honey chocolate cake Sissi.

It's taken me a while to post this recipe because there has been a lot happening, and as it stands now, Mr. HRK is concerned there may not be enough bees left in the hive to support the Queen and see our hive grow. If that is the case we will need to buy some more frames of bees. However we will persist. C'est la vie, and if anyone thinks that beekeeping is easy, they are very much mistaken, but it is such an interesting hobby, and we hope we are doing our little bit for the environment and the pollination of our neighbour's gardens.


Warm wishes, Pauline


Monday, November 8, 2021

Instant Chocolate Mousse, it's egg free and delicious

Chocolate Mousse is such a crowd favourite, and when we both had a yearning for a chocolate dessert,  I was intrigued to find this Express recipe by the iconic Nigella Lawson, which uses mini marshmallows instead of raw eggs as the setting agent. The secret ingredient is the gelatine in the marshmallow, and it works beautifully and is delicious without being too sweet. There's no stress involved with worrying whether or not this chocolate pudding will set, because it sets brilliantly in the refrigerator. I tweaked this recipe over a couple of days as there are a few versions of it out there in books and online, but this is my final rendition of this classic dessert. I am so pleased that I now have the perfect chocolate mousse recipe to offer, which I will be very happy to make repeatedly, and without using lots of valuable eggs along the way. 

The first two batches were still edible but very dense and chocolatey, is that a word? I can't tolerate very rich desserts anymore, although Mr. HRK still thought they were delicious as he was feeling a little unwell with a head cold, but I knew the texture I wanted, light and creamy and fluffy but still with delicious chocolate as the base, and not overly sweet. For the first batch I made, I tried chopping up normal marshmallows into small pieces as I couldn't find mini marshmallows at the first supermarket I shopped at. I don't suggest that you try this as an alternative, as chopping up marshmallows is an onerous job, and they took a long time to melt. That first batch almost became Rocky Road, which would have been a delicious outcome, but I persisted, and it was eaten anyway by our young neighbours, happy to be experimented on. As you can see, I had fun along the way and shared the love of chocolate. 

Do you derive a huge sense of satisfaction out of working with a recipe until you finally achieve the result you are after? To be honest, I don't do it that often, but with this recipe I enjoyed the process, so did Mr. HRK. Read on my friends, and I know you will enjoy making and eating this divine Chocolate Mousse. My Cook's tips will give you further insight into my cooking process.

Ingredients:

150 grams mini marshmallows, pink and white is fine

50 grams (4 tablespoons) softened butter

250 grams good quality dark chocolate melts or dark chocolate chips (I used melts)

60 millimetres (1/4 cup) hot water (from a recently boiled kettle)

284 millimetres thickened or double cream

1 teaspoon vanilla extract

Method:

In a flat, wide heavy-based pan, place the marshmallows, butter, chocolate buttons and water. It's fine if the mini marshmallows are pink and white. 

Heat the saucepan over a gentle heat, to melt the contents. Stir often whilst hovering over the pan. The chocolate will melt first, the marshmallows will take longer.

The marshmallows are starting to melt while I stir. Marshmallow streaks are starting to appear.

The marshmallows are melting well.

When all the ingredients are melted and combined, remove the pan from the heat. It will be a smooth and silky chocolate sauce like mixture.

A smooth and silky chocolate sauce mixture, a few marshmallow streaks don't matter as cream will be added

Leave the chocolate mixture to cool off the stove top.  Meanwhile whip the cream with the vanilla extract until thick.

 Fold the cream by large spoonfuls into the cooled chocolate mixture until the mixture is smooth and well mixed.

Pour or spoon the chocolate mixture into 4 decorative glasses or ramekins, allowing about 175 ml/3/4 cup each in capacity, or 6 smaller ones (125 ml/1/2 cup), and chill until you are ready to eat dessert.

Decorate with swirls of cream and grated chocolate, or just grated white chocolate.

Cooks Notes:

  • This recipe doesn't use eggs. The gelatine in the marshmallow is the ingredient that sets the mousse and works it's magic.
  • Make them the day before and keep covered and chilled in the refrigerator. This makes life a lot easier on the day of eating as the work is already done. 
  • Take the mousse out of the refrigerator when the main course is being served, cover,  and allow the desserts to soften up slightly for eating while the main course is being eaten. The mousse may become quite solid in the refrigerator. It needs to be soft and fluffy and "mousse like" before being served.
  • If you like your mousse to be on the lighter chocolate side, use the dark chocolate buttons or dark chocolate chips. However if you like your mousse to be very dark chocolate, and rich and denser in texture, use a finely chopped dark chocolate block, at least 78 % cocoa. The ratio of cream to chocolate determines how light and fluffy the mousse will be. Some recipes only use 1 cup of cream, I like to use 284 millimetres of double cream for a lighter and fluffier mousse. It's a matter of personal taste, and the amount you need to serve to your guests. More cream will  stretch the quantity of the mousse, and take slightly longer to set. But it will set on the same day in a couple of hours.
  • If the mini marshmallows are taking a long time to melt in the pan, increase the heat slightly on the stove and keep stirring. My stove is electric and I did most of the melting at number 2, and raised it to 3 to melt the marshmallows.
This second Chocolate Mousse batch below was quite dense and very rich, using 78 % Lindt chocolate and only 1 cup of cream.


What is your preference for a chocolate dessert ? Do you prefer the the very rich and denser chocolate mousse, or are you like me and prefer a lighter and fluffier style of chocolate mousse. It's certainly easier to eat more of the latter, but both are achievable by altering the ratio of cream to chocolate sauce.

Best wishes,
- Pauline xx


Monday, September 14, 2020

Showcasing In My Kitchen, September 2020


Sunday morning foraging has become part of our routine whilst the local farms still have beautiful produce before the heat of Summer takes it's toll. Most Sunday mornings we visit the farm truck of a local Mackay farm called Sweet As Fresh As, and indeed it is just that. This is what I bought yesterday, golden sweet corn, heritage cherry tomatoes (not in the photo), zucchinis, and strawberries. The pineapple is from a local pineapple farm and I purchased it from the corner shop near us. Pineapples are in season here at the moment and are very sweet. The strawberries are sweet and delicious and the corn hardly needs any cooking at all. It's nice and so easy here to bring home some fresh produce from local suppliers. It lasts much longer than what I buy at the supermarket,which travels a long way to get here. Buying what is locally in season and cooking with that is what I try to do.


The previous weekend, I purchased these, and at a very reasonable price.


Our daughter arrived home as a big Father's Day surprise for Mr. HRK, which was on the 6th September here in Australia this year, although I knew she was driving down from Cairns. Mr. HRK didn't, so its been a lovely week with her home, and lots of home cooking and stories and laughter. It's so good when you can pull off a surprise isn't it? Delicious Spring Lamb is in the butcher shops  now at a very reasonable price, and when I baked a Leg of Lamb one night during the week flavoured with rosemary and garlic, I made this Cauliflower Cheese as one of the vegetable dishes to accompany the lamb. I always have lots of haloumi cheese in the refrigerator as Mr. HRK loves it and so I added haloumi slices around the circumference of the cauliflower cheese dish as I was a bit low on parmesan. It was really delicious, and the cheesier the better I reckon. By the way the cauliflower was also grown locally, and was so delicious I could also eat it raw.


A celebratory glass of champagne on Father's Day with our daughter was very nice. I made my
Tuna and Cannellini Bean Dip again as a snack to go with it and Shannon loved it. 


Of course there had to be a cake for Father's Day and Shannon's arrival. I've been wanting to make this one for ages, and my friends we just loved it. The flavour of apricot in cakes is one of my favourites, as we can very rarely buy nice apricots this far North. So here is Nigella Lawson's fragrant and delicious Apricot cake. If you can't quite come at using Rosewater in this, just leave it out.

Nigella's Apricot Almond Cake with Rosewater and Cardamon


Ingredients:


Serves 8-10

150 grams dried apricots
250 millilitres cold water
2 cardamon pods (cracked)
200 grams ground almonds
50 grams fine polenta (not instant)
1 teaspoon baking powder
150 grams caster sugar
6 large eggs
2 teaspoons lemon juice
1 teaspoon rosewater
nonstick spray or sunflower oil for greasing

For Decorating

2 teaspoons apricot jam
1 teaspoon lemon juice
2 1/2 teaspoons very finely chopped pistachios

METHOD:

Grease and line a 1 x 20 cm/8-inch round spring form cake tin
  1. Put the dried apricots into a small saucepan, cover them with cold water and drop in the cracked cardamon pods, still containing the fragrant cardamon seeds. Bring to the boil, and keep it bubbling on the stove for 10 minutes. Keep an eye on it as at the end of 10 minutes  the saucepan will be just about out of water but mustn't boil dry. The apricots will absorb more water as they cool. 
  2. Take the saucepan off the heat and allow the apricots to cool.
  3. Preheat your oven to 180 deg. C./160 deg. C. Fan, or Gas mark 4/350 deg. F.
  4. Remove 5 of the dried apricots and tear each in half, and set them aside on a plate for a while. Discard the cardamon husks, leaving the seeds in the pan.
  5. Pour and scrape out the sticky contents of the saucepan including the apricots into the bowl of a food processor. Add the ground almonds, polenta, baking powder, caster sugar and eggs, and give a good long blitz to combine.
  6. Open up the top of the food processor, scrape down the batter, and add 2 teaspoons of lemon juice and the rosewater, and blitz again, then scrape into the prepared cake tin and smooth the surface with a spatula. Arrange the apricot halves around the circumference of the tin.
  7. Bake for 40 minutes, however if the cake is browning  too early, cover it loosely with foil at the 30 minute mark. I didn't need to do this. When it's ready, the cake will be coming away from the edges of the tin, the top will feel firm, and a cake tester will come out with just one or two damp crumbs on it.
  8. Remove the cake to a wire rack. If you are using apricot jam to decorate and this gives a beautiful gloss and flavour to the cake, warm it up a little first to make it easier to spread. Stir a teaspoon of lemon juice into the jam and brush over the top of the cake. Then sprinkle with the pistachios and leave the cake to cool in its tin before releasing from the cake tin and removing to a serving plate.

With all of those very fresh zucchinis I bought, I just had to make Zucchini. Corn and Bacon Slice, a delicious family favourite. It was the week for our favourite foods.


Now I know I am cheating a little bit here, as this is supposed to be about My Kitchen, but I couldn't let the opportunity of my daughter visiting without us taking advantage of enjoying a High Tea  at the Fifth Floor Restaurant during the week. It is actually a hospitality training restaurant for Central Queensland University which merged with TAFE a few years ago and now teaches hospitality which was always the domain of TAFE. I used to work for CQU so I still keep my ear close to the ground about what happens there, and this High Tea was reasonably priced, delicious and located on the 5th floor of the inner city CQU building with nice surrounding views. The hospitality students waited on the tables and did a good job. They also cook and serve very nice lunches throughout the month.


The High Tea Menu. 


Spring is as much about gardening as cooking for us and we have been spending a lot of time gardening in the mornings. I collected a few bits and pieces form the garden to fill a vase to put on the bench in my kitchen, and the pretty pink leaves are from a Cordyline, which will strike shoots in a vase of water and can then easily be replanted. Cordylines bring very  nice colour to the tropical garden. We have a couple of garden projects going on at the moment, but I will write more about that later.


I am sending this post to Sherry of Sherry's Pickings for the In My Kitchen event, that was started by Celia of Fig Jam and Lime Cordial,  If you would like to join in, send your post to Sherry by 13th of the month. I'm a bit late with this, but it is still the 13th somewhere in the world:)  Or just head over to her blog and visit more kitchens.

Warm wishes everyone and have a lovely week wherever you are,

Pauline xx