It's May already, and I'm about to share with you what I've been cooking and enjoying in my kitchen during April, which is always a busy month. This year we were home for all of April, which was lovely. I resorted to making a few of my favourite recipes, and cooked up some new ones. April brings Easter, precious thoughts about loved ones during Anzac Day, and our wedding anniversary as well. All of these events are full of memories, as are so many food recipes that I cook. May brings the very welcome cooler weather, and that means that I start making delicious soups again.
Showing posts with label May. Show all posts
Showing posts with label May. Show all posts
Monday, May 6, 2024

Monday, May 23, 2022
We Are Harvesting and Preserving our Fresh Ginger, now is the right time to do it

Growing edible root ginger in the Tropics and sub-Tropics in the home garden is very easy, low maintenance and sustainable, the climate and the tropical environment is perfect for this crop. As long as the soil is fairly well drained, the crop thrives on heat and humidity, and tells us it needs to be harvested when it's flowers start to emerge from the ground on stalks and the leaves start to brown off. Sorry no photo of this. So for us, now is the time to harvest our crop. Fresh ginger is very expensive to buy, and can be used in so many dishes both savoury and sweet, in drinks, in smoothies, teas, really the list is endless. We love the flavour. It is also known for it's anti-inflammatory and anti-antioxidant properties, with gingerol thought to be its main bioactive compound. So lets get hot, spicy and sweet and start using ginger as often as we can.
Ginger is a root herb, and when it's dug up out of the ground the green foliage needs to be removed and placed in the compost bin, the soil needs to be washed off the roots, and the ginger cleaned very well ready for preserving how you wish, such as dehydrating, freezing or just cutting up fresh for use.

Over a cup of coffee one morning, Mr. HRK came up with the innovative idea of using our gurney to wash the ginger. What a great idea I agreed. So he placed our compost sifting rack over the compost heap box, spread the ginger over the rack and began gurneying. Ah, men and their gurneys, and women love them too here in the tropics. They are an essential piece of equipment to keep in the shed for reducing mould on driveways, garages, and all sorts of other essential things. Just can't do without them.
 |
| Cleaning the ginger with the gurney |

We were unprepared for what a great job the gurney did. Not only did the jet spray of water remove all the dirt, but also removed the outer shell leaving the fresh ginger ready for use. When we broke up some of the larger ginger clumps later, there was still a little dirt left in the crevices, but that was easily washed out in the laundry sink. I think we're onto something here he said. Yes, our annual ginger harvest has just become mechanised.
 |
| Mr. HRK sorting the ginger on the frame |
We harvested 2.6 kilos of ginger this time, which is a good amount for us to handle. We froze 500g in vacuum sealed pouches, and dehydrated the rest. 2.1 kilos of ginger dehydrated and ground to a powder, transformed into 319 g of dried ginger. Now, with supermarkets here selling ginger at $50.00 a kilo, no-one is going to buy ginger from the supermarket to make their own dried ginger spice. However, fresh ginger is selling at our local markets for $20.00 a kilo which sounds much more realistic. Given that the ginger we are seeing but not buying in our supermarkets is probably grown around Brisbane, being a Queensland crop, I wonder how the markup in price can be justified, when it can be sold locally for $15-$20.00 a kilo.The reality is though that a very small quantity is generally needed for cooking, so customers will buy a small knob of ginger and pay the price. I always leave a small amount of fresh ginger in the garden for our use, but the frozen ginger works in a lot of dishes.
After washing and cleaning the ginger, it needs to be sliced finely for the dehydrator.

Ready for slicing and dicing

Mr. HRK sliced the large knobs very carefully using the mandolin, better him than me for that job, and I sliced up the small bits with a knife.

I washed some of the slices a little more in the colander to remove the last specks of dirt, dried them off with a clean tea towel, and then they were ready for the dehydrator.

Two large bowls of sliced ginger ready to be dehydrated

 |
| Washing off the last specks of dirt |
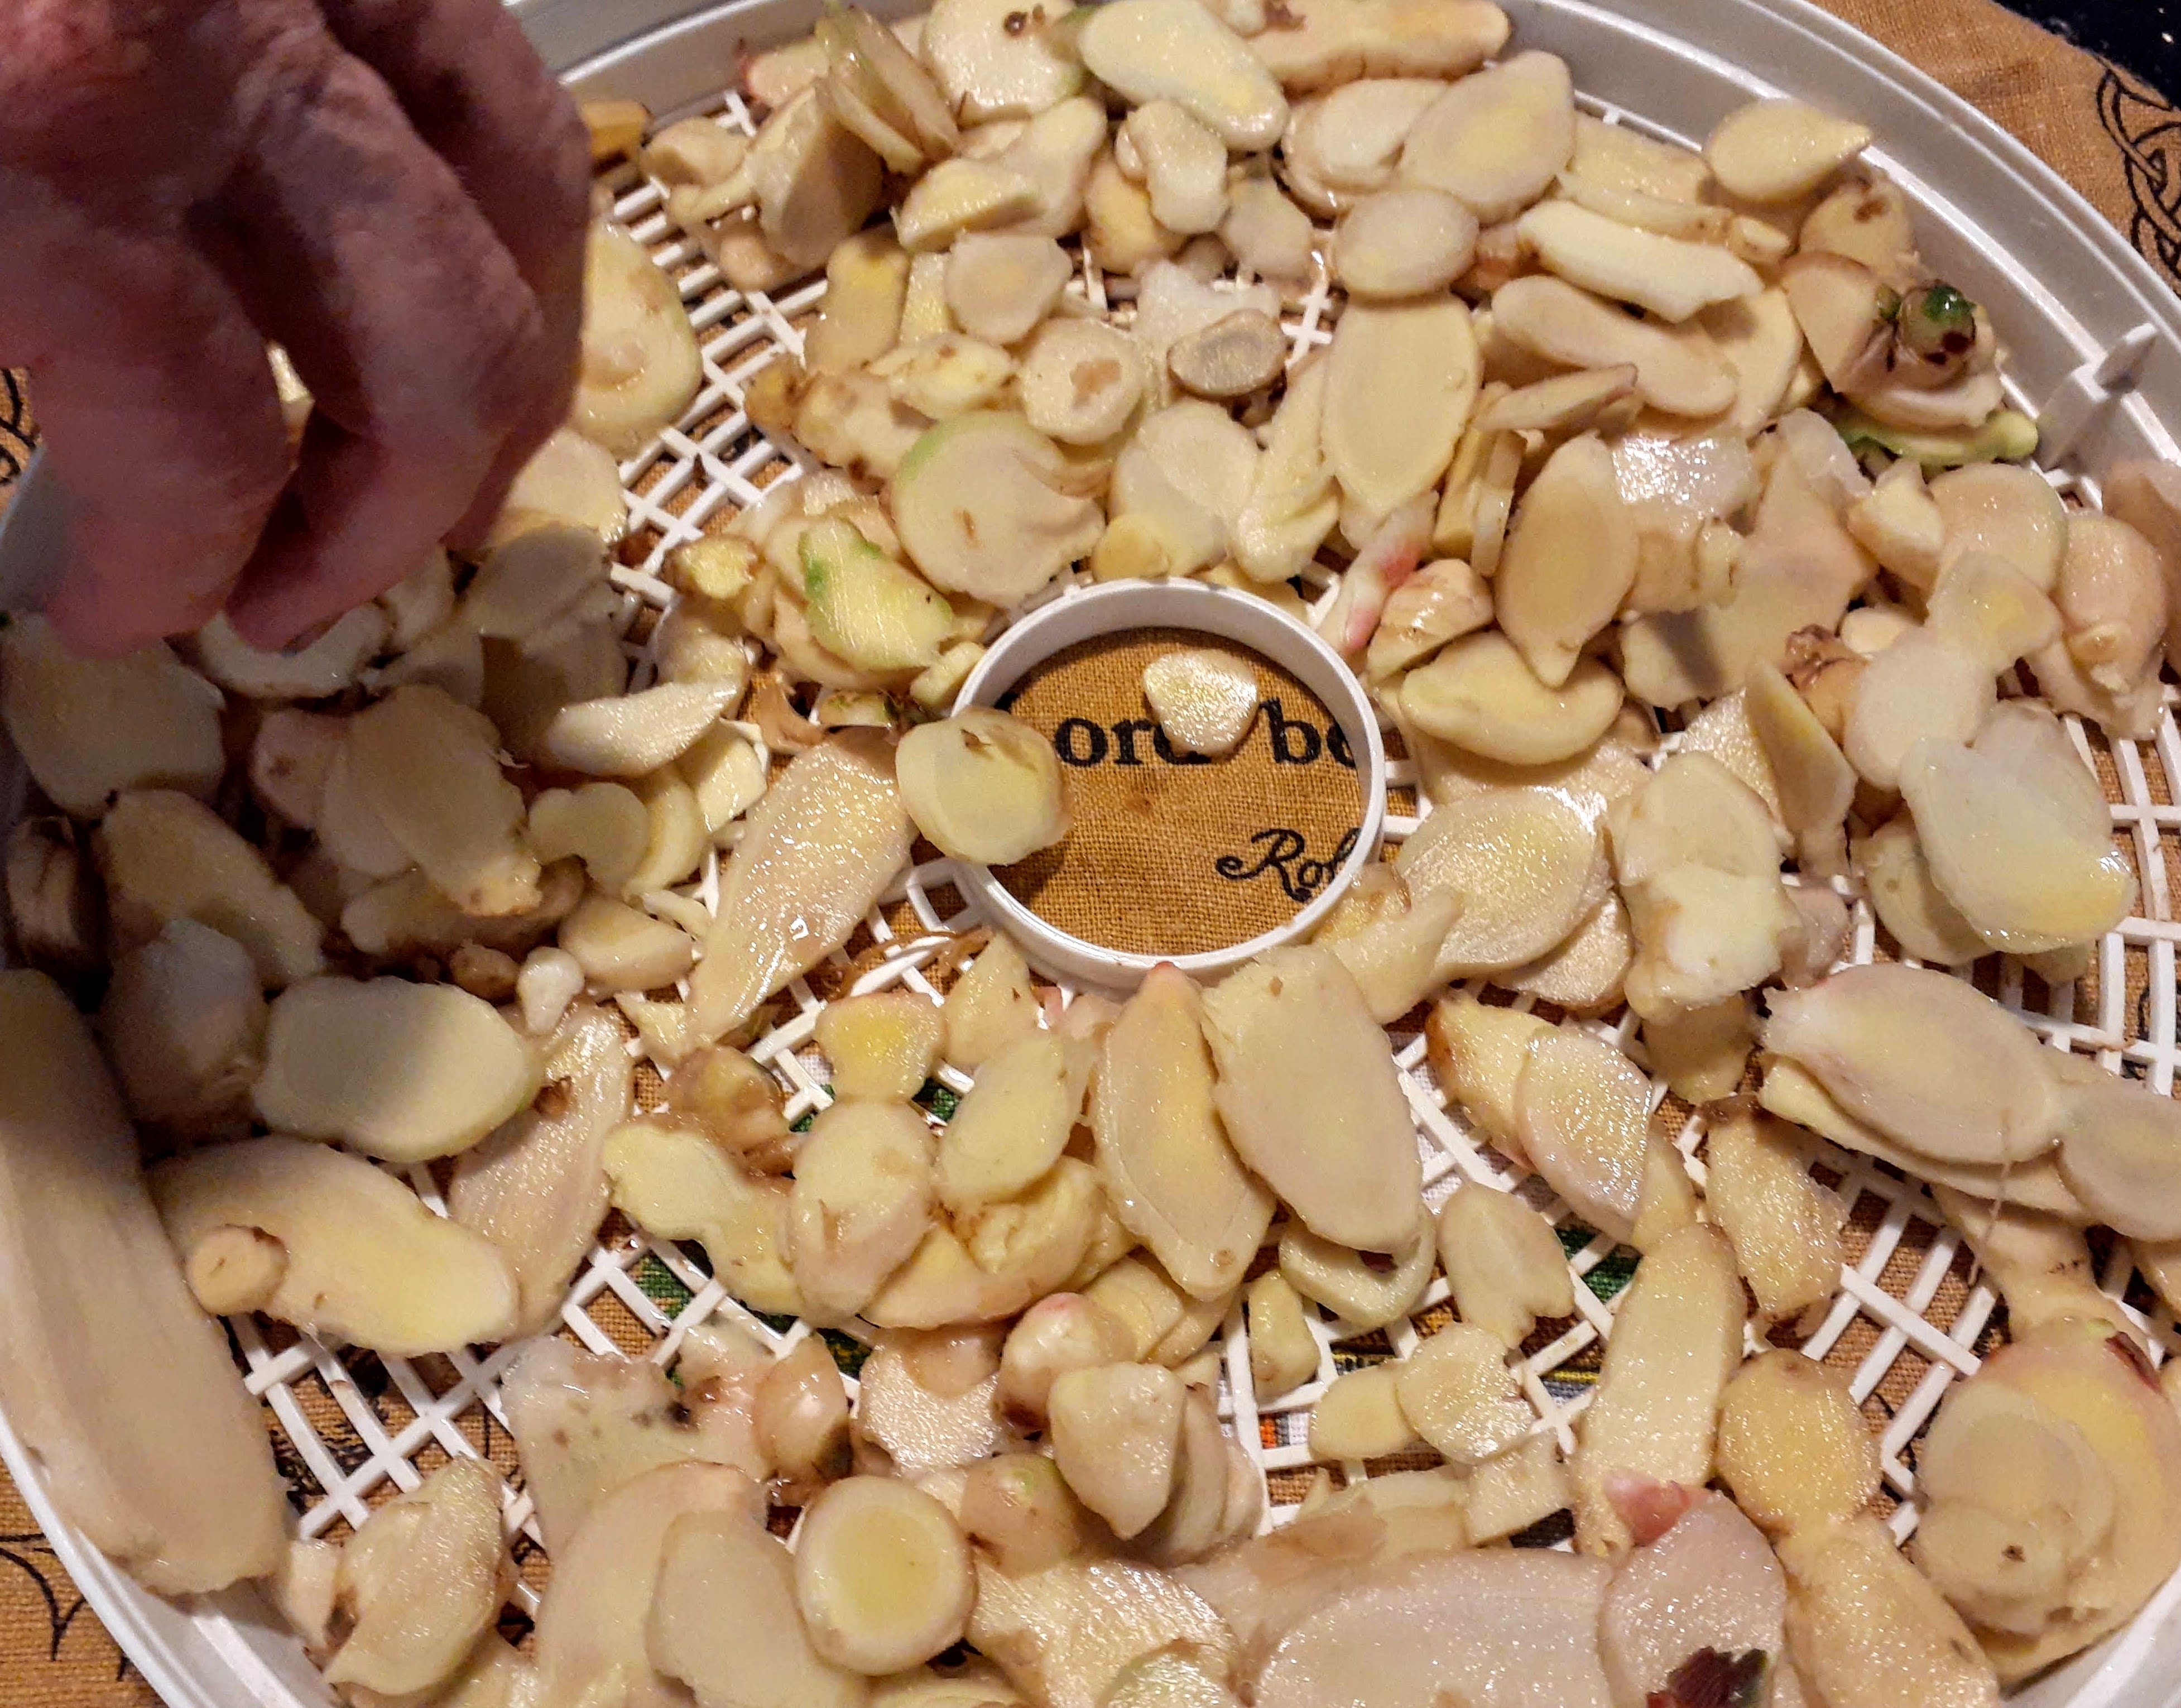
We arranged thin layers of sliced ginger on each tray of the dehydrator.

 |
| Dehydrated ginger |
The spice grinder is perfect for finely grinding the ginger into a powder

Oh my, the heady aroma coming from the ginger being ground up is quite intoxicating. I feel healthier by the minute.


And now we have our annual supply of dried and frozen ginger. The dried ginger we have made ourselves is so much more potent, aromatic and full of flavour than the ginger spice produced commercially.

It's quite traditional to now place a few pieces of ginger on a sunny windowsill until it starts to sprout some green shoots, which generally starts around spring time or even Summer and those pieces are then planted in the ginger garden, and become the new ginger crop for next year. However around that time, I find that even sticking a few pieces of ginger in the ground in early Summer will shoot and become healthy plants, without needing to have them shooting first.
Now for some cooking and baking, Ginger nuts, Ginger cake, Stem Ginger in Syrup, Ginger Pork, what else? I'd love to hear what your favourite recipe using ginger is.
Turmeric is also growing in tropical gardens, and right now is also the time to harvest and dehydrate or preserve your turmeric. Here is the link to a previous post I wrote about harvesting your turmeric.
Pauline
Wednesday, May 18, 2022
Vegetarian and Rustic Mini Party Pizzas


These very tasty vegetarian mini party pizzas are perfect for easy entertaining as finger food, or to eat on a lazy weekend for brunch with a salad, or as an appetizer. They can also be very economical and use up bits and pieces leftover in the refrigerator as the ingredients can be quite versatile, as you would find on most large pizzas. They don't need to be vegetarian either, add some finely chopped bacon, salami or ham as a topping, and add mushrooms or anchovies if you wish as well. The presentation can be quite rustic, as the small puff pastry shapes are never going to be uniform, even though they start out that way. I made up this batch when I was craving a slice of Italy with some pizza, and show me someone who doesn't love pizza flavours. Friends were coming over for drinks, so I made a batch of these for some simple and delicious finger food. The filling can be chopped up and mixed in advance, the night or the morning before, and stored in a covered container in the refrigerator.
It's Summer in Europe, the USA and the rest of the Northern Hemisphere, and casual entertaining with friends has started. My son who is living in France with his beautiful family, says that currently the Summer weather is lovely following a wet and miserable Winter, and people are celebrating and entertaining outdoors. Here in tropical North Queensland it's still warm and sunny in between rainy showers, so life isn't that different, we are still entertaining outdoors even though it is technically our Winter. We are waiting for the first real cold snap with excitement.

These Party Pizzas are so easy, that I feel a bit guilty about writing them up as a recipe. Do you sometimes just crave for something really tasty like pizza, but don't feel like making your own dough or visiting the supermarket to buy ready made pizza bases, or spending the money to buy take away pizzas? These are the easiest bite sized pizzas I have ever made. They may be just bite sized, but they have BIG-sized flavours, with zero effort. In fact you will feel as if you have had a night off from cooking and everyone will be happy to pitch in and help. Mr. HRK is is happy to cut the pastry sheets into squares for me while I oil up the muffin tins. So much of the preparation can be done in advance.
If you are planning some large scale entertaining, 90 little pizzas can be made from a 10 pack Puff Pastry box, and I have done this in the past for a party. They disappeared very quickly. Very economical when catering. This recipe is for 18 pizzas which Mr. HRK and I have been known to enjoy over a couple of days. Just increase the quantities as needed. These would also be perfect to take to work for lunches with a salad, if you are able to heat them up in a microwave. Perhaps though you are happy to eat them cold, some close members of my family are happy to eat cold pizza. I prefer it warmed up though.
Let's Cook:Preheat your oven to 180 deg. C
Equipment: Two medium size muffin trays
Ingredients for 18 mini pizzas
2 sheets of frozen Butter puff pastry
2 cups grated tasty pizza cheese
1 finely chopped red capsicum
1 cup classic pizza sauce (homemade or purchased)
1/2 cup chopped fresh basil or oregano
1/2 cup roughly chopped black olives
Finely chopped bacon, ham or salami to sprinkle over the top of the pizzas before baking if you wish for a non-vegetarian edition of these pizzas.
Partially thaw out two sheets of Puff Pastry. Cut each Puff pastry sheet into 9 squares. (For a larger quantity of pizzas, buy a 10 pack box of Puff Pastry and cut 9 squares from each sheet until each person has at least 3-4 pizzas)
Let's cook:
Grease two muffin trays very well with vegetable or olive oil, or use a spray can of oil, and place a pizza square in each muffin hole (18 for this recipe). Coat the pastry with tomato sauce with a small pastry brush. Prick the base of the pastries twice with fork to ensure the pastry base doesn't swell up. Cook in the oven for 10 minutes until the puff pastry is just coloured and starting to crisp up. This can be done in advance as well. Allow them to cool very slightly and then very gently ease the edges of pastry around the top away from the tin with a knife, sometimes it sticks to the tin. If the pastry has risen up from the bottom, just press it down gently with your fingertips to make room for the filling. This first step will ensure the pastry cases come out of the tin easily when cooked. I have made them before without prebaking the pastry cases first, but it makes removing the cooked pizzas a little more fiddly.
Throw the combined ingredients into a large bowl. Mix well together.
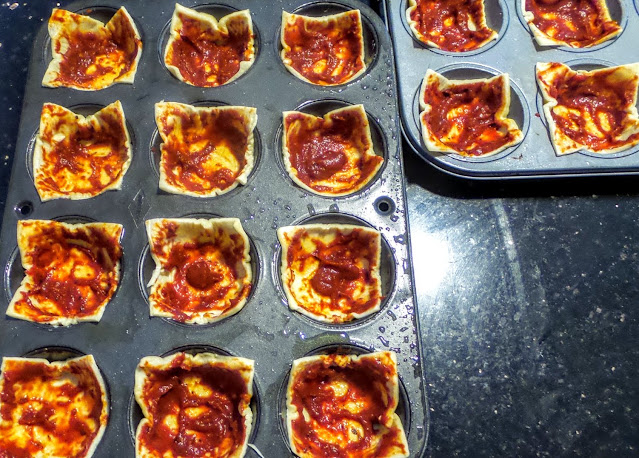
3/4 fill pastry cases with ingredients and sprinkle with ham, bacon or salami if desired.

Cook in a moderate oven, at 180 deg. C, for 10 minutes or until pastry and filling is cooked.

Ingredients for 18 mini pizzas
2 sheets of frozen Butter puff pastry
2 cups grated tasty pizza cheese
1 finely chopped red capsicum
1 cup classic pizza sauce (homemade or purchased)
1/2 cup chopped fresh basil or oregano
1/2 cup roughly chopped black olives
Finely chopped bacon, ham or salami to sprinkle over the top of the pizzas before baking if you wish for a non-vegetarian edition of these pizzas.
Partially thaw out two sheets of Puff Pastry. Cut each Puff pastry sheet into 9 squares. (For a larger quantity of pizzas, buy a 10 pack box of Puff Pastry and cut 9 squares from each sheet until each person has at least 3-4 pizzas)
Let's cook:
Grease two muffin trays very well with vegetable or olive oil, or use a spray can of oil, and place a pizza square in each muffin hole (18 for this recipe). Coat the pastry with tomato sauce with a small pastry brush. Prick the base of the pastries twice with fork to ensure the pastry base doesn't swell up. Cook in the oven for 10 minutes until the puff pastry is just coloured and starting to crisp up. This can be done in advance as well. Allow them to cool very slightly and then very gently ease the edges of pastry around the top away from the tin with a knife, sometimes it sticks to the tin. If the pastry has risen up from the bottom, just press it down gently with your fingertips to make room for the filling. This first step will ensure the pastry cases come out of the tin easily when cooked. I have made them before without prebaking the pastry cases first, but it makes removing the cooked pizzas a little more fiddly.
Throw the combined ingredients into a large bowl. Mix well together.

3/4 fill pastry cases with ingredients and sprinkle with ham, bacon or salami if desired.

Cook in a moderate oven, at 180 deg. C, for 10 minutes or until pastry and filling is cooked.
 |
| Straight out of the oven |
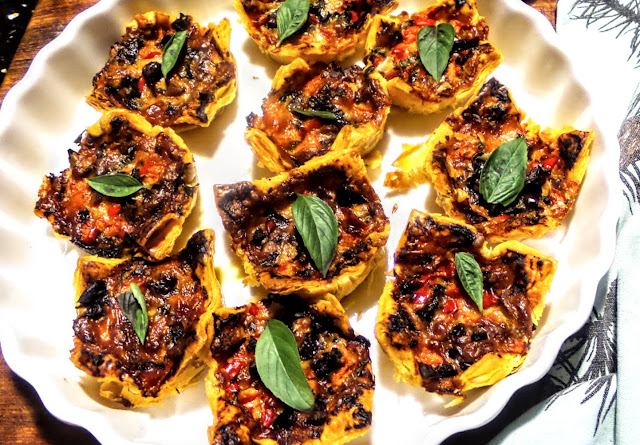
Allow to cool slightly, then carefully remove from the muffin tins using a butter knife, easing the edges out gently. Garnish with individual basil or oregano leaves, but be prepared, these little pizzas will do the disappearing act as soon as your family or guests dive in.

Notes:
- I make these mini pizzas quite regularly and they are always delicious, but when a friend asked me for the recipe, I changed the baking process slightly to ensure she would be very happy with the result. If you are using Teflon coated muffin tins which are not scratched at all, and still quite new, and you are short of time like most of us are, you could get away with not prebaking the pastry in the oven, which is what I have generally done. The tins still need to be greased very well with oil. However, I am advising you to prebake the pastry cases if you have time and your tins are well used, to ensure the pizzas can be removed easily from the muffin holes. Always leave the cooked pizzas to cool slightly before easing them from the tin
- Make these tropical, by adding a little finely chopped fresh or canned pineapple. Add some finely chopped ham, and there will be squeals of delight from the kids big and small, as who doesn't love ham and pineapple pizza. I know some of my readers don't like pineapple, however in my family we love it. Ham and pineapple pizza was always a favourite when our kids were growing up.
This is the link to our original "Make It Like a Man" style Pizza recipe ,which Mr. HRK makes when the Rugby League State of Origin matches are on. It is always delicious, and he adds lots of meat, however it is also delicious with a vegetarian topping similar to the one in my mini pizzas. We make one of each. Pizza toppings really are so versatile aren't they?
Bye for now,
Pauline
Bye for now,
Pauline
Thursday, May 6, 2021
In My Kitchen - May 2021

It's citrus season, and Dried Mandarins feature in this edition of the May IMK. Where did April go? And now that it's May, the weather here in the Tropics of North Queensland is cooling down so we are spending a lot more time in the garden preparing the garden beds for Winter planting, and also it is really a pleasure now to be preparing delicious food in the kitchen.
A lot of the activity in my kitchen this last month and in Mr. HRK's workshop, has been centred around the mandarin fruit. The branches of our mandarin tree in the front garden have been sagging to the ground with the weight of the mandarins it is producing. Even though the skins hadn't ripened, and are only just starting to ripen now, the flesh is sweet, and we needed to pick some of those mandarins to ease the load off the tree, and then find a way to use them, as well as give a lot to friends. We also needed to find a way to preserve them. Did you know that even though the skin of the mandarin fruit is still green, the fruit can be ripe enough to eat, and in fact be very juicy and delicious? It takes a cold snap in the weather, which we are really still waiting for, for the skins to change colour. We also don't have a clue what variety of ,mandarin this tree is.
When my Mum passed away on the 13th May, 13 years ago, just after Mother's Day, my Aunty Mary, my Mum's stepsister, gave me a mandarin tree to plant in memory of Mum, a lovely and very thoughtful idea. That was in 2008, so the mandarin tree is 13 years old, and this is the best crop it has yielded. This is all very special to me as my Mum would have been 100 years old this year. During those 13 years due to the tree's lack of interest in producing fruit, Mr. HRK has threatened it, cajoled it, fed it, watered it, but not hugged it, however something has worked because this year it has excelled itself, just when seriously it was under threat of being faced with it's demise. Because of it's sentimental value to me, of course I have protected it, or it might have met it's sad end a few years ago, but it just shows that trees have feelings and after 13 years it is coming into its own, a late bloomer. Sadly Aunty Mary is also no longer with us either, but I will let my cousins know this story. We never found out what the variety of this mandarin is. But it is a large fruit, thin skinned, with very few seeds and very sweet. If you have any clues as to what it is I would love to hear from you. Anyway it has adapted to living in the tropics, like all of us.
 |
| These are the fruit just starting to colour up. There are a few green ant nests in the tree as well just for added value. |
This is the mighty mandarin tree in our front yard surrounded by some tropical colour; Coleus, Ixora, a Desert Rose, purple ground Orchids, Geraniums and the large leafed exotic Caladium with a pink heart. Around the base of the tree is well cleared though as it needs to be.


And bucket loads to give away.

However when we started thinking about how to preserve some of them, Mr. HRK was very keen to experiment with dehydrating them. So the dehydrator moved into his workshop to work away quietly during the night, and off we started. Well the good news is that they are delicious dehydrated, and will keep bottled and well sealed in a cool place for 12 months. For the first batch we tried, we left the skins on the fruit when we sliced them up, however because the skin was still green, the fruit tasted quite tart when dried. However if you can dry them with the golden skin still on the fruit they will look very pretty, even prettier than mine:) I hope that enough fruit will survive the bugs and not become stung by fruit fly before they ripen enough to pick them, so we can dry some more with the skin on. That was another reason why we were fearful about leaving the fruit on for too long, as the fruit fly wreak havoc on citrus in our part of the world. We try to spray with eco friendly sprays and hang bottles of various concoctions from the tree guaranteed to repel the bugs but some fruit still gets stung.

This was our second batch where Mr. HRK removed the skins, and sliced the mandarins as finely as he could, and then dried them in our dehydrator overnight.
Then I decided to sprinkle a spice rub over the next batch before drying for some extra flavour, which took them to another level, and this photo below is the result. We have taste tested them on friends, and I recommend this method to you for oranges and mandarins. Bottle them up, label them, enjoy them at home, and they will also be delicious edibles to give as gifts. I still need to print off some labels, but they look really nice bottled in jars.

We are now sprinkling the mandarins over our cereal in the morning as well. We also dried some pineapple slices which is more popular and commercially available for sale than the mandarin, and we think it's delicious as well, and great for a snack if you are travelling.


SPICE RUB FOR DRIED MANDARINS
Ingredients:
4 large mandarins or oranges thinly sliced
1/2 cup coconut sugar
1 teaspoon ground cinnamon
1/4 teaspoon ground ginger
large pinch of sea salt
Method:
Fruit can be dried in the oven or in a dehydrator or even in the sun. Using the dehydrator is an easy way to do it as it can work overnight, and if not quite dry enough in the morning, then adjusted by the hour until the fruit is just right.
Wash and dry your fruit, then cut them into very thin slices, (as thin as possible)
Mix the spices and the sugar in a bowl and sprinkle evenly over the mandarins or oranges
Layer them on dehydrator trays, or if you want to use your oven, dry them on trays lined with baking paper at 200 deg. F for 2 1/2 to 3 hours. They may take longer.
We were using two dehydrators by this stage.


When dried, they can be stored in ziplock bags, or in bottles. Store them in a cool, dry place and they should store well for 12 months. In my neck of the woods, the humidity can cause problems, so they need to be packaged as soon as possible.
Dried mandarin or orange slices can also be added to decorate a cocktail, a fruit shrub, or any drink really. There are endless possibilities to how they can be used, only limited by our imagination. The flavour is really developed by the drying process.
The other day, whilst I was cooking a chook with stuffing in the oven for lunch, I made a Banana Sultana cake and to save time and electricity, I baked it in the oven with the chook. The cake was delicious, so was the chook by the way. I used some dried mandarin to decorate the top of the cake before baking. The dried fruit browned off a little too much for my taste when it was cooked, however it didn't take away from the overall success of the cake at all. This cake was just so delicious straight out of the oven that I will definitely be baking it again. I can't see any reason not to add both walnuts and sultanas if I have the ingredients on hand. This is a photo of my cake before it went into the oven.

Here is the recipe, which just happened to be on the back of a Sunbeam sultanas packet. I think the sugar content could be halved if you are watching calories, and this would still be to your taste.
Banana Sultana Loaf
Ingredients:
70 g butter
1 cup brown sugar
1 egg, beaten
3 ripe bananas, mashed
1 1/2 cups self raising flour
1 cup sultanas
2 tablespoons milk
Method:
Preheat oven to 180 deg. C.
Grease and line the base of a loaf tin, mine measured 22 cm x 12 cm and was perfect
Beat the butter and sugar together until light and creamy, add the beaten egg, and then add in the bananas one at a time
Add the flour, sultanas and the milk and stir by hand to combine
Pour the mixture into the prepared loaf tin and bake in the oven for 45 minutes. AT the end of the cooking time, insert a skewer into the centre of the cake and if it comes out clean it is cooked.
Cool in the tin and then slice to serve while it is still warm and enjoy.
When I was growing up and still living in my family home, I remember that this kind of cake was often served warm and with butter spread on it, gosh we were naughty back then weren't we, but it was so very good.
If you read my blog regularly, you will already know that I play Mahjong once a week, and as well as having the fun of playing Mahjong with friends, we also enjoy some delicious cake at each others homes. This week was my turn to host Mahjong, and I made my Ginger Syrup cake, which is a recipe I really enjoy making, and this time I decorated it with a slice of the dried mandarin. The ladies really enjoyed it. The cake recipe is now being distributed to all the Mahjongers. You can find it at this link. The flavours of the spice rub and the intense ginger flavour of the cake complimented each other perfectly, all enhanced by the wonderful espresso coffee made by our barista for the afternoon, Mr. HRK.


The weather here has plummeted to 14 degrees this morning, so a pot of my healthy and delicious Green coconut cheesy soup is on the stove right now, ha, ha. Bring on soup weather.
Well that's it from me for this edition of In My Kitchen. This is part of the IMK event hosted globally by Sherry from Sherry's Pickings, where lots of bloggers participate to showcase the highlights of what they have been doing in their kitchens for the month.
Take care, and thanks for dropping by,
Best wishes,
Pauline
Friday, May 29, 2020
Lemon Tapioca Pearl Pudding with Creme Fraiche Lemon Curd Topping

Sago and tapioca are distinctly different in their botanical origin but now are used interchangeably. Sago comes from the middle part of the trunk of the sago palm, and tapioca comes from the tuber of cassava or manioc which grows in tropical climates. It's not easy to find sago now in supermarkets,
and "LION" a Western Australian firm packages "Tapioca pearls" which have captured the business in our supermarkets. "LION" states on the packet that Tapioca and Sago are both starch extracts from plants, Tapioca from the tuber of the cassava plant and Sago from the pith of Sago palm stems. "Tapioca and Sago are traditionally used in both sweet and savoury dishes throughout the world and can often be used interchangeably in recipes". Lemon sago is an old fashioned dessert, which my Mum often cooked for us when we lived at home, however back then I didn't appreciate it as much as I do now. Possibly because back then we ate some kind of "healthy" pudding most nights. Sago used to be the main grain commonly used in the kitchen along with rice and barley, before the super grains like quinoa, chia seeds, linseed, and many others erupted on the culinary scene as super grains and became quite trendy. What I have written isn't in any way an advertisement for Lion.I thought that seeing a photo of the packet might help you to find it at the supermarket near the jellies if you are interested. It was on the bottom shelf when I was looking.

Sago was being used in British home cooking during the 18th century when presumably it arrived aboard British ships trading in South East Asia. Old cookery books from this era talk about recipes for sweet sago puddings made from milk, cream, eggs, spices and lemons, all the good things. Mrs. Beeton was a 19th century cookery icon who in her Book of Household Management, 1861, p. 79, described the sago making process:
"In order to procure it, the tree (palm tree) is felled and sawn into pieces. The pith is then taken out, and put in receptacles of cold water, where it is stirred until the flour separates from the filaments, and sinks to the bottom, where it is suffered to remain until the water is poured off, when it is taken out and spread on wicker frames to dry. To give it the round granular form in which we find it comes to this country, it is passed through a colander, then rubbed into balls, and dried."
During Mrs. Beetons era, the 19th century, Singapore was the centre for sago processing with this industry employing many people.
Lately sago and tapioca have both been used for all kinds of tropical pudding variations using coconut milk and tropical fruits, or red grapes in the Barossa Valley, where they make "rote grutze" as a signature dessert. I will be into the tropical varieties next Summer when mangoes are back in season, but for now it's citrus season and I have more bush lemons, so I made Lemon Sago, oops Tapioca, last night and we both loved it. Lemon brings a tangy sour edge to the sweetness of this pudding which tantalizes the taste buds. Any lemons will work for this pudding, but I think the bush lemons have a rather unique lemon flavour if you can get them. Layer it in a serving glass for a special treat with this creme fraiche lemon curd topping and it is delicious. I used my homemade lemon curd but lemon curd is available for purchase. For my Lemon curd recipe please click here.
 |
| A bowl of lemon tapioca/sago |
Lemon Tapioca "Sago" Pudding
4 serves
Ingredients:
1/2 cup tapioca or sago (100 gr.)
3/4 cup Raw Sugar ( use caster sugar if you like but I prefer the flavour of the raw sugar)
grated rind of 3 lemons
3 cups of water
1/2 cup of lemon juice
1 tablespoon of golden syrup
Let's Cook:
- Wash tapioca (sago); soak for 2 hours in 300 ml of water. (Don't omit this step, or you will be stirring the mixture for what seems like hours.)
- Rinse tapioca.
- Combine tapioca, sugar, lemon rind, and water in a saucepan.
- Bring to a gentle simmer. Stir regularly over a low to medium heat for 20 mins. or until sago is translucent, soft and thick.
- Remove from heat and stir in lemon juice and golden syrup and cool for 30 minutes
This is nice served in dessert glasses with the creme fraiche lemon topping for a special occasion.
Creme Fraiche Lemon Topping
4 serves
Ingredients:
200 g creme fraiche
4-5 tablespoons lemon curd (depending on your taste and the curd)
1 tablespoon thinly sliced mint
3 tablespoons toasted coconut flakes
Finely grated lime zest from 1-2 limes
- Gently mix the lemon curd into the creme fraiche in a small bowl
- Layer the creme fraiche evenly over the surface of each lemon pudding
- Top with some freshly shredded mint. Scatter with the coconut flakes and lime zest and serve.
When I cooked this pudding, Mr. HRK who ate much more lemon sago as a child than I did from what he says, so is somewhat of an expert says it is the same as he ate at home, which presumably was the authentic sago. Were Tapioca Pearls even around back then? I am still coming to grips with this sago v tapioca debate my friends so if you can shed any light on the topic I would love to hear from you, and I will keep looking for sago. Whilst this story probably sounds like an ode to sago, I have made this pudding from tapioca pearls and there doesn't seem to be any difference in the final result. It's all in the name. However I would like to know if sago can in fact still be purchased at all. I'm sure packets of it are tucked away on shelves in Indian or Asian supermarkets in the cities, or even health food shops.
Thanks for dropping by and I hope you find some beautiful sunshine to enjoy this weekend.
Pauline
An original recipe by Pauline @ Happy Retirees Kitchen.
Friday, May 15, 2020
Aussie Beef Saltbush Stew in the Slow Cooker

Monday, May 4, 2020
Plum Tarte Tatin: happiness on a plate

Sunday, May 3, 2020
Pesto, Zucchini and Capsicum Lentils for Brunch

Let me share with you the easiest and healthiest lentil and vegetable meal we enjoyed for brunch yesterday. We are mainly cooking just for ourselves now as are most people.
Sunday, April 7, 2019
Our Backyard Honey Beehive Swarm moves into it's New Hive
 |
| One of our bees in our garden on the Salvia flowers |
 |
| The New Hive |

 |
| Our original Bee swarm in the Bird Box on the Palm Tree |
Neil has been building the boxes and the internal frames with foundation wax, for two new bee hives, over the last couple of months, all from scratch, and all from recycled materials. The hives have been constructed from old waterbed timbers, including the bedhead and the frames that he was given. The honey extractor (centrifuge) is also built from scratch, from recycled pieces of metal and bicycle parts, except for the food grade bin. A couple of the metal components needed to be purchased online. All of that activity kept him well occupied. It is great to think this whole project has been very environmentally sustainable.
 |
| Home made State of the Art Honey Extractor (centrifuge) |
The big day arrived last Sunday when the Bird Box beehive was to be relocated to the new Beehive, which is set above the ground on a concrete slab amongst the rain forest area of our garden. Keith arrived early and equipped to help us move the hive. There is a lot to it, and Keith has years of experience and knowledge with bees. In fact what he doesn't know about bees, hives and honey probably isn't worth knowing. The hive was smoked carefully and the process began. This needs to be a very gentle and slow activity, so that the bees don't get stirred up and start attacking. Keith and Mr. HRK donned their bee suits and started dissecting and analysing the combs in the bird box. I was also wearing mine as a precaution, as I was the brave photographer.
 |
| The inside of the very full Bird Box Hive |

It is important to check for disease with a hive like this one. Thankfully overall it is a healthy hive. Keith found only a few small hive beetles which he thought was pretty good and placed a bait in the hive for them. There was also a little chalk brood in there which apparently is because of the moisture which could enter the bird box, but otherwise it was all looking good.


Below are Neil and Keith checking one of the brood combs from the original hive,

The search was on for the Queen Bee and any signs of problems in the hive. Just in case he couldn't find the Queen, Keith had brought a new Queen with him. Most of the combs had been moved and the bees dropped carefully into the new hive when Neil spotted the Queen Bee, right at the bottom of the bird box. The clever girl had been evading discovery up until now.
There she is, where he is pointing.
 K
 |
| A rather fuzzy closeup of the Queen Bee |
The bees had built beautifully consistent rows inside the Bird Box which Keith attached to the frames with rubber bands and carefully placed into the new hive. All the wooden frames were constructed by hand by Neil.


Below, the brood box is successfully completed with the Queen Bee excluder in place. The second box in this picture was used to keep all the bees together and with a little smoke they retreated in to the brood box.

It's all going well and getting ready to take the extra box away.

Feeding the Bees
There was little food in the hive for them, because of the difficult weather conditions that bees have been coping with lately. They need some of their own honey to feast on. However Keith brought a new frame from one of his hives laden with honey that the bees can enjoy. So they will be ok.We also made up a sugar and water syrup solution for them to eat and to help with the readjustment.
Sugar and water bee syrup recipe: (There had to be a recipe somewhere in this story.)
Boil the kettle and measure one cup of water or use one cup of distilled water. Add one cup of sugar and stir until sugar is dissolved. When cool, add this solution to a plastic sandwich bag, and press the edge closed. Remove the lid, and place it on the top rack in the beehive and gently cut two small slots into the top plastic surface. Press the surface very gently so that a little of the solution seeps through, and watch the bees crawl toward it and start feeding. This should keep them fed for three days in addition to what they forage out in the garden. Smoke the hive, and check the sugar bags in three days, and replace until there is enough food in the hive for them to live on. We used two smaller bags as we didn't have any normal sized sandwich bags.
The metal Queen excluder which the Queen can't fit through but the honey bees can, was placed above the brood box in the hive. The brood box contains all of the brood comb that was inside the Bird Box.
 |
| Close up of the sugar syrup bags and the bees and the black hive beetle bait box in the background. On the left is all the comb with honey that was attached to the top of the bird box hive. |


 |
| Neil cutting small slits in the bags |

Neil has replaced the repaired bird box back onto the palm tree in the hope that we may attract another swarm. Keith suggested we add a couple of drops of lemon grass oil to the box as an incentive for another swarm of bees to settle there. Our bees had also built a comb outside the bird box so they were possibly looking at expanding or swarming again.
Neil and I still have a lot to learn about beekeeping, but we have also come a long way since Christmas. I hope all of the experienced beekeepers and Apiarists who read this will be kind with their thoughts about some of my beekeeping terminology. By blogging this, I hope we will also receive some interesting comments or emails from you, dear reader, and that we will continue to learn and enjoy our bees.


A Bee Friendly Garden
We are aiming for a Bee and Butterfly friendly garden, and are particularly conscious now of growing plants that will attract and feed our bees. They are loving the New Guinea bottlebrush at present, and if you look carefully you should be able to see the bee in the middle flower in this photo.
They also love the purple Salvia flowers (photo at top of page) we have growing in a few spots, and we recently purchased a few Coleus plants. Remember that old fashioned hardy plant with a variegated leaf which our Aunts and Grandmothers always had in their gardens? It's making a comeback and the bees just love the blue/mauve flower spikes it produces. Ours is yet to flower but it shouldn't be long. Wandering Jew is another old fashioned plant that sends bees crazy with desire, however it also goes crazy in the garden and will take over so it needs to be planted in a sunny spot where it can be the boss. We are gradually adding to our garden of bee attracting plants and I'll write another story about this at a later date.
The biggest benefit for us with having bees besides the honey they will produce, is their pollination of surrounding fruit trees, flowers, and vegetable gardens, and for the neighbours as well. On an optimistic note, we are hoping to harvest some of our own honey by next October, for our own use and a few gifts.
Speaking of honey.......

I am very happy to be able to promote a wonderful, local honey product, produced by Pure'n Natural Honey. This is a family owned Mackay business. Their beehives are placed in carefully selected pristine bushlands, and also move their hives to local farms growing macadamias and citrus to assist them with their pollination. The honey is 100% natural and raw and tastes delicious with well known health benefits. Also thank you to Kylie for providing me with the Pure'n Natural honey photo.
Products can be purchased by clicking on this link, or visit the Wednesday morning Farmers Market at Bluewater Quay in Mackay. The product is also sold at various Airlie Beach outlets, and is used by numerous restaurants and cafes in the region. You can also keep up to date with what is happening by subscribing to their Blog here.
We are very fortunate that Keith from Pure'n Natural Honey has provided a lot of his support and knowledge with our backyard bee hive, and as part of their business initiative, assisted us with successfully moving our hive.
Mr. HRK and I would love to hear from you with any advice, comments etc, which you can provide either through the email box on the side bar of this post or in the Comments Section at the end of this post. Click on the title link at the top for the Comments page.
Thanks for dropping by,
Best wishes
Pauline
Subscribe to:
Posts (Atom)