Showing posts with label Christmas recipes. Show all posts

Saturday, December 10, 2022

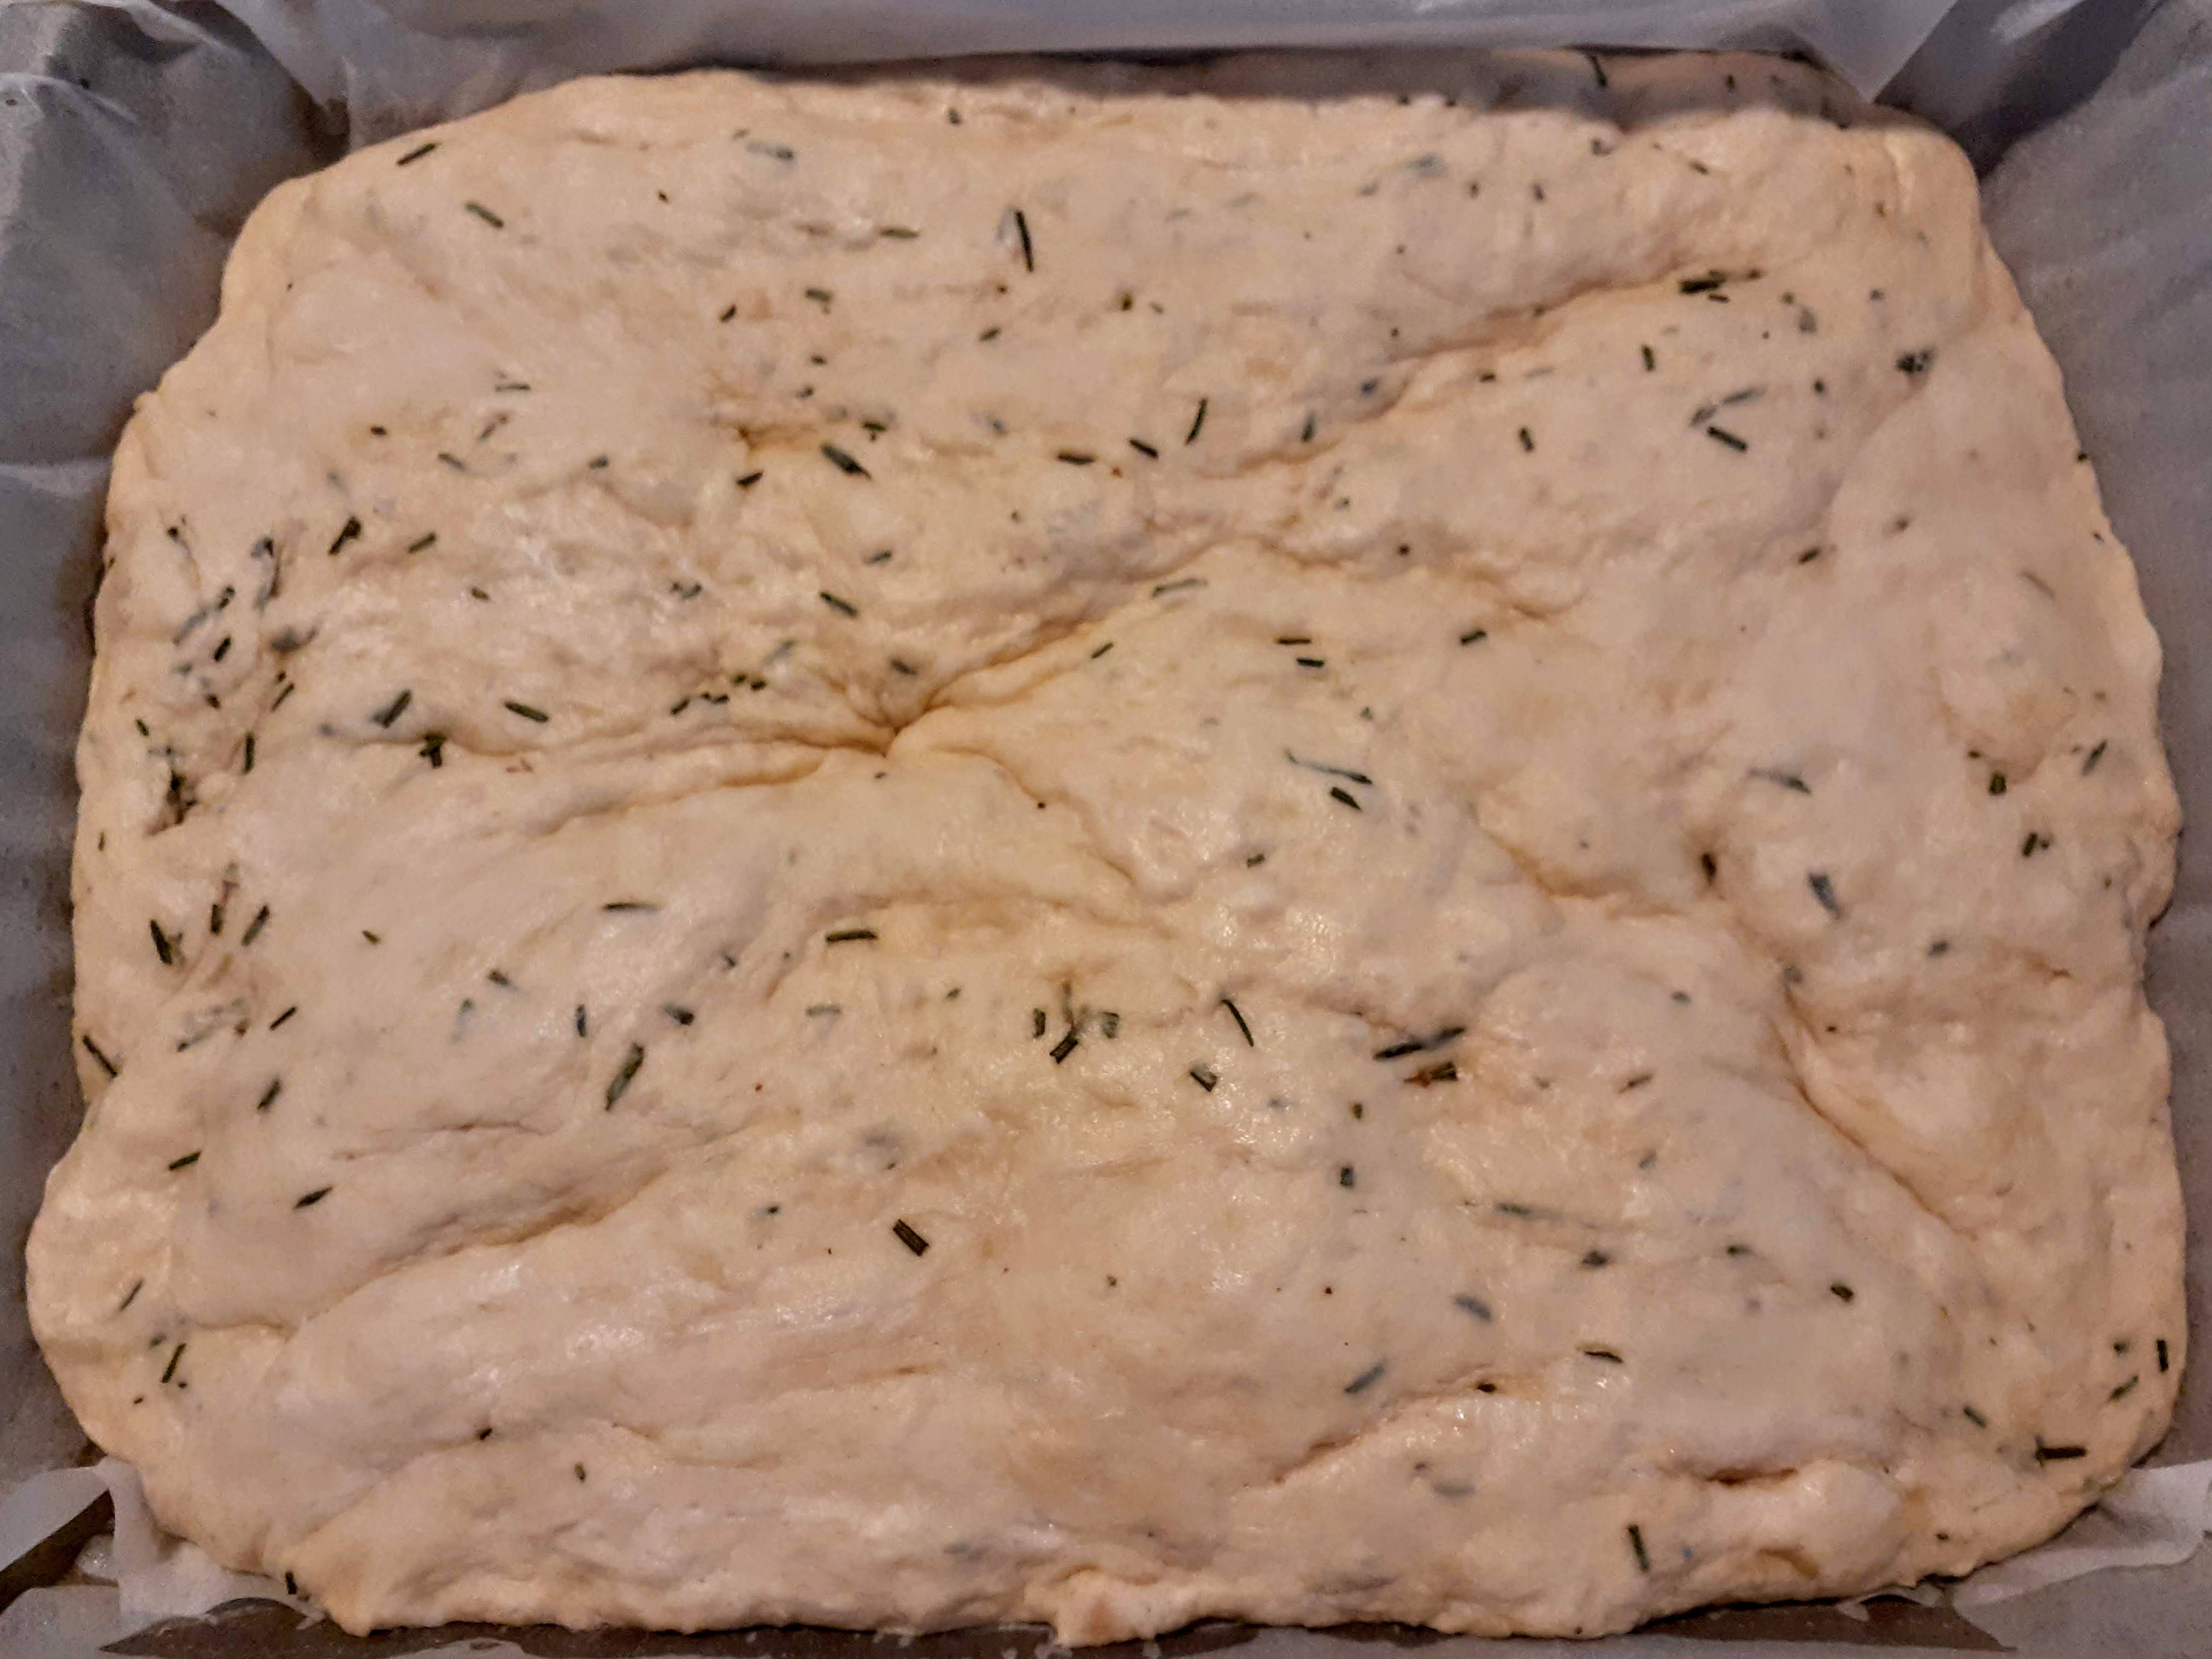
Rosemary Sourdough Focaccia Bread

It's the "Silly Season" when Focaccia bread is perfect to serve to friends with a Grazing Platter or a Charcuterie board and to take to a Christmas party. I've taken a long break from breadmaking for a number of reasons, and consequently I haven't been feeding my Sourdough "Mother" as often as I should. Trying not to eat too much bread which is impossible when I make my own, lack of time, lack of availability of the flour I like to use, travel, all of these things meant that I have sometimes fed my sourdough Mother sparingly just enough to keep her alive in the refrigerator. That sounds awful doesn't it? However, a few days ago I decided a good place to start with breadmaking again would be to make Focaccia. It's delicious and substitutes perfectly for crackers and biscuits. It makes a really nice change. We have an old and faithful rosemary bush growing in our front garden which keeps soldiering on and produces wonderful flavours in so many dishes, and particularly in this bread, and a batch of focaccia doesn't take as long to make as a sourdough loaf does. It's a perfect choice at this time of year.

I fed my sourdough Mother jars with plain flour and water, I have three Mothers now, as she has grown over the years. I placed two jars back in the refrigerator and left the other one out to ferment, and two days later she rewarded me by bubbling away happily. This is a refresh of a post I wrote a few years ago, and hopefully will inspire me and you too my friends to start baking some sourdough as a weekly tre in the New Year, to not only stretch the budget, but to also keep healthy as sourdough is great for the gut. 

I was recently told by a dietician friend, that sourdough bread is most nutritious if baked long and slow, like most foods, so that is one of my projects for 2023, to research the best way to bring the best sourdough qualities out in my bread. Even though the dough has a slow overnight rising process, apparently the bread needs to bake long and slow as well, for maximum health benefits. I'd love to hear from you if you already bake your sourdough loaves this way.

Let's Bake some Sourdough Focaccia Bread:

This is how I make my Sourdough Rosemary Focaccia Bread. There are also plenty of recipes around for how to make this with instant yeast if you don't have a sourdough starter which will still be delicious. To substitute instant powdered yeast for sourdough starter, replace 100 g of starter with 5-7 grams of instant powdered yeast, or 12-15 grams of fresh bakers yeast.

Timing:

Steeping the rosemary: 12 hours
Mixing and kneading: 15 minutes
First rising: 2 hours
Proofing: 1 hour 30 minutes
Baking: 15-20 minutes

Ingredients:

Makes 1 large focaccia, about 940 g., leftovers can be frozen. It reheats well.
  • 4 sprigs fresh rosemary
  • 30g (2 tablespoons) extra virgin olive oil, plus extra for drizzling
  • 500 g (4 cups) plain flour
  • 295 g (1 1/3 cup) lukewarm water 
  • 100 g (1/2 cup) liquid sourdough starter that is very active and bubbling, or substitute 5-7 grams of instant yeast
  • 1 1/4 teaspoons instant powdered yeast (which I used) or if you can get it, use 7 g (2 1/2 teaspoons) fresh bakers yeast, in addition to the sourdough starter
  • 10 g (2 teaspoons) salt
  • Sea salt flakes for sprinkling
The night before, remove the leaves from the fresh rosemary sprigs and mix them with the olive oil. Leave them to steep overnight at room temperature. If you forget to do this the night before, add the rosemary to the olive oil the next morning, and warm up the olive oil and rosemary together in your microwave. This will help to soften the rosemary.

I kneaded my dough by hand so I will give instructions for using a stand mixer and for doing it by hand.

KNEADING BY HAND

Put the flour in a large mixing bowl and make a large well in the centre. Pour in half the water, then add the sourdough starter, yeast, and salt. Mix well, then add the rest of the water and knead until all the flour has been incorporated. Add the rosemary and the steeping oil. Knead the dough until it becomes smooth and elastic. If you think the dough is a little dry, wait until you've added the oil and rosemary before adding more water.

I always knead my sourdough by hand, however there isn't really much kneading needed for this recipe. If you prefer to use the dough hook in your Stand Mixer, here is a method for that process. 

KNEADING IN A STAND MIXER

Put the flour, water, sourdough starter, yeast, and salt in the bowl. Knead with the dough hook for 5 minutes at low speed, then for 10 minutes at high speed. Add the rosemary and the steeping oil around 3 minutes before the end of the kneading time.


Shape the dough into a ball, cover with a damp cloth, and leave to rise for 2 hours in a warm spot. Midway through the rise, deflate the dough by folding it in half. By the end of the rising time it will have increased in volume.


Put the dough in a shallow baking pan lined with baking paper. 


Stretch the dough with your hands to make a flat piece that fills a 40 x 30 cm pan, or 16 x 12-inch pan. I used one of my old baking dishes. Cover with a damp cloth and leave to proof for 1 hour and 30 minutes. Ensure the pan is deep enough for rising.


Place a baking tray on the bottom shelf of your oven and preheat to 230 deg C. (or 450 deg. F.) Use the tips of your fingers to press small holes over the surface of the focaccia. Pour a little oil into the holes and sprinkle with salt flakes.


Just before you put the focaccia in the oven, pour 1/4 cup or 50 g of water into the baking dish in the bottom of your oven.

Bake for 15-20 minutes.

Remove from the oven when beautifully browned, turn out the focaccia , and leave to cool on a wire rack.


Slice into squares or tear apart. Mr. HRK loves the rustic approach by tearing a Focaccia loaf into pieces, no photo available unfortunately. Focaccia pieces are also delicious dunked in good quality olive oil, and then into Dukkah. This is a very simple way to eat it.

However one time he excelled himself and cut it into perfect shapes. 


Stay safe, healthy, and Covid free, it's on the rise again unfortunately.

Warm wishes,

Pauline

Thursday, December 8, 2022

In My Kitchen, December 2022


This is the Christmas Edition of In My Kitchen, and 'tis the season for baking. This also means my friends, that it's the season for Mangoes and Lychees here in tropical North Queensland. Bowen Mangoes which are the best to buy in our humble opinion, were costing $15.00 a bucket at our local market last Saturday. Just this morning we picked up a bucket for $12.00 from a roadside stall, and a bag of lychees. Bowen is just a couple of hours North from us. The lychees were a bit more expensive, the first of the season, but we couldn't resist them, they are a precious commodity, and for Christmas holidays only. We'll be freezing, dehydrating and eating mangoes for the next month, and then eating frozen mango with ice cream and yoghurt for the rest of the year. Dried mango is great for just snacking on. We'll also be looking out for the Common mangoes from backyard trees, strictly for making delicious Mango Chutney with, which we traditionally eat with our Christmas ham.

Sunday, November 27, 2022

My Family Recipe for Christmas Plum Pudding


It's the countdown to Christmas, and I really hope that Christmas still brings lots of excitement and love to many families on Christmas Day. We all love Christmas in our family. We generally try to keep it simple with the catering, when the traditional favourites make yet another appearance, such as my Mum's Plum Pudding with homemade Vanilla Custard for dessert, and the traditional Christmas Cake. 

Tuesday, December 21, 2021

Creamy Baked Brie and Fig Jam Puff Pastry Bites


 At this time of year leading up to Christmas, a predinner canape or starter which partners beautifully with a cold glass of bubbly, is just what we need. The silly season is underway. These bites can be prepared and cooked in the cool of the morning and stored in the refrigerator, and then just reheated and crisped up for 5 minutes in a hot oven before the party. In the Northern Hemisphere, avoiding the heat at this time of year isn't a consideration is it? Cook these just before the party and watch them disappear before your eyes. I can't buy reasonably priced figs so I buy my fig jam, a little indulgence, but well worth it. We have a fig tree growing, but when it decides to produce some figs, I doubt there will be enough for jam, we will be eating them fresh. I've made a few batches of these puff pastry bites, and each time the shapes are slightly inconsistent when cooked, which is the nature of puff pastry, but that doesn't matter. They do such a disappearing act, that nobody notices anyway. Who doesn't love puff pastry with a delicious filling?

I first saw this recipe on Sammie@the Annoyed Thyroid's blog, and after a few little changes, they have been a favourite of mine to bake ever since.

Makes 24

Ingredients:

2 sheets butter puff pastry, defrosted

24 teaspoons fig jam

200 g brie, chopped into 2 cm pieces with rind left on

Method:

Preheat oven to 190 deg. C

Grease two, 12 hole mini muffin trays, the easiest way is with spray on olive oil

Cut each pastry sheet into 12 rectangles. 

Then very carefully, using two fingers (second and third) gently press the pastry rectangles into the muffin holes. Be careful your nails don't pierce the pastry, it is quite soft.The pastry needs to cover the sides of the muffin hole.

Then prick the base a few times with a fork, so that the pastry doesn't puff up when it cooks. We want the sides to puff up, but not the base.

 Bake for 12 minutes in your hot oven.

Carefully take the hot muffin trays from the oven, and lightly press down the base of the pastry. It will have  risen slightly.

Start filling the pastries with the cheese bits. Press the cheese down lightly into the centre to fill the recess. Top with enough of a teaspoon of fig jam, so that the jam is encased in the pastry, not running over the edge.

Place the trays back in the oven, and bake for another 5 minutes, still at 190 deg. C., until the pastry is golden, and the cheese has melted. They will look and taste delicious.

Carefully remove the pastries from the muffin tins with a knife, and place on a nice serving plate, or allow to cool and store covered in the refrigerator.

 Cook's Tip:

  • These little beauties will keep in the refrigerator in a sealed container for up to 5 days, however they never last in our home for that long. They can be kept in the refrigerator, and then you are always ready for impromptu get togethers with family and friends, with minimal effort.
  • I recommend you buy the best puff pastry you can, preferably made with butter.
  • Serve with finely chopped chives sprinkled over the plate, for a little extra colour and subtle flavour.

In this lead up to Christmas there can be a lot of hustle and bustle and pressure to get everything done in time. I'm staying away from the shops as much as possible, mask wearing is now mandatory here again, which is a wake up call that Covid is back in our community. So I think throughout all of this, it is important to be kind to ourselves, and to our family and friends, and to think simply. 

This will be my last post until after Christmas. Thank you to my friends who regularly read my blog, and inspire me with your comments,  it is always a pleasure to hear from you and to read your posts as well. I hope you all enjoy a festive and meaningful Christmas, with those you love, and that the New Year will bring health, happiness and good news. 


Warmest wishes,

Pauline


Friday, December 17, 2021

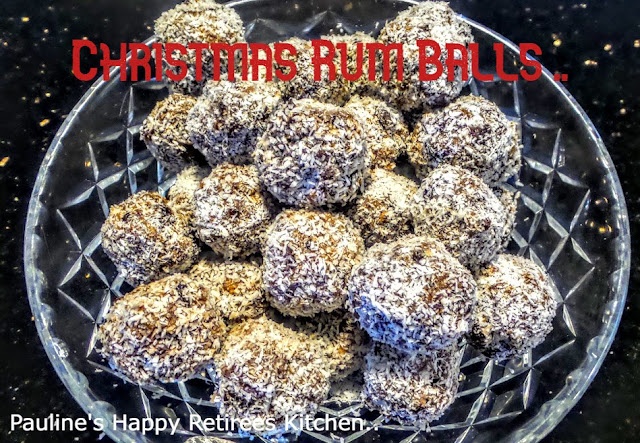
Christmas Rum Balls and Chocolate Rum Truffles


Fragrant and sweet, Rum Balls are a Christmas tradition in our family, and I can't imagine Christmas without a batch of these in the refrigerator to enjoy on Christmas Eve and Christmas Day. However it's never too early to eat them. Rum balls are the quintessential Christmas treat. They can be served as a dessert, for afternoon tea, or as an edible gift.

Monday, December 7, 2020

In my Christmas Kitchen 2020

 My friends it's been a cooking frenzy in my kitchen this last week, preparing for Christmas and the arrival of our daughter and family. Sore feet, music constantly playing, lots of water and the occasional vino, have ensured the marathon is completed. 

Friday, December 4, 2020

Ricciarelli Biscuits or Italian Almond Biscuits


Italian biscuits like these are always such a treat. The Christmas Countdown is on for us. My daughter and family arrive on Monday from Cairns which is such a joyous thought, however that means lots of cooking, cleaning and organising, but as much time for blogging. 

Tuesday, December 10, 2019

It's All about Christmas In My Kitchen


Here in Tropical North Queensland, our verandahs and patios become as much a part of our kitchen and eating area as our inside kitchen does. We spend a lot of time outside in our outdoor kitchen. So I thought as part of my In My Kitchen series for Sherry's Pickings, it was appropriate to showcase my latest orchid which is flowering in my outdoor kitchen. 

Monday, November 11, 2019

Reviving the Prawn Cocktail, drizzled with Marie Rose Sauce


  When done right, a Prawn Cocktail is the perfect starter for Christmas lunch or dinner, Good Friday seafood brunch,  or just anytime. Combining a delicious seafood sauce named Marie Rose with a small salad of crunchy Iceberg or Gem lettuce, might be a bit retro from the 1970's, but it is still one of the most delicious ways to serve freshly cooked prawns, or rock lobster, a perfect Summer starter. 

Monday, October 28, 2019

Gran's Scottish Shortbread recipe


You can call this Christmas shortbread, Scottish shortbread, Plain shortbread, Delicious shortbread, Granny's shortbread, or Vintage shortbread. What's in a name anyway, because the main thing is that this is a delicious recipe and a cinch to make. If you have plain flour, icing sugar, butter and a pinch of salt in your kitchen cupboards, you can make it. The only obstacle could be the 7 inch or 18 cm diameter tin needed to bake two shortbread circles in, but I will talk about that later.

 I have torrents of Scottish blood running through my veins, so when I made this I thought of all my Scottish ancestors, my dear Mum and also my favourite Great Aunt Eilleen (not on the Scottish side) but a great cook, who always produced delicious shortbread at Christmas time, which is the traditional time in Australia to eat shortbread.These are mouth wateringly good and have the distinctive buttery flavour unique to shortbread.


So this was a practice run for me my friends, as in case you didn't realise, it's only two months until Christmas (sorry) and I always like to introduce at least one  new cooking achievement at Christmas to surprise our family. This will be it. This is a very old recipe, which was given to me by a friend, also called Pauline,  who is a long standing member of my Book Club group. I've only just joined this group and am really enjoying it. Book club Pauline made this for the first book club meeting I attended, and then again at the third one held at her beautiful home, as part of a lovely afternoon tea spread, as it was one of the lady's birthdays. Pauline said that she was given this recipe by her Gran, and it was the first  sweet thing she ever cooked after she was married, and now it is the only biscuit she ever cooks. I feel very privileged to have been given this recipe, so thank you Pauline. 

I am really enjoying the Book Club, and what strikes me as special is that everyone who attends is valued for their individual opinion about the chosen book we have all read, and every comment is treated with interest and respect. It also doesn't matter if you haven't managed to read the whole book, as the conversation is always stimulating and quite intelligent, and afternoon tea is always delicious, a definite plus. The latest book we read was a collection of short stories by Western Australian author Robert Drewe, titled "The True Colour of the Sea". Each story was linked to water in some way. I haven't read a collection of short stories for a long time, but I loved this author's quirky writing style and how he engaged the reader from the first page. Well worth a read.


The only potential problem for me with this recipe was that because it is very old, it requires two x 18cm or (7 inch) shallow cake tins which can't be bought anymore. Perhaps they can be found in the cities where there are more specialist kitchen shops or at garage sales or op shops. I had two of them which were my Mum's but they are now in Cairns in my daughter's house. Cake tins, saucepans and cutlery sets have often been passed down through generations, however the healthy emphasis on decluttering has possibly curbed that tradition. When Mr. HRK got wind of my cake tin dilemma, he sprung into action and was off to the Incredible Tip shop before I could say Jack Robinson, looking for some stainless steel to make two specially designed cake rings, similar to the  egg rings we used to poach eggs in but much larger. Do you remember those? I remember them being difficult to clean. In the end he found what he wanted at Bunnings, of course, and I now have two custom designed aluminium cake rings, 18 cm in diameter, with a lip for easy removal. Perfect for the task in hand. I told him he should patent the design, but he is a very modest handyman.


Both of them fit on my large biscuit tray and they worked a treat for cooking the shortbread. Having said all of that my friends, a shallow 8 inch cake tin would probably work just as well,  as most of them have a  7 inch (18cm) diameter base anyway. With a high sided tin though, it is trickier to remove the shortbread triangles from the tin. The cake rings are both perfectly circular although the photo makes one look a little bent.

I  have a family Scottish tartan which my Mum and her Granny were very proud of, the Royal Stuart tartan. I was pretty excited about it as well,  and then we visited Scotland and it was everywhere in the tourist shops but of course I bought a scarf anyway, which makes a rare appearance in the North Queensland Winter, ha ha, or in these shortbread photos.


Mr. HRK also has a Scottish tartan, the MacGregor clan tartan; his ancestors originated from the unruly MacGregor clan in the Scottish Highlands, the name was even banned at one stage, not nearly as refined as mine ha, ha. I could tell you the very interesting story of how shortbread was really launched in Scotland by Mary, Queen of Scots, but can be traced back in a variety of forms to the 12th century, and how it is still traditionally offered to the "first footers" at New Year. However look it up here on Historic UK if you are interested in knowing more. There is plenty written about this iconic Scottish biscuit, and I love the history of foods, but I think we need to bake don't you?


Let's Cook:

Ingredients converted from the original imperial to metric measurement:

3 oz (87 g) sifted icing sugar

6 oz (175 g) softened butter
8 oz (225 g) sifted plain flour
pinch of salt

Equipment:

2 x 18 cm (7 inch diameter) shallow cake tins

Method:

Dust 2 x 18 cm (7 inch) diameter shallow cake tins with plain flour. I dusted my biscuit tray with plain flour, and greased the cake rings.


Heat oven to 140 deg. C


Beat together (87 g) 3 oz sifted icing sugar or icing mixture, and (175 g) 6 oz butter until pale and creamy. If the butter is softened, this takes hardly any time at all.


Add a pinch of salt to 225 g (8 oz plain flour) and sift it.

Fold flour into mixture, about a quarter at a time.


Remove mixture from the bowl and bring together on a floured bench.


Divide into 2 equal portions and press into the cake tins.


 I then rolled it with a small bottle to smooth out the surface.


Mark around the edges by pinching the mixture between thumb and forefinger (not essential if this doesn't make sense).


Take a cocktail fork or skewer and press about a dozen holes into the mixture. Shortbread always looks very attractive and tastes sweeter if sprinkled lightly with caster sugar before popping it in the oven. I omitted that step but I will do it for the Christmas version.

Bake for about 40 minutes (if you like it even crispier/crunchier cook for a bit longer). Mine took 50 minutes and was perfect, but definitely check it after 40 minutes. It should be very slightly browned.

Remove the tins or the biscuit tray onto a wire cooler and immediately cut into 12 triangular pieces as with a pizza.

Allow to cool in the tins.


If you don't have scales that show imperial as well as metric measures, the following is pretty close:

3oz = 87 g   6oz = 175g   8 oz = 225 g

Shortbread continues to be a lovely gift to bake for friends at Christmas time, and wrapped in tartan or presented in a beautiful biscuit tin, with a tartan ribbon, I think it is still considered to be special holding a certain mystique about it.


Thanks for dropping by,

Best wishes,

Pauline


Thursday, December 13, 2018

Itsy Bitsy Broccoli Bites for the holidays


With a free morning up my sleeve, I made a batch of these green goodies  for the freezer to have on hand at Christmas time. These nutritious and fun snacks are great for small children to munch on and for adults to enjoy with a cold Christmas drink. If you know you are being visited by young parents over Christmas with little people you will score some serious Brownie points if you produce these little beauties which the kids will love. They don't even realise that they are packed with nutritious green vegetables and no sugar. Finger food and vegetables are essential for healthy children and if they see us eating them as well, they will want them. The Sweet Chilli Jam on the side is strictly for adults only.

The rain has stopped for the moment leaving muggy and oppressive weather, suggesting that more rain is on it's way. The Dove orchids are coming out in bloom again, also a promise of more rain,  so hopefully they are right. According to the BOM reports Cyclone Owen will be bearing down on us this Sunday so batten down the hatches. I am trying to get all of the housework, washing etc done today knowing that over the next couple of days the wet weather could hamper our activities.

To make these little gems, I whizz the broccoli up in the food processor to save time doing all that chopping and then the rest of the ingredients just need to be mixed up, shaped into bite sized balls and put in the oven to quickly bake. So easy and just serve with Sweet chilli sauce or Sweet chilli jam for the adults,  or homemade relish or eat them unadorned! This is my version of Sarah Wilson's clever recipe. I also find it easier to grease my hands with a light layer of coconut oil when rolling them as they can get sticky.

I am putting this recipe up again as I last posted it two years ago and for some reason all of the photos disappeared. This recipe has endured the test of time.

Ingredients:

Makes 36 Bites

2-3 cups of finely chopped fresh broccoli or frozen, thawed and chopped broccoli
1 1/2 cups grated cheese ( cheddar, Parmesan or whatever you have on hand)
3 free range eggs, beaten at room temperature
1 cup flour (plain, gluten-free or almond)
1 teaspoon dried oregano or 1 tablespoon freshly chopped oregano
sea salt
olive oil, coconut oil or butter for greasing (I use coconut oil and put a little on my hands as well when rolling the balls)

Let's cook:

Preheat your oven to 190 deg. C.
Line two baking trays with baking paper and lightly grease the paper.
Combine all the ingredients in a large bowl and mix well.


Roll the mixture into bite sized balls and place on the baking trays. Or spoonfuls of the mixture can just be plopped onto the tray to resemble small fritters.


Sprinkle a small amount of dried oregano or black sesame seeds onto each ball before cooking for the rustic look and for added flavour. Reserve the black sesame seed bites for the adults.

Bake for 25 minutes or until golden.


These will keep in the fridge in an airtight container for 4-5 days, or freeze for a few months.


Best wishes

Pauline


Friday, October 12, 2018

Crispy Teriyaki Chicken Wings, they're delicious party food


Crispy Teriyaki chicken wings at a party are always delicious as finger food, and to my way of thinking they are definitely party food. I wouldn't cook them just for Mr. HRK and me now, however if the family or friends were visiting, well that is a different story. I used to cook them as a treat sometimes when the children were younger and lived at home, and as an easy meal with rice and a salad they also stretch the budget. I was planning ahead for a family party when I marinated these,  so they went into a large freezer bag until mid-September for the party. It is safe to freeze the marinated chicken wings for 6 months. They cooked beautifully on the night of the party and did the disappearing act. I was lucky to get a taste, let alone a photo. However my friends you all know what cooked chicken wings look like I'm sure, so I'm afraid you will have to use your imagination with this one.  Just take my word for it that they were finger lickin' good and so easy.

I paid $4.00 a kilo for these at Woolworths yesterday, but last week they were only $2.00 a kilo. Now that would be a bargain. At that price I am happy to prepare and cut them up myself. However if you are time poor and feeling cashed up, chicken wings already dissected can be purchased at Lenards Chicken for $10. 00 a kilo. I think they were also marinated though. That's quite a markup isn't it for only 20 minutes work, and I prefer to make my own  marinade as then I know what has gone into it. (Apologies, this was written a little while ago, I forgot that I hadn't posted it, so prices might have changed again.)

Ingredients:

2 kg chicken Wings (Approximately 21-24 wings) Or 24 if you want to count out exactly 24 wings
3/4 cup (180 ml) Teryaki sauce
2 tablespoons peanut oil
1/2 teaspoon ground ginger or 2 teaspoons grated fresh ginger
2 tablespoons peanut oil
2 crushed cloves garlic
2 red cayenne chillis ( only 1 if they are a bit hotter), finely chopped, and deseeded
1 tablespoons brown sugar (I used Dark Muscovado sugar)
1 teaspoon sesame oil
1/2 teaspoon Chinese five-spice powder
1 tablespoon toasted sesame seeds, for garnish

Cooking Notes:
*I only substituted the Dark Muscovado sugar because I had no Brown sugar (Oops, I was sure I had bought some)
*I substituted Ground ginger for the fresh stuff because we have recently dehydrated a lot of our home grown fresh ginger and it is amazingly fragrant and flavoursome

Preparation of the Wings:

Cut the chicken wings into three pieces at the joints. I thought this would be more onerous than it was. It only took me about 10 minutes all up. I removed all of the wing tips first and froze them, and then with a twist of both parts of the wing, it was easy to locate the soft part in the middle between the bones and slice through.
 

Reserve the frozen wing tips for another use such as making soups from scratch. I have frozen mine in small ziplock bags to use in my next batch of chicken stock.

Let's cook:

In a large bowl, combine the Teryaki sauce, peanut oil, ginger, garlic, chilli, sugar, sesame oil,and Chinese five spice. Add the chicken and toss with the marinade to coat all of the wing pieces.
Cover and then refrigerate for at least 3 hours or overnight in the frig.


Preheat your oven to moderately hot, 180 degrees C.

Drain the marinade from the wings and discard. Place the wings on an oiled cake cooling rack over a baking dish. I used an Alfoil baking dish to save washing up because of the amount of cooking I was doing. I think that one batch of wings was cooked directly in the alfoil baking dish and they worked out well.

Roast the chicken uncovered in the oven for about 40 minutes until cooked through and brown. Turn them once after 20 minutes if possible.

These are attractive to serve sprinkled with a few sesame seeds and a green garnish.

Have you started thinking about your Christmas menu yet? I think these wings might be on mine this year, after all they are easy party food.

Thanks for visiting,

Best wishes

Pauline


Sunday, December 24, 2017

Chocolate Rum Truffles or Christmas Trumffles


It's Christmas Eve and it's starting to feel like Christmas, especially when these delicious chocolate truffles are made and sitting in the refrigerator waiting to be enjoyed. My first batch only had 2 tablespoons of rum in them, however when they are refrigerated as we need to during a hot Queensland summer the flavour of the rum tends to reduce so I doubled the amount in the next batch and Mr. HRK and Shannon gave them the thumbs up, after trying a couple of them of course just to make sure. They are delicious with an afternoon  cup of  tea or coffee or an evening aperitif.

I hope you are enjoying the lead up to Christmas and that the commercial frenzy of the event hasn't affected you too much.

I have to admit that when I first starting making these  little balls I was calling them Rum Balls. However as often happens, the recipe evolved into more of a truffle like mixture so that is what I have called them. Shannon also reminded me that my classic Rum Balls used to always be made with Weetbix and had coconut in them. So do you prefer to make Rum Balls or Truffles at Christmas time or is there another traditional sweet family treat that you like to make?

Shannon has named these Trumffles as they are a cross between a Rum Ball and a Truffle, ha, ha.

Merry Christmas everyone.

Ingredients:

250g sweet biscuits, such as Mcvities Digestives Milk Chocolate biscuits or Arrowroot biscuits
1 cup sweetened condensed milk
1/2 cup cocoa powder
1 1/2 cups desiccated coconut
4 tablespoons rum (I used Bundaberg Rum)
Chocolate sprinkles and extra fresh desiccated coconut for coating in two separate batches

Method:

Drop your biscuits separately into the food processor through the chute whilst motor is running to make fine crumbs.
Place the biscuit crumbs into a mixing bowl. Stir in all of the other ingredients until well combined.
Cover the bowl and refrigerate for 1 hour until mixture is cold and firm.
Roll level tablespoons of the mixture into bowls. This may be easier if you dampen your hands first.
Lightly roll each truffle in either coconut or chocolate sprinkles or cocoa powder.

As these may be served at a family gathering over Christmas, a special Kid's edition can be made minus the alcohol by replacing the rum with 2 teaspoons of vanilla extract, and reduce the cocoa to 1/3 cup.

(This recipe is loosely based on one I saw on a Jamie Oliver Website, and then for some reason I couldn't find it again. )

I'd like to thank you for reading my blog and supporting me with your comments throughout the year. I'd also like to thank those bloggers who have inspired me throughout the year with their enjoyable and inspiring posts. We are all part of a very diverse, global and supportive blogging community, which I look forward to being part of in 2018.

This will be my last post for a while now, possible until mid-January.

Wishing all the best for a wonderful Christmas with family and a healthy, safe and rewarding 2018.

Bye for now

Pauline xx

Tuesday, November 21, 2017

Traditional and Homemade Christmas Plum Pudding


Plum Pudding, yum. Christmas preparations have started in my house. I have a Christmas list, and making a traditional Christmas Plum Pudding is on it. 

Sunday, November 5, 2017

My Green Mango Chutney recipe, it's spicy and sweet


This Mango Chutney, made from green mangoes freshly foraged, is a family recipe from my Mum and her family which I have always used. Anglo-Indian style chutneys basically consist of a fruit or vegetable, malt or cider vinegars, sugar, herbs and spices

Thursday, December 8, 2016

Home made gifts ready for Christmas


Caribbean Rum and Gingerbread Balls

Rum Balls have always been such a classic part of the Christmas treats in our home, but to my way of thinking the classics are the forms that can spawn a plethora of variations. Hence, these Gingerbread Balls are based on the idea of Rum balls but use Ginger cake as a base, with the addition of Caribbean Rum and the exotic Stem Ginger, an ideal marriage of flavours. There is no cooking involved, unless you want to make the ginger cake yourself. I have only been able to find good stem ginger at specialist Delicatessen stores, but I'm sure it is more readily available in the cities. More ginger can be added to this recipe for the gingerholics.

These will be Christmas gifts made with love for my friends, which I find more satisfying and meaningful than presenting them with something I have purchased. I hope they feel the same way. Since I have finished work, I guess I approach a lot of things differently, and  now that I can I enjoy spending more of my time being creative in my kitchen, a valued luxury of retirement.

Ingredients:

500g homemade ginger cake, crumbled, or take the shortcut and buy a Ginger Loaf (Coles has them).
3/4 cup (60g) desiccated coconut
1/3 cup (80ml) sweetened condensed milk
1/2 cup finely chopped stem ginger, drained of syrup or use Naked uncrystallised ginger
2-3 tbs. Caribbean or Bundaberg (dark) rum (optional)
1/3 cup (65g) dark chocolate chips
Extra desiccated coconut for the coating

Makes about 40 balls.

Method:

  1. Place the cake crumbs, coconut, condensed milk, rum, and chocolate chips in a bowl. Stir until well combined.
  2. Line a baking tray with baking paper. Roll 1 tablespoonful of the mixture into a ball. Place on the lined tray and continue with the rest of the mixture.
  3. Place extra coconut on a plate. Roll the balls in the coconut to coat. Place in an airtight container and store in the fridge.


Wednesday, December 2, 2015

It's time for biscotti at Christmas time

Nigella's Cranberry and Pistachio Biscotti

To my way of thinking, this biscotti spells Christmas, with the lovely red cranberries and pistachio nuts specifying a festive event. A lot of ingredients are interchangeable in biscotti, eg pistachio nuts can be substituted with almonds as can the dried fruits, but this is a spectacular combination. The orange zest freshens up the whole biscuit. 

Traditionally, biscotti is meant to be dipped when eating in a sweet dessert wine, however Nigella Lawson in Nigelissima suggests a ruby port. Whatever takes your fancy really I think, even a cup of tea will do, these biscuits are just meant to be savoured over and dipped.

Makes 15, excluding the end pieces. I know I will need to bake another batch. 

Ingredients

1 EGG
75G CASTOR SUGAR
2 TEASPOONS FINELY GRATED ORANGE ZEST
125G PLAIN FLOUR, PLUS MORE FOR ROLLING
1/2 TEASPOON BAKING POWDER
FRESH NUTMEG (it should be grated off a whole nutmeg for best flavour)
75G PISTACHIO NUTS
50G DRIED CRANBERRIES

Let's cook:

Preheat the oven to 180 deg. C. /gas Mark 4.

Beat or whisk the egg and sugar until pale and moussy. Beat in the orange zest, then slowly fold in the flour mixed with the baking powder and a good grating of fresh nutmeg.

Fold in the whole pistachios and dried cranberries. Flour your kitchen bench well, and also your hands, as it is a sticky mixture. Now form the dough into a flattish, oval ciabatta-like loaf, approx. 25x5cm, and taper the ends slightly.

Lay the biscotti dough loaf carefully onto a piece of baking parchment on a baking tray and cook for 25-30 minutes, it should be a pale, brown colour. (I use a long and wide icing spatula knife to do this.) Rotate the baking sheet halfway through the cooking time, as the base can brown quickly.

Transfer the cooked loaf to a wire rack and leave for 5 minutes to harden slightly, then using a fine serrated-edged knife, slice the baked loaf diagonally into fingers about 1 cm thick.

These look bigger in the photo than they actually are.

Place the slices back onto the baking parchment covered tray and cook again for another 10 minutes, and then turn the biscotti over and cook for yet another 5 minutes.

Allow the golden-brown biscotti to cool on a rack and then store them in an airtight container. They will keep for a few weeks, as long as they are well hidden.

So, my friends, how are your Christmas preparations progressing? We are travelling away for Christmas so I need to have my baking finished well in advance. I would love to hear from you about your Christmas baking plans. I know many more people are reading my blog than comment, so it would be nice to hear from you. Comments box at the bottom of this blog.

Best wishes

Pauline xx


Tuesday, November 24, 2015

Making your own Mango chutney, a Christmas tradition in North Queensland


Bowen mangoes, and part of the latest batch of mango chutney. 

Mango chutney recipe


 There were always bottles of homemade mango chutney  in the house when I was growing up in Rockhampton, in Central Queensland,  as it was an annual tradition to make a batch before Christmas, for family and friends, just as the common mango trees were fruiting. The challenge was and still is, to pick the mangoes before they ripened on the trees. In those days most people had a mango tree growing in their back yard, or had friends who did. These days, mangoes can be bought pretty cheaply from the farmers markets, or from roadside stalls, on the Northern Bruce Highway. They will probably be seconds, or second grade fruit, which is fine, as the commercial supplies of mangoes are shipped to the southern markets and overseas as soon as they are picked.

Wednesday, December 31, 2014

Smoked Salmon and Dill Pikelets


Smoked salmon, fresh dill, and a delicious sour cream mixture served on small, bite size pikelets, this was maximum impact for minimum effort. I cheated and bought the mini pikelets from Coles, but of course with more time you can easily make them yourself, but honestly for $3.00 a packet why would you bother. These were a real hit as a Christmas entree. However, they would serve up beautifully and hold their own at any dinner or cocktail party.

My apologies there is no photo of these little beauties as they disappeared  before my eyes, as did the second batch. When life settles down after Christmas/New Year I will make some more and add a photo.

Ingredients:

300g (1 1/4 cups) sour cream (reduced fat if you prefer)
1 tbs Wholegrain Mustard
2 tbs finely chopped chives
1 tbs finely chopped dill
2 tsp lemon juice
2 x 140g pkts Coles Golden Pikelet Bites
200g smoked salmon
Dill sprigs, to serve

  1. Combine the sour cream, mustard, dill, chives, and lemon juice in a small bowl. Season with salt and pepper. 
  2. Spoon a little of the sour cream mixture onto each pikelet and top with some of the smoked salmon and a sprig of dill. Season with freshly ground black pepper and arrange on a serving platter embellished with extra Dill sprigs.


Monday, December 29, 2014

Christmas Seafood in the Tropics and a Seafood Sauce Recipe

This year Christmas was in warm tropical Cairns in Far North Queensland, so a departure from the traditional style Christmas lunch was inevitable. Fresh seafood which is so plentiful and locally caught was the obvious choice.