This year, late January sees the start of the very active Monsoon season here in North Queensland. From Mackay up to Cairns, the highway has been cut in several places at different times, a couple of bridges washed away, and the sugar cane farming town of Ingham is completely flooded. The government is flying in generators so that residents can have power. Thankfully a tropical cyclone hasn't entered into the equation, that would be disastrous. The torrential rain has been enough.
Showing posts with label January. Show all posts
Showing posts with label January. Show all posts
Thursday, February 6, 2025
Saturday, January 11, 2025
In My Kitchen, January 2025

Happy New Year 2025 to you all. It has really felt like the Summer holidays here at home since Christmas, which I think we all needed. Christmas was wonderful, we survived it, thanks to the air-conditioning. Hope you had a fabulous Christmas with some of your favourite people wherever you were.
Thursday, January 12, 2023
Beating the Heat with a Summery Mixed Bean Salad
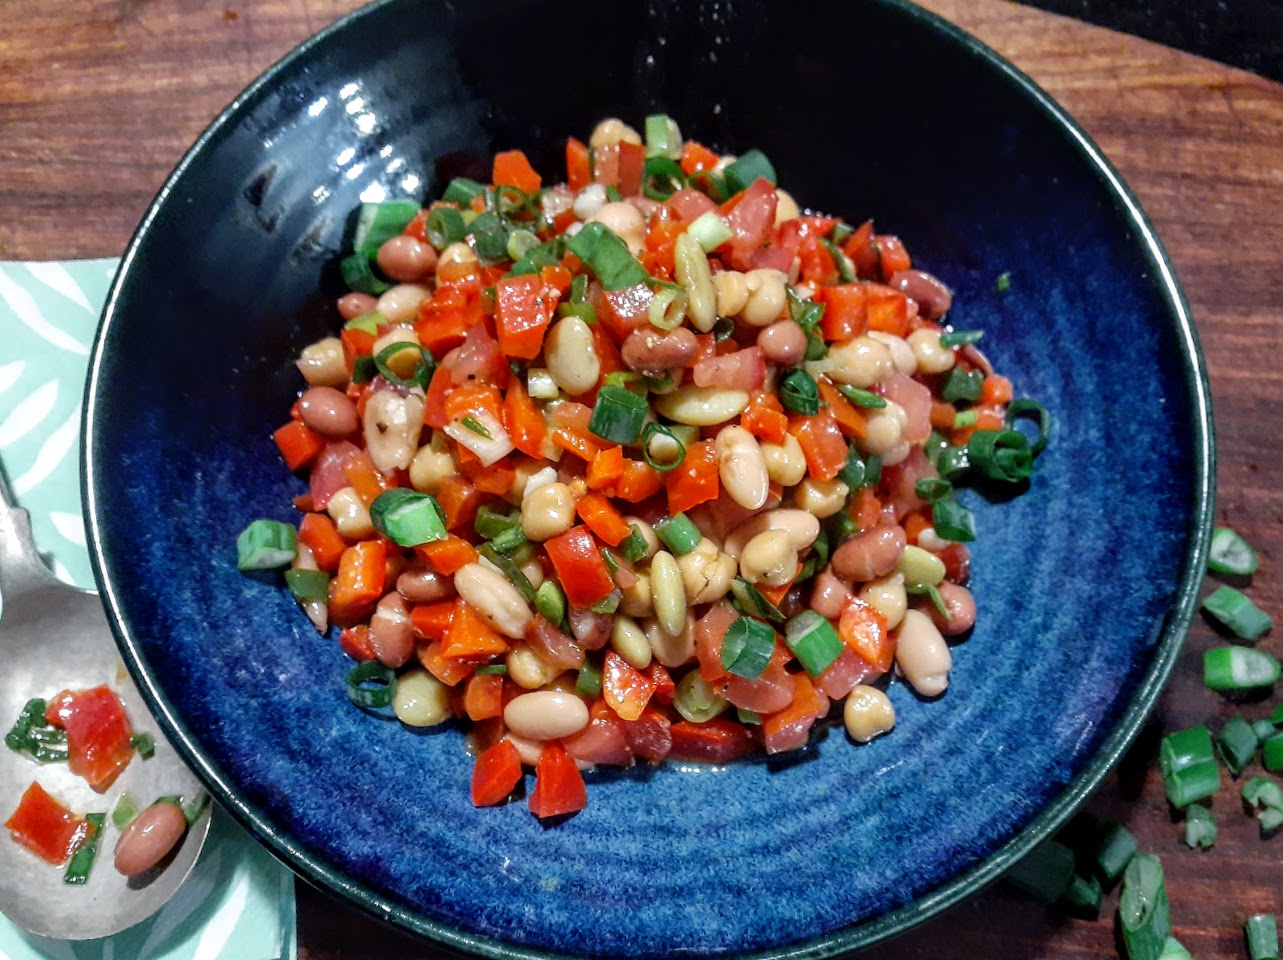
Dear Friends, Reach into your pantry, hunt down that tin of Mixed Beans, and whip up this simple bean salad. This salad serves 4-6 people. If you are doubling the quantities, use a red and a green capsicum, as the two colours look attractive and give a nice contrast in flavours. I just love the tang of this salad in Summer. I originally made this just with white Cannellini beans and it was delicious, so it is versatile regardless of what type of beans you choose. I have also lightly blanched some green beans, and added them chopped to the mix as well. Whilst I love a healthy grain salad at the best of times, this bean salad requires no cooking at all, such a bonus at this time of year.
Happy New Year to you all. We are just back from our Summer holidays at the Gold Coast and I am gradually easing back into cooking, blogging and everything really. January is such a transition period, don't you think? Did I say cooking? Up until yesterday, we were experiencing maximum temperatures here at home of 35 deg. C. with high humidity, so salads and easily prepared meals involving little to no cooking were my preference. That's how this recipe came about, as during the heatwave I was craving something really tasty, a little bit sweet, sour and tart that required no cooking. However, thank goodness the heavens have opened up and the heat has been followed by very heavy rain today, over 100 mm, which we just love. Hopefully there won't be any serious flooding. It's predicted to continue over the next few days. The heat and humidity came as a bit of a shock to us after a cool beach holiday at the beautiful Gold Coast, and Gold Coast hinterland in Southern Queensland.
These are photos of Tugun beach on the Gold Coast, with the Life Guard Tower on the right, complete with cute Christmas decorations and solar panels. We found this to be the best swimming beach, and whilst our holiday accommodation wasn't at this beach, Mr. HRK swam here during family holidays as a child. The rule is to always swim between the flags. The Life Savers (Guards) do a wonderful job looking after swimmers and surfers on the beaches at this time of year.


This is how I make my Mixed Bean Salad.
Ingredients:
Serves 4-6
400g (1-16oz) can Mixed Beans (or any white bean such as Cannellini if you prefer)
1 red or green capsicum, or use half of each for colour
2 spring onions, finely chopped or 1/2 medium very fresh brown onion
1 large tomato, deseeded and finely chopped
6 tbsp. good quality red wine vinegar (I used Jamie Oliver)
1/4 cup Extra Virgin Olive Oil
salt to taste
1 clove garlic finely chopped(optional)
(Preparation time 10 minutes)

Preparation:
- Rinse and drain the can of beans
- Chop the capsicum and spring onions very finely and place into a medium size mixing bowl. Add the beans and any other fresh salad ingredients that you choose and mix it all together.
- Mix together the red wine vinegar, the olive oil, and whisk with a small whisk to emulsify. Add the salt, a light grinding of black pepper, and pour into the beans. Taste it and adjust the seasoning if necessary, although the flavours will develop so you could do this closer to serving the salad.
- If you have some very fresh garlic and you love it, peel and mince 1 clove of garlic, and add it to the mixture and stir.
- There is plenty of dressing for this salad so if you wish to add a few extra salad ingredients, see my notes below for ideas, then there will be plenty of dressing for a larger salad.
- Add a teaspoon of mustard and a little sugar to the dressing if that is more to your taste for a vinaigrette dressing.
- If you are entertaining dinner guests, the whole recipe can also be mixed together early on the day of serving and kept in the refrigerator, so that is one less thing to do close to the event.
Cook's notes:
- Omit the tomato if you wish, it wasn't in my original recipe, but I like tomato in this salad.
- This salad is perfect just with the ingredients listed above. I am always careful not to add to many ingredients to recipes however with salads, which are so versatile, it is generally quite simple to add extra ingredients that you have on hand. Add 2 celery sticks for some extra crunch, and if you intend to serve all of this in one sitting, add some finely chopped cucumber just before serving if you wish. However, the cucumber won't last well in the salad if refrigerated.
- Add some herbs such as chopped fresh tarragon and chopped fresh parsley for extra flavour.
- The quantities can easily be doubled to serve more people. A tin of extra chickpeas can be added, and another chopped capsicum of a different colour, green or yellow.
- Leftovers will keep well covered in the refrigerator for 2-3 days, and even improve in flavour. Unlike some fresh salads which wilt after adding a dressing and being refrigerated, this one will last beautifully.

We ate this salad last night with my delicious Rustic Greek Halloumi and Spinach Pie that I love to make and eat. It's very easy to bring together and it had started raining so the kitchen was cool, bliss.

I needed to use up some frozen spinach and halloumi so it was a perfect match, and ideal for a vegetarian meat free Monday, even though it wasn't Monday. This salad also contrasts perfectly served with Spanish chicken and chorizo casserole. However, it can stand on it's own just served with a green salad. I would also happily serve it with any Mexican style meals.
Thanks for dropping by,
Have a great weekend,
Pauline
I'm adding a little p.s. to my post today, as I'm having trouble replying to your comments but I am reading them, and trying to catch up on your lovely comments on previous posts. Hopefully Blogger will rectify this problem . After all it is Friday the 13th. Take care everyone.
Monday, January 25, 2021
Mango, Lime and Coconut Panna Cotta

Lamb is often the meat of choice on Australia Day for the BBQ, or seafood, however we will be enjoying beef ribs this year with our good friends who are doing the marinating and we are doing the cooking.
It's my job to provide dessert, and generally host the meal, so whilst I still have some of the delicious Caramel Mango and Coconut Ice cream from a previous post still in my freezer, I also still have a few of the fresh mangoes in the frig that we picked ourselves. A chilled mango Panna Cotta with sweet fresh mango seemed perfect as it can all be prepared the day before, and perhaps we will have just a smidgen of ice cream as well. The two desserts really are a perfect pairing, as the ingredients are quite similar, both cold, and will complement each other beautifully. Add a couple of meringues in place of the pavlova if you have them, and we are set. My friends are you still enjoying mangoes this summer? It is a short season for them from November to March approx., however they can be bought frozen now, so we can enjoy mango desserts all year round. No complaints here. As we had a few extra, we sliced and froze some mangoes last week, so now we can eat them throughout the year, much more reasonable than buying frozen mango at the supermarket.
INGREDIENTS:
300 g fresh diced mango (2 cups) , or thawed frozen mango
600 g Vanilla Custard, homemade or from a carton
70 g caster sugar (1/3 cup)
1/4 cup fresh lime juice (60 ml)
1 tablespoon finely grated lime zest
6 g small gelatine leaves (about 4)
2 cups (560 g) coconut flavoured yoghurt, lactose free will be fine
1 medium ripe mango (430 g), extra, thinly sliced for garnish
100 g mini meringues for garnish if using
METHOD:
Pour your custard into a large bowl. I'll admit I guiltily bought the custard for this dish, as I was also baking sourdough bread this morning so time was at a premium.
Then process the diced mango until smooth in your food processor.

Place the gelatine leaves in a small bowl of cold water until softened, allow about 5 minutes. Do this as close as possible to coincide with the lime mixture being taken off the heat, which is the next step. Squeeze the excess moisture from the gelatine, and add the gelatine to the saucepan of heated lime juice and mango puree. Stir until the gelatine is dissolved.
Place the sugar, lime zest, lime juice, and just 1/4 cup of the mango puree in a medium saucepan. This mixture needs to be stirred over a medium heat until it reaches just below simmering point. You will see some steam start to come off the surface, but no bubbles. Allow about 3 minutes for this.
Now you need to work quickly. Immediately whisk the lime mixture, including the softened gelatine, into the custard. Spoon in the yoghurt and the remaining mango and whisk until smooth.

Strain this mixture through a fine sieve into a large jug. This might take a little time because of the sieving process, and you will be left with a small mixture of thick fruit pulp and custard in the sieve. It is quite tasty and nice with any leftover yoghurt, waste not want not. The panna cotta should be smooth and lump free.
Select 6 x 1 1/4 cup (310 ml) shallow bowls or ramekins, and pour the panna cotta mixture into them . Cover and refrigerate for at least 4 hours, or overnight until set.

I made these dishes late in the morning before lunch, and they were beautifully set by 5 pm that afternoon. Garnish the dishes with sliced mango, and mini meringues or whatever you wish really. Some toasted coconut flakes would also be nice. There was some multitasking this morning, with three sourdough loaves baked, whilst I did the prepping for the panna cotta. \
After I had taken the photo for this post, I said to Mr. HRK, " I think I might have put too much mango on the panna cotta for the photo." He said, " You can never have too much mango." Always helpful, he said, "I wouldn't use the toasted coconut flakes next time."
This is the cob loaf I made this morning, and two other sandwich loaves to be sliced for the freezer.

Happy Australia Day, and to my Australian friends and any Aussies overseas, how are you celebrating tomorrow?
Warm wishes
Pauline
Sunday, January 17, 2021
Salted caramel mango and Coconut Ice Cream Crumble Bars

Mangoes and ice cream are delicious together, and because I am still in holiday mode I am using plain bought vanilla ice cream for this recipe. However you can use your own homemade ice cream if you feel like making it and well done if you do.There's still some mango madness here in North Queensland with local mangoes ready for the picking. What we cook and feel like eating is often dependent on the weather at the time, whether it is hot and humid like it is here in Summer, or very cold, as our Northern Hemisphere neighbours are experiencing.
At the moment here in tropical Queensland, fresh salads and fruits are a mainstay and a colorful salad is the preferred option for a meal. Hot desserts can be too heavy to eat in our climate right now unless dining out in an air conditioned restaurant whereas in the cooler climates, I know you are all enjoying delicious warming foods like sticky date puddings. However one exception to all of the rules is ice cream. Ice cream is enjoyed everywhere, whether its cold, hot, temperate or in between, the main difference being that in our climate we need to eat it faster before it melts. No problem there. When I saw this recipe in a Coles supermarket catalogue before Christmas I wanted to make it straight away. However as we travelled to Cairns for Christmas that didn't happen. Local mangoes are ripening very late here, possibly due to the dry conditions last year, and paying $2.50 for a supermarket mango isn't an option for me when we can buy them for $10.00 a bucket at the markets or pick them from a friends tree, which is what we have just done.

This photo is of mangoes that we have just picked straight off the tree. The mango tree is located on a cattle property near where we live and is a very large tree. As you can see they have some imperfections which you don't see on mangoes purchased at a supermarket and are all different sizes. This is the reality of mangoes growing on large trees on privately owned property. They often look like this before they are washed and cleaned for the market.Time will tell when they ripen if they all make good eating. So far they are delicious. The fruit is ready to pick when the skin changes from green to yellow, or red or pink depending on the variety of mango. Most of the mangoes growing in our area are Bowen mangoes, which have a beautiful red blush on their skin. We try to pick them when they are still hard, as otherwise the flying foxes will raid the tree and eat them overnight. One of the tricks to hasten ripening is to wrap them individually in newspaper and then they will often ripen indoors on the windowsill or in a tray or bucket in a week.
 |
| Mangoes wrapped in newspaper ready for ripening |
The mango trees are often very large, and it's important to be well prepared before picking mangoes as they can also release a lot of sap from the stem when they fall from the tree. This sap can burn our skins if we aren't careful, so long sleeves and gloves need to be worn for protection. Its also snake season so shoes are essential, as often the trees are in the paddocks on large properties, not that we have seen any snakes, but they are around. The most essential piece of equipment is the mango picker, which are often homemade and comprise a hook at one end, which hooks over the top of the mango. This hook is attached to a large pole like a broom handle to reach the top of the trees, and there is also often a long sock attached so that the mangoes have a soft landing into the sock. A good pull by the hook and the mango will come away from the stem. However often they land on the ground without any damage. Picking mangoes is a labour of love, and this annual event is one we have grown up doing over the years. Mr. HRK is taller than me and is very good at it. Commercial mango farms have a much more streamlined procedure for picking as you would expect.

Let's cook:
Serves 16. Preparation 20 minutes (+ cooling & 4 1/2 hours freezing time.)Cooking 30 minutes.


Ingredients:
3/4 cup (165 g) brown sugar
2 cups (300 g) plain flour
1 cup (75 g) shredded coconut
2/3 cup (60 g) rolled oats
250 g unsalted butter, melted
1/2 cup (80 g) finely chopped dried mango
50 g unsalted butter, extra
2 large mangoes, stoned peeled, and coarsely chopped
1/2 cup (110 g) brown sugar, extra
1 tsp vanilla
1tsp sea salt flakes
2 Litre tub vanilla ice cream, softened
270 ml can coconut cream
Method:
1. Crumble:
Preheat oven to 180 deg. C. Line a baking tray with baking paper. Place the sugar, flour, coconut and oats in a bowl and stir to combine.
Add the melted butter to the bowl and use a round-bladed knife to stir until just combined.
Spoon this mixture onto a lined biscuit oven tray.
Bake, stirring occasionally, for 30 mins or until all of the mixture has cooked.
Stir in the chopped dried mango. Cool.
2. Caramel salted mango

Melt the extra butter (50 g) in a non-stick frying pan over medium heat. Add the fresh mango, extra sugar (1/2 cup) and vanilla. Cook, stirring occasionally, for 5 minutes until the mixture thickens and becomes caramelised. Sprinkle with the salt and place on a tray to cool.
3.
Grease a 20 cm (base measurement) square cake pan. Line the base and sides with baking paper, allowing sides to overhang. Separate half the baked oat mixture and spread over the base of the lined cake pan. Place the pan in the freezer for 30 mins to chill.
4.
Ice cream
Next combine the softened ice cream and the coconut cream in a bowl. Add the mango mixture and gently swirl to marble through the ice cream.
5.
Spoon the ice cream mixture over the oat mixture in the pan. Smooth the surface. Sprinkle with the remaining oat mixture, pressing down gently.

6.
Place in the freezer for 4 hours or until firm. When ready to eat, cut into pieces and serve straight away.
There is no need to serve anything else with this however a couple of fresh or frozen mango pieces on the side would be delicious.

The Life of Locky
 |
| Dressed in a Queensland Scouts bandana which belonged to my Mum |

Warm wishes,
Pauline x
Friday, January 1, 2021
Tropical Ginger Ice Cream and Happy New Year

Happy New Year. May 2021 bring to you sanity and light, hope and happiness, and most of all, good health. When the heat is on here in the tropics, and it sure is now, we all yearn for ice cream. Everyone in our family loves ginger, and when Mr. HRK suggested to No. 1 daughter when she was home on holidays, that we make some ginger ice cream, she sprang into action.
Saturday, January 11, 2020
Rustic Spinach, Feta and Haloumi Pie, a Scottish vegetarian recipe
This is the most delicious Spinach and Cheese Pie I have ever eaten, and I know that's a big call as I've eaten quite a few. Perhaps it's the grated haloumi that gives it the edge, and the garlic is a must my friends.
Wednesday, January 23, 2019
Succulent and Saucy Nannygai Fish Wings

We were given a kilo of Nannygai fish wings by friends who went on a a fishing trip to the Great Barrier Reef out from Mackay. They caught a lot of fish. I'm not sure whether these were small mouth Nannygai (Crimson Snapper) or Large mouth Nannygai, however both are beautiful eating fish, and I think it would have been easier from what I have read to catch the small mouth ones.
Thursday, January 11, 2018
Friday Night Special for a family

Tuna and rice are the basis of so many economical and tasty meals and this one has been a family favourite for years. Preparing fast, easy and nutritious meals is the way to survive the summer we are having. Sometimes they take a little bit of forward planning, for example with this dish having the rice cooked in advance, but that is easy particularly if you cook a stir fry the night before accompanied by rice.
Saturday, January 6, 2018
Strawberry Jam Drops, a weekend biscuit treat
Jam Drops may be retro, but they are still a popular biscuit to enjoy for morning or afternoon tea. This is a family recipe from my Mum's collection and probably dates back to the 1950's. When haven't Jam Drops been part of every home cook's repertoire? I have tweaked it slightly, adding vanilla essence, but I love the nutty flavour and aroma that rolling these uncooked biscuits in dessicated coconut brings to the plate when they are baked. It is the browned coconut sprinkles that set this recipe apart. The whole family will love them.
Happy New Year to my readers of this recipe. I hope 2018 is healthy and fulfilling and everything you wish it t be.

Jam Drops are a great way of using up extra jam, which sits patiently bottled in the refrigerator waiting to be noticed. We returned from Cairns this week, to shockingly hot weather, exacerbated by a very hot Northerly wind blowing which we aren't used to at all. However, I needed a sweet treat with a cuppa and rather than make a whole cake, I thought of biscuits which are quick to make and bake, and also to eat, although I can stop at one. These biscuits are nicely crisped on the outside, and chewy in the middle. I used my homemade strawberry jam in these which is quite thick, however any jam will do. To bring them up to children's party status in the past, I have also added hundreds and thousands or some other colorful decoration to the top of the jam filling, nice for a change. I'm sorry I didn't think to do that this time for an interesting photo.
The trickiest part with making these biscuits is rolling them into the right sized shape in the coconut. The mixture spreads during cooking, as you can see in my first cooked tray below, so they do need to be spaced out well. The ideal Jam Drop is round, with the shape not affected by it's closest neighbour. However it depends on how you are feeling as to how particular you want to be, and the shape doesn't affect the deliciousness of them at all. The second tray of 5 biscuits, is more like how they should look in an ideal world. There were 6 on that tray before Mr. HRK sampled them.
This is a recipe and a biscuit to be enjoyed whilst relaxing with your feet up.
Ingredients:
Makes about 25
1//2 cup softened butter
1 cup sugar
2 eggs
2 cups sifted SR flour
1 teaspoon vanilla essence
1 cup desiccated coconut
115g (1/3 cup)strawberry or raspberry jam
Method:
Preheat oven to 180 deg. C.
Beat butter and sugar to a cream.
Add well beaten eggs one at a time. Then add vanilla essence.
Lastly add sifted flour.
Take teaspoonfuls of mixture and roll in coconut.
Place each uncooked Jam Drop on a greased tray about 5cm apart, or on a tray lined with non-stick baking paper.
Use your lightly floured finger to make an indentation in each ball. Add 1/2 teaspoon jam into the centre of each biscuit with a small spoon.

Place tray in oven.
You may need to turn tray around halfway through cooking for even browning.
Bake in preheated oven for 15 minutes, until biscuits are cooked through and light golden.
Store biscuits in single layers between sheets of non-stick baking paper, in an airtight container in a cool place if possible for up to 2 days. They won't last much longer.

6 cooked on a second tray and one missing already whilst still hot.

Below is the riginal handwritten recipe from my Mum's recipe book. This is the full extent of the recipe. What occurred to me when I was looking through her old recipes was how simple and briefly worded they were. Most of them were hand written and handed on through the family or friends. The specific instructions on how to cook the recipe was communicated verbally and still is to a certain extent, and there was also an understanding that who you gave your prized recipe to could cook. Recipes in books and on line now often include so much detail, aimed at the beginner cook to those more experienced. Ingredients are also more complex requiring explanation. What are your thoughts on this? Is there sometimes too much wording and detail in the recipes of today? Or do you find all of that extra detail interesting as I do.

This was the complete recipe in my Mum's recipe book. Just four ingredients and a brief method. How times have changed.
Keep cool or warm depending on which Hemisphere you are living in.
Thanks for dropping by.
Best wishes,
Pauline
Happy New Year to my readers of this recipe. I hope 2018 is healthy and fulfilling and everything you wish it t be.

Jam Drops are a great way of using up extra jam, which sits patiently bottled in the refrigerator waiting to be noticed. We returned from Cairns this week, to shockingly hot weather, exacerbated by a very hot Northerly wind blowing which we aren't used to at all. However, I needed a sweet treat with a cuppa and rather than make a whole cake, I thought of biscuits which are quick to make and bake, and also to eat, although I can stop at one. These biscuits are nicely crisped on the outside, and chewy in the middle. I used my homemade strawberry jam in these which is quite thick, however any jam will do. To bring them up to children's party status in the past, I have also added hundreds and thousands or some other colorful decoration to the top of the jam filling, nice for a change. I'm sorry I didn't think to do that this time for an interesting photo.
The trickiest part with making these biscuits is rolling them into the right sized shape in the coconut. The mixture spreads during cooking, as you can see in my first cooked tray below, so they do need to be spaced out well. The ideal Jam Drop is round, with the shape not affected by it's closest neighbour. However it depends on how you are feeling as to how particular you want to be, and the shape doesn't affect the deliciousness of them at all. The second tray of 5 biscuits, is more like how they should look in an ideal world. There were 6 on that tray before Mr. HRK sampled them.
This is a recipe and a biscuit to be enjoyed whilst relaxing with your feet up.
Ingredients:
Makes about 25
1//2 cup softened butter
1 cup sugar
2 eggs
2 cups sifted SR flour
1 teaspoon vanilla essence
1 cup desiccated coconut
115g (1/3 cup)strawberry or raspberry jam
Method:
Preheat oven to 180 deg. C.
Beat butter and sugar to a cream.
Add well beaten eggs one at a time. Then add vanilla essence.
Lastly add sifted flour.
Take teaspoonfuls of mixture and roll in coconut.
Place each uncooked Jam Drop on a greased tray about 5cm apart, or on a tray lined with non-stick baking paper.
Use your lightly floured finger to make an indentation in each ball. Add 1/2 teaspoon jam into the centre of each biscuit with a small spoon.
Place tray in oven.
You may need to turn tray around halfway through cooking for even browning.
Bake in preheated oven for 15 minutes, until biscuits are cooked through and light golden.
Store biscuits in single layers between sheets of non-stick baking paper, in an airtight container in a cool place if possible for up to 2 days. They won't last much longer.
6 cooked on a second tray and one missing already whilst still hot.
Below is the riginal handwritten recipe from my Mum's recipe book. This is the full extent of the recipe. What occurred to me when I was looking through her old recipes was how simple and briefly worded they were. Most of them were hand written and handed on through the family or friends. The specific instructions on how to cook the recipe was communicated verbally and still is to a certain extent, and there was also an understanding that who you gave your prized recipe to could cook. Recipes in books and on line now often include so much detail, aimed at the beginner cook to those more experienced. Ingredients are also more complex requiring explanation. What are your thoughts on this? Is there sometimes too much wording and detail in the recipes of today? Or do you find all of that extra detail interesting as I do.
This was the complete recipe in my Mum's recipe book. Just four ingredients and a brief method. How times have changed.
Keep cool or warm depending on which Hemisphere you are living in.
Thanks for dropping by.
Best wishes,
Pauline
Sunday, January 29, 2017
Slightly devilish Aussie beef mince burgers perfect for weekend dining

Aussie Beef Mince Burgers
Aussie burgers that you can assemble yourself have become a popular way of eating Down Under and are perfect when entertaining at home, particularly on the Australia Day weekend. However, to be a true Aussie burger it must contain tinned or pickled beetroot which really takes it to new heights. Beef rissoles are easy to make, tasty and can be prepared in advance. This recipe has stood the test of time.Go straight to the recipe here:
The basics remain the same, and chefs of today have taken it to a restaurant level by increasing the amount and combinations of fresh herbs they use, replaced onions for eschallots, and ensuring that the condiments served with the burgers tantalise the taste buds. For example, I have discovered the Slightly Devilish Spicy BBQ Caramelised Onion relish, just like Lee, from the Beerenberg Family Farm in Hahndorf, South Australia. I make most of my own relishes and chutneys, however chopping up all of those onions to make a relish doesn't excite me and this relish is so delicious. Definitely a must to serve with your Aussie burger along with a good Spicy Tomato relish, or even incorporate it into the beef mixture before cooking.

However the beef rissole needs to be tasty, and I would suggest after you combine the mince with the other ingredients with your clean hands, you fry up about a dessertspoon full in a pan, taste it and see then if it needs more seasoning or herbs. Once the mince is formed into rissoles, you are past the point of being able to add to the ingredients, unless you start over.

Lamb can also be used but is more expensive. This is a fun alternative to a more formal style of entertaining and so tasty.
We enjoyed the leftovers the next day with vegetables, or rather I did. My Man of the House had another burger. This recipe is enough to feed 8-10 people, however if you are only feeding 2-4, it is very time and cost efficient to still form the mince into rissoles, and freeze what you don't eat in a plastic container with layers separated by baking parchment. You can them take them out of the freezer and cook them as needed. And they will taste even better the next time.

Rissole ingredients:
Serves 8-10 people
1 kilo of premium grade beef mince
2 onions
4 slices brown bread (a few days old)
4 tbsp. mixed fresh herbs, including parsley (2 tbsp.), sage 2 tbsp.), and 4 teaspoons chopped tarragon if you have it (it is a strong herb with great flavour) or use 1 tbsp. dried mixed herbs instead
4 tsps. Dijon mustard
1 tsp salt
ground black pepper
1 tablespoon tomato sauce
1 tablespoon Worcestershire sauce
4 cloves garlic, squashed and finely chopped (optional)
2 beaten eggs
2 tablespoons grated carrot (optional) - great though if you are trying to encourage your children toe at more vegetables
2 tablespoons oil
1/4-1/2 cup flour
Method:
- Place onion, herbs, and bread in a food processor and process until finely chopped
- Add to the mince with the pepper, salt, sauces, beaten egg, carrot, and mustard
- Mix this all up in a large bowl with your clean hands until well combined
- Form into even sized balls and flatten (or) use an egg ring to shape and flatten them uniformly
- Leave to rest on a plate in the refrigerator, covered in alfoil or cling wrap for at least an hour so that they firm up
- Remove from the refrigerator and dust with plain flour
- Cook for about 8 minutes turning over halfway
- Drain on absorbent paper
- Heat oil in a fypan or on the BBQ and fry rissoles until they are cooked. They can be kept warm and covered in the oven for a couple of hours before eating if this suits your agenda
Burger accompaniments:
Grated carrot
Sliced cucumber
Lettuce
Baby rocket leaves
Sliced tomatoes
Tomato relish (preferably homemade) Click for recipe.
Pickled beetroot slices or canned beetroot slices (Absolutely essential for an Aussie burger)
Cheese slices
Caramelised onion
Mayonnaise
Flat Bread rolls for easy eating
Slice and Butter the bread rolls on the inside and place down on the grill or BBQ and brown.
Caramelised onion and tomato relish can then be spread onto the bread. The burger is then assembled by your guests according to their individual taste.
Be sure to give your guests napkins.
I hope you enjoy this recipe and find it useful.
Thanks for dropping by to read my blog.
Warmest wishes and enjoy the rest of the weekend.
Pauline xx
Thursday, January 26, 2017
It's Australia Day, a public holiday and a time to relax and celebrate being Australian
Australia Day is the anniversary of the arrival and landing of the First Fleet of 11 convict ships from Great Britain, at Sydney Cove in N.S.W on 26th January, 1788. It's surprising how some people still aren't sure of what we are actually celebrating and each year it is a little controversial as to whether we should actually be celebrating this event or not. Despite the politics, I think it should be a time to relax, and just celebrate living in such a wonderful and diverse country.
I went for an early walk around my garden this morning with a cuppa and it reminded me how closely linked my garden is to my kitchen and my cooking and how some of the produce is only days away from being harvested and included into some delicious dish for us to eat. It is also a very multicultural collection of plants, some things that my Mum would never of thought of growing in her garden in the 50's or the 60's. That is exciting to me, how far we have come with what we grow and cook now. These photos are just a selection of what we have growing.
Mr. DIY has now finished our new ramp at the back of the house. He has done such a great job. Perhaps it needs just one more coat of varnish.
I am having an easy day at home today. Pickling some beetroot because it needs to be done, watching some cricket and some tennis, and enjoying just living in the Lucky Country. We will be eating BBQ Lamb as after all Australia rode on the sheep's back.
Happy Australia Day everyone! I hope you can all enjoy a relaxing day.
 |
| Chillis |
 |
| Our new ramp now finished |
 |
| Eggplant |
 |
| Tarragon, ground orchids, and oregano next to the bird bath |
 |
| My miniature rainforest |
Sunday, January 22, 2017
A Tropical Fruit Salad medley with Home Made Yoghurt for Sunday breakfast
 |
| Fresh Tropical Fruit Salad. Serve it with yoghurt for breakfast, or with ice-cream for dessert. |
TROPICAL FRUIT SALAD
The ready availability of Tropical Fruit Salad ingredients on hand is one of the great reasons and benefits for living in the Tropics. The beautiful medley of fruits pictured here comprises watermelon, red paw paw, rockmelon, passionfruit, lychee, apple, Bowen mango (yum), peach, orange and banana. Potential items missing I suppose are kiwi fruit, pineapple and star fruit and probably a few others available further North in Cairns, but I think we did pretty well. (Fancy forgetting the pineapple though :) The flavour that rose up above the others out of the bowl was that of the lychee. Such a sweet, sublime yet subtle Eastern flavour, what a shame they have such a short season. The lychees I bought yesterday from the Farmers market, were only $10 a kilo and grown quite locally so that is a bonus. Unfortunately the Bowen mango season for locals appears to have finished. Thankfully I still have some frozen.Thursday, January 19, 2017
Bake delicious Muffins with in season Nectarines

Nectarine Muffins served Upside Down
Muffins are such a delicious way to enjoy the bountiful supply of seasonal stonefruits which are available right now. Nectarines must be the perfect fruit for upside down cakes as the colours transform beautifully into a decorative topping. Be as creative as you wish with how your nectarine slices are arranged. I just wanted to get these little gems made in a hurry and into the oven, it was a busy day, so I didn't spend that much time on slicing the nectarines for photographic appeal. The next time I bake them I will be more particular with presentation. They still tasted delicious. Thanks to our friend Paul for this recipe which he told me originally came from Germany. Paul often calls in for a weekly cup of tea and a chat, and when he has arrived with these muffins I have been so appreciative. So of course I had to make them.
It's been a busy week in retireeland. We are planning a holiday, the Australian Open tennis matches with the young Aussies playing have been terrific to watch, and the Man of the House has been rebuilding the ramp at the back of our house. Conscious of the hot conditions, I have been the water girl as well, very appropriate I think as we are now in the Age of Aquarius, my star sign, and symbolised by the Water Bearer. I'm a little bit interested in star signs, and where people fit into the scheme of things in that regard. To my way of thinking some of my friends, including the Man of the House, are very typical in a lovely way of their Star Sign's personality traits. And when you can remember your friend's star signs, it can also act as a trigger to remembering their birthdays, which is very important. How about you my friends, do you know your Friend's star signs, and do you sometimes think that they display characteristics typical of their star sign? Anyway, time to carry some more cold water out to my man who is doing a great job on the new ramp, and loves a project.
Ingredients:
3 or 4 nectarines cut into slices
2 eggs
2 cups S.R. flour
3/4 cup of plain yoghurt
3/4 cup of white sugar
1 teaspoon of mixed spice
1/4 cup of sunflower type oil
1 teaspoon vanilla essence
Butter
Brown sugar
Makes 12.
Let's cook:
Prepare the 2x6 hole muffin trays.
Place a dob of butter (1 tsp.) into each muffin hole, and place into the oven to melt when you turn it on to preheat. Remove the trays from the oven and add one teaspoon of brown sugar to each muffin hole on top of the melted butter.
Place the nectarine segments upside down in the muffin holes (pretty side up and flesh on the bottom.) Combine wet ingredients in a medium bowl i.e. beaten eggs, yoghurt, oil, and vanilla essence.
- Sift S.R. flour with mixed spice, and combine with sugar, in a mixing bowl.
- Gently mix wet ingredients into dry ingredients to form a batter.
- Spoon a tablespoon of the batter into each muffin hole over the fruit. Top up each muffin batter if there is some left in the bowl.
Enjoy with some fresh yoghurt and a nice cuppa.
Warmest wishes
Pauline
Tuesday, January 17, 2017
Salmon Fishcakes (Rissoles) for a nutritious and easy midweek meal

Salmon Rissoles or Fish Cakes
Salmon rissoles or Fishcakes are a great idea for a satisfying, nutritious and tasty midweek meal and the kids love them as well as the adults. I remember this being one of my favourite meals when I was growing up at home in Rockhampton, many moons ago. It is a timeless classic, very simple to make and kind to the household budget. If you keep a can of salmon or tuna and a few potatoes and onions in your pantry, this dish can be very easily created at the end of a working day or during the day if you work from home, and then just cooked up 15 minutes before you want to eat. I am often quite varied with ingredients that I add depending on what I have on hand.It is a good idea to make a double quantity, as you can then freeze half of them uncooked for next time, or you will find that leftovers are great heated up the next day for lunch boxes or eaten cold, or be prepared that they will all just disappear in one sitting by your hungry family. Make these an hour before you want to cook them if possible. They will firm up in the fridge and be much easier to cook and turn over.
Serves 4
Ingredients:
1 large can of quality pink or red salmon or tuna in springwater
1 medium onion, finely chopped ( or a small bunch of fresh chopped chives or finely chopped shallots)
3 medium potatoes, boiled and mashed
1/4 cup of breadcrumbs for the mixture
1 large free-range egg
25g fresh or frozen peas (optional)
1 chilli, finely diced (optional)
1/2 capsicum finely chopped
Coriander and Parsley (or just parsley), finely chopped (approx. 2 tablespoons)
salt and pepper to taste
1 cup Panko or homemade breadcrumbs for coating or just plain flour for coating so they don't stick to the pan
Let's cook:
Put your peeled and chopped potatoes onto boil in a half-filled large saucepan and add a pinch of salt. Bring the pot to the boil, and then simmer gently for around 10 minutes or until cooked through. If using peas as well, place them in the boiling water for the last 2 minutes. Whilst the potatoes are boiling, prepare the rest of the ingredients.
Drain all the liquid from the can of salmon in a colander over the sink. Remove the skin and place salmon in a bowl and using a fork flake it into small pieces. Leave the bones in, these are very good for you, and are full of calcium.They're soft and you can easily mash them to incorporate into the flesh.
Chop the other ingredients.
Mash the cooked potato and allow it to cool.

While the potato is cooling add all the other ingredients to the fish, then the cooled mashed potato, mix well and form into patties about the size of the palm of your hand. Coat with dry breadcrumbs, if desired, or just coat them in flour and leave them in the fridge on a plate covered in Cling Wrap for about an hour to firm up. After removing them from the fridge, you may need to give them another light dusting of breadcrumbs or flour before cooking.
Fry in hot oil such as Rice Bran Oil until both sides are golden brown, which takes about 15 minutes.
Serve with Sweet Chilli Sauce or Chilli Jam if you are in a hurry, and a fresh green salad or vegetables. Sometimes I make a Minted Yoghurt dressing to serve alongside them.
Minted yoghurt dressing:
100 g reduced-fat natural Greek style yoghurt
2 tablespoons finely chopped mint leaves
1-2 teaspoons lemon juice, to taste
Mix together and serve alongside the salad and fishcakes.
MY TIP: This recipe is just as delicious made with tinned tuna. Tinned salmon used to be very expensive, pink salmon not as expensive, so tinned tuna was generally used by my Mum and they also tasted just as delicious.
I hope you get a chance to make these easy rissoles, I don't think you will be disappointed.
Enjoy!
Warm wishes,
Pauline.
Monday, January 18, 2016
Use your Christmas Ham Bone to make this light and delicious Kale and Ham Soup

Ham and Kale Soup
This is a terrific recipe I found a few years ago, and until now I have restricted making it to Winter, using the Christmas ham bone which I place in the freezer religiously after each Christmas. My beautiful daughter inspired me though shortly after Christmas this year by making this soup (her favourite) in her slow cooker and freezing it in single edible portions in her freezer, for a perfect and nutritious meal to have after work some days, or even for lunch in the air-conditioning. After all, we had Christmas in Cairns so she inherited the ham bone this year.
So I returned home, thinking about that soup which smelled and looked wonderful. Of course I found myself at the local butchers, bought a ham hock and cooked the soup in my old but ongoing and faithful red crock pot, and froze it in double portions. Then it rained cats and dogs yesterday, so the soup was the perfect meal for a rainy day. However, it is light enough to be eaten on a cool evening in the heat of Summer as well.
It is also the perfect way to eat Kale, a vegetable I am not smitten with to be truthful, but which I know is full of the essential healthy vitamins we need. Sharp Parmesan Cheese finishes it off beautifully.
Ingredients:
Stock:
1 smoked ham hock or bone from your Christmas Ham
1 onion, halved
2 sticks celery
1 carrot, sliced
3 garlic cloves
2 parsley stalks, or 1 teaspoon dried parsley
Soup:
2 tbsp olive oil
1 onion, thinly sliced
2 leeks. white part only, thinly sliced
2 garlic cloves
400g can cannellini beans, drained
1 bunch kale (about 12 leaves), trimmed and chopped
Shaved Parmesan, to serve
Olive oil, to serve
Let’s make the
stock:
Place the ham bone, onion, celery, carrot, garlic and
parsley in a large saucepan or slow cooker bowl.
Slow cooker method:
Place all the ingredients in the slow cooker bowl and fill the pot with
3 litres of water. Cook on low for 8 hours or on medium for 4 hours. Halfway
through the cooking, adjust the ham bone if necessary, so that all of the bone
will be cooked and the meat tender by the end.
Remove the ham hock and discard the skin. Shred meat and set aside.
Strain stock and set aside.
Large saucepan
method:
Place all the ingredients in the saucepan and cover with 3
litres of water. Cook, simmering for 30 minutes (use a spoon to skim the
surface).
Cover and simmer over low heat for 1 hour, or until meat is
tender and falling off the bone. Remove the ham hock and discard the skin.
Shred meat and set aside. Strain stock and set aside.
Let’s make the
soup:
Heat oil in a large saucepan. Add the onions, leeks, and
garlic. Cook, stirring for 4-5 minutes, or until onion is soft. Add stock and
bring to the boil. Add cannellini beans, kale, and ham hock meat. Reduce heat
to a simmer and cook for 5-10 minutes, or until kale is tender.
Season with sea salt and freshly ground pepper. Spoon into
soup bowls, top with shaved Parmesan, and drizzle with olive oil.
Warm wishes,
Pauline
Sunday, January 17, 2016
Potatoes and Deconstructed Pesto

Basil is such a great herb to have growing in the garden and fortunately I have heaps of it. At this time of year, it is challenging to maintain a vegetable garden in the hot tropics, so I think that herbs are the way to go.
Subscribe to:
Posts (Atom)